
Operation Manual
Page 2
... and refrigerators. The correct power tool will reduce personal injuries. Prevent unintentional starting. WORK AREA SAFETY Keep work area clean and well lit. Do not use any adjusting key or wrench before connecting to your hair, clothing and gloves away from heat, oil, sharp edges or moving parts. Always wear eye protection. Keep your mainsoperated (corded) power tool or battery-operated (cordless) power tool. A careless action can cause...
... and refrigerators. The correct power tool will reduce personal injuries. Prevent unintentional starting. WORK AREA SAFETY Keep work area clean and well lit. Do not use any adjusting key or wrench before connecting to your hair, clothing and gloves away from heat, oil, sharp edges or moving parts. Always wear eye protection. Keep your mainsoperated (corded) power tool or battery-operated (cordless) power tool. A careless action can cause...
Operation Manual
Page 3
... by the manufacturer. in the hands of cut -off wheel. A charger that is exposed towards the operator. Charging improperly or at least equal to operate the power tool. SAFETY INSTRUCTIONS FOR CUT-OFF TOOLS The guard provided with the side of untrained users. Maintain power tools and accessories. Such preventive safety measures reduce the risk of starting the power tool accidentally. Store idle power tools out of the reach of...
... by the manufacturer. in the hands of cut -off wheel. A charger that is exposed towards the operator. Charging improperly or at least equal to operate the power tool. SAFETY INSTRUCTIONS FOR CUT-OFF TOOLS The guard provided with the side of untrained users. Maintain power tools and accessories. Such preventive safety measures reduce the risk of starting the power tool accidentally. Store idle power tools out of the reach of...
Operation Manual
Page 4
... pull the power tool out of your control. Do not run out of balance, vibrate excessively and may cause electrical hazards. Do not operate the power tool near the rotating accessory. SAFETY INSTRUCTIONS FOR CUT-OFF TOOLS The outside diameter and the thickness of your accessory must be forced in the direction opposite of the wheel's rotation at maximum no load speed for...
... pull the power tool out of your control. Do not run out of balance, vibrate excessively and may cause electrical hazards. Do not operate the power tool near the rotating accessory. SAFETY INSTRUCTIONS FOR CUT-OFF TOOLS The outside diameter and the thickness of your accessory must be forced in the direction opposite of the wheel's rotation at maximum no load speed for...
Operation Manual
Page 5
... injury. Check damaged parts. Following this power tool. SAFETY INSTRUCTIONS FOR CUT-OFF TOOLS Do not "jam" the wheel or apply excessive pressure. Read operator's manual carefully. Do not attempt to make an excessive depth of electric shock, fire, or serious injury. Use clamps or another practical way to secure and support the workpiece to be properly repaired or replaced by hand or against your hearing...
... injury. Check damaged parts. Following this power tool. SAFETY INSTRUCTIONS FOR CUT-OFF TOOLS Do not "jam" the wheel or apply excessive pressure. Read operator's manual carefully. Do not attempt to make an excessive depth of electric shock, fire, or serious injury. Use clamps or another practical way to secure and support the workpiece to be properly repaired or replaced by hand or against your hearing...
Operation Manual
Page 6
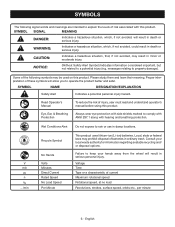
... with ANSI Z87.1 along with this product. Some of current Maximum rotational speed Rotational speed, at no .../min No Hands Volts Minutes Direct Current Rated Speed No Load Speed Per Minute This product uses lithium-ion (Li-ion) batteries. Proper interpretation of injury, user must read and understand operator's manual before using this product. Read Operator's Manual To reduce the risk of these symbols will result in death or...
... with ANSI Z87.1 along with this product. Some of current Maximum rotational speed Rotational speed, at no .../min No Hands Volts Minutes Direct Current Rated Speed No Load Speed Per Minute This product uses lithium-ion (Li-ion) batteries. Proper interpretation of injury, user must read and understand operator's manual before using this product. Read Operator's Manual To reduce the risk of these symbols will result in death or...
Operation Manual
Page 7
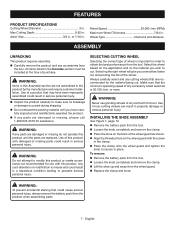
... until you have been improperly assembled could cause serious personal injury, always remove the battery pack from the product when assembling parts. 7 - FEATURES PRODUCT SPECIFICATIONS Cutting Wheel Diameter 3 in . Arbor Size 3/8 in serious personal injury. Wheel Type Diamond and Abrasive ASSEMBLY UNPACKING This product requires assembly. Use of any kind with the screw in the clamp. Place the clamp onto the wheel guard and tighten the knob to secure in order...
... until you have been improperly assembled could cause serious personal injury, always remove the battery pack from the product when assembling parts. 7 - FEATURES PRODUCT SPECIFICATIONS Cutting Wheel Diameter 3 in . Arbor Size 3/8 in serious personal injury. Wheel Type Diamond and Abrasive ASSEMBLY UNPACKING This product requires assembly. Use of any kind with the screw in the clamp. Place the clamp onto the wheel guard and tighten the knob to secure in order...
Operation Manual
Page 8
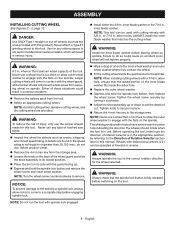
... assembly up . Depress and hold the spindle lock button, then replace the wheel screw. Failure to set the depth of oil onto the inner wheel washer and outer wheel washer where they contact the wheel. Fit the cutting wheel inside the arbor hole. Replace the outer wheel washer. Depress and hold the spindle lock button and remove the wheel screw and outer wheel washer. Select another wheel. Remove the 4 mm hex key...
... assembly up . Depress and hold the spindle lock button, then replace the wheel screw. Failure to set the depth of oil onto the inner wheel washer and outer wheel washer where they contact the wheel. Fit the cutting wheel inside the arbor hole. Replace the outer wheel washer. Depress and hold the spindle lock button and remove the wheel screw and outer wheel washer. Select another wheel. Remove the 4 mm hex key...
Operation Manual
Page 9
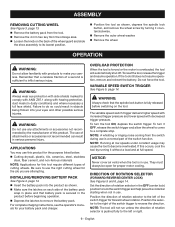
... or accessories not recommended can result in objects being thrown into the product as shown, depress the spindle lock button, and remove the wheel screw by turning it counterclockwise. Remove the outer wheel washer. Remove the wheel. VARIABLE SPEED SWITCH TRIGGER See Figure 5, page 14. If this tool require different types of rotation selector in the OFF (center lock) position to lock the switch trigger and help prevent accidental starting when...
... or accessories not recommended can result in objects being thrown into the product as shown, depress the spindle lock button, and remove the wheel screw by turning it counterclockwise. Remove the outer wheel washer. Remove the wheel. VARIABLE SPEED SWITCH TRIGGER See Figure 5, page 14. If this tool require different types of rotation selector in the OFF (center lock) position to lock the switch trigger and help prevent accidental starting when...
Operation Manual
Page 10
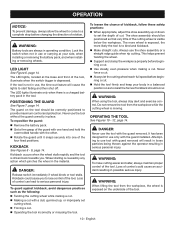
... the tool. Always use the tool with guard removed will cause the lights to start fading and then shut off. WARNING: When lifting the tool from the workpiece while the cutting wheel is visible below the workpiece. KICKBACK See Figures 8 - 9, page 14. WARNING: When using the tool, always stay alert and exercise control. DANGER: Never use the shoe assembly or a straight edge guide when rip cutting. POSITIONING THE GUARD...
... the tool. Always use the tool with guard removed will cause the lights to start fading and then shut off. WARNING: When lifting the tool from the workpiece while the cutting wheel is visible below the workpiece. KICKBACK See Figures 8 - 9, page 14. WARNING: When using the tool, always stay alert and exercise control. DANGER: Never use the shoe assembly or a straight edge guide when rip cutting. POSITIONING THE GUARD...
Operation Manual
Page 11
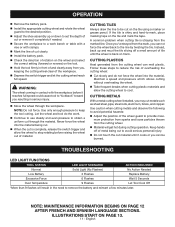
... cutting wheel installed, you can not force the wheel back to the line by twisting the tile. TROUBLESHOOTING LED LIGHT FUNCTIONS TOOL STATUS LED LIGHT SCENARIO ACTION REQUIRED Normal Solid Light (No Flashes) No Action Needed Low Battery 3 Flashes Replace Battery Excessive Force 6 Flashes Wait 5 Seconds Over Temperature 9 Flashes Let Tool Cool Off *More than 9 flashes will get hot during cutting operation. Use only enough pressure to remove the battery...
... cutting wheel installed, you can not force the wheel back to the line by twisting the tile. TROUBLESHOOTING LED LIGHT FUNCTIONS TOOL STATUS LED LIGHT SCENARIO ACTION REQUIRED Normal Solid Light (No Flashes) No Action Needed Low Battery 3 Flashes Replace Battery Excessive Force 6 Flashes Wait 5 Seconds Over Temperature 9 Flashes Let Tool Cool Off *More than 9 flashes will get hot during cutting operation. Use only enough pressure to remove the battery...
Parts Diagram
Page 1
Always mention this information in all communications regarding this product and when ordering parts. 8-17-20 (Rev:01) P.O. REPAIR SHEET BRAND RYOBI MODEL NO. PSBCS02 DESCRIPTION 18 Volt Cut-Off Tool ONE WORLD TECHNOLOGIES, INC. Box 1288, Anderson, SC 29622 1-800-525-2579 www.ryobitools.com The model number and manufacturing location will be found on a label attached to the product.
Always mention this information in all communications regarding this product and when ordering parts. 8-17-20 (Rev:01) P.O. REPAIR SHEET BRAND RYOBI MODEL NO. PSBCS02 DESCRIPTION 18 Volt Cut-Off Tool ONE WORLD TECHNOLOGIES, INC. Box 1288, Anderson, SC 29622 1-800-525-2579 www.ryobitools.com The model number and manufacturing location will be found on a label attached to the product.
Parts Diagram
Page 3
... Tile Cutting Blade 1 1 34 682477003 Carbide Abrasive Blade 1 1 Not Shown: 1 998000211 Operator's Manual (961153418) 3 PART NO. PSBCS02 PARTS LIST KEY NO. KEY NO. arbor size) 4 662936001 Screw (M2.6 x 10 mm, T8 Torx Pan Hd.) 5 658865002 Detent Plate 6 643981003 Safety Guard 7 658868002 Wire Guide Spring 8 614401004 Wire Guide Clamping Cover 9 564429001 O-Ring 10 301124017 Knob 11 659050001 Flat Washer 12 565526001 Gasket 13 206691005 Motor Armature Assembly 14 561653001 Pin 15 206689007 Motor Field and Circuit Board Assembly 16 565689001 RYOBI...
... Tile Cutting Blade 1 1 34 682477003 Carbide Abrasive Blade 1 1 Not Shown: 1 998000211 Operator's Manual (961153418) 3 PART NO. PSBCS02 PARTS LIST KEY NO. KEY NO. arbor size) 4 662936001 Screw (M2.6 x 10 mm, T8 Torx Pan Hd.) 5 658865002 Detent Plate 6 643981003 Safety Guard 7 658868002 Wire Guide Spring 8 614401004 Wire Guide Clamping Cover 9 564429001 O-Ring 10 301124017 Knob 11 659050001 Flat Washer 12 565526001 Gasket 13 206691005 Motor Armature Assembly 14 561653001 Pin 15 206689007 Motor Field and Circuit Board Assembly 16 565689001 RYOBI...

Parts Diagram
Page 4
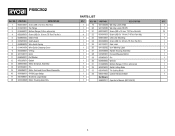
PSBCS02 BATTERY CONTACT PLATE RED RED WHITE REAR LED LENS RIBBON CONNECTOR SWITCH BLACK WIRING DIAGRAM 4 FRONT LED LENS MOTOR FIELD AND CIRCUIT BOARD ASSEMBLY
PSBCS02 BATTERY CONTACT PLATE RED RED WHITE REAR LED LENS RIBBON CONNECTOR SWITCH BLACK WIRING DIAGRAM 4 FRONT LED LENS MOTOR FIELD AND CIRCUIT BOARD ASSEMBLY


