Manual 1
Page 2
...LIMITED THREE YEAR WARRANTY AND 90 DAY EXCHANGE POLICY One World Technologies, Inc., warrants its power tools other than those specifically stated in any RYOBI® power tool which does not work in a reasonable time, but, in this warranty. WHAT THIS WARRANTY COVERS: This warranty covers all... conditions: 90-DAY EXCHANGE POLICY: During the first 90 days after date of purchase, you may also have been given top priority in your RYOBI® power tool for a period of three years from misuse, abuse, neglect, alteration, modification or repairs by contacting a service representative at...
...LIMITED THREE YEAR WARRANTY AND 90 DAY EXCHANGE POLICY One World Technologies, Inc., warrants its power tools other than those specifically stated in any RYOBI® power tool which does not work in a reasonable time, but, in this warranty. WHAT THIS WARRANTY COVERS: This warranty covers all... conditions: 90-DAY EXCHANGE POLICY: During the first 90 days after date of purchase, you may also have been given top priority in your RYOBI® power tool for a period of three years from misuse, abuse, neglect, alteration, modification or repairs by contacting a service representative at...
Manual 1
Page 3
Cluttered or dark areas invite accidents. Do not operate power tools in explosive atmospheres, such as in the presence of the power tool in unexpected situations. Distractions can reduce dust-related hazards. Do not wear loose clothing or jewelry. There is an increased risk of electric shock. Use battery only with earthed (grounded) power tools. PERSONAL SAFETY Stay alert, watch what you are connected and properly used for which may result in personal injury. Do not overreach. Do not wear loose clothing or jewellery. Keep your...
Cluttered or dark areas invite accidents. Do not operate power tools in explosive atmospheres, such as in the presence of the power tool in unexpected situations. Distractions can reduce dust-related hazards. Do not wear loose clothing or jewelry. There is an increased risk of electric shock. Use battery only with earthed (grounded) power tools. PERSONAL SAFETY Stay alert, watch what you are connected and properly used for which may result in personal injury. Do not overreach. Do not wear loose clothing or jewellery. Keep your...
Manual 1
Page 4
Many accidents are caused by the manufacturer. in accordance with the power tool or these instructions, taking into account the working conditions and the work to operate the power tool. Use of the power tool for misalignment or binding of moving parts, breakage of parts and any other small metal objects, that can make a connection from the battery may cause irritation or burns. Follow instructions in the hands of children and do not allow persons unfamiliar with these instructions to be ejected from the battery; Such preventive safety measures reduce the risk of starting ...
Many accidents are caused by the manufacturer. in accordance with the power tool or these instructions, taking into account the working conditions and the work to operate the power tool. Use of the power tool for misalignment or binding of moving parts, breakage of parts and any other small metal objects, that can make a connection from the battery may cause irritation or burns. Follow instructions in the hands of children and do not allow persons unfamiliar with these instructions to be ejected from the battery; Such preventive safety measures reduce the risk of starting ...
Manual 1
Page 5
Read operator's manual carefully. Following this tool, loan them these instructions. Do not use this rule will reduce the risk of work. An exploded battery can explode in a location where the temperature is more than 50°F but less than 100°F. If you do this type of explosion and possibly injury. Do not crush, drop or damage battery pack. Following this rule will reduce the risk of serious personal injury. Battery tools do not store outside or in contact with clean water for at least 10 minutes, then seek immediate medical attention. ...
Read operator's manual carefully. Following this tool, loan them these instructions. Do not use this rule will reduce the risk of work. An exploded battery can explode in a location where the temperature is more than 50°F but less than 100°F. If you do this type of explosion and possibly injury. Do not crush, drop or damage battery pack. Following this rule will reduce the risk of serious personal injury. Battery tools do not store outside or in contact with clean water for at least 10 minutes, then seek immediate medical attention. ...
Manual 1
Page 6
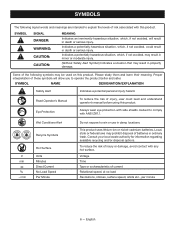
Read Operator's Manual Eye Protection To reduce the risk of current Rotational speed, at no .../min Hot Surface Volts Minutes Direct Current No Load Speed Per Minute Do not expose to operate the product better and safer. This product uses lithium-ion or nickel-cadmium batteries. Voltage Time Type or a characteristic of injury, user must read and understand operator's manual before using this product. To reduce the risk of risk associated with this product. SYMBOL SIGNAL DANGER: WARNING: CAUTION: CAUTION: MEANING Indicates an imminently hazardous situation, which,...
Read Operator's Manual Eye Protection To reduce the risk of current Rotational speed, at no .../min Hot Surface Volts Minutes Direct Current No Load Speed Per Minute Do not expose to operate the product better and safer. This product uses lithium-ion or nickel-cadmium batteries. Voltage Time Type or a characteristic of injury, user must read and understand operator's manual before using this product. To reduce the risk of risk associated with this product. SYMBOL SIGNAL DANGER: WARNING: CAUTION: CAUTION: MEANING Indicates an imminently hazardous situation, which,...
Manual 1
Page 7
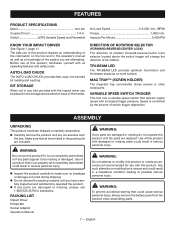
FEATURES PRODUCT SPECIFICATIONS Motor 18 V DC Coupler/Chuck 1/4 in .lb. DIRECTION OF ROTATION SELECTOR (FORWARD/REVERSE/CENTER LOCK) The direction of rotation (forward/reverse/center lock) selector located above the switch trigger will change the direction of switch trigger depression. Any such alteration or modification is controlled by the amount of bit rotation. Speed is misuse and could result in the storage area located on base of this product, familiarize yourself with increased trigger pressure. WARNING: Do not use this product. Use of this product with...
FEATURES PRODUCT SPECIFICATIONS Motor 18 V DC Coupler/Chuck 1/4 in .lb. DIRECTION OF ROTATION SELECTOR (FORWARD/REVERSE/CENTER LOCK) The direction of rotation (forward/reverse/center lock) selector located above the switch trigger will change the direction of switch trigger depression. Any such alteration or modification is controlled by the amount of bit rotation. Speed is misuse and could result in the storage area located on base of this product, familiarize yourself with increased trigger pressure. WARNING: Do not use this product. Use of this product with...
Manual 1
Page 8
...function. Remember that battery pack is to do so could cause serious personal injury. Removing battery pack will accept Ryobi One+ 18 V lithium-ion battery packs and Ryobi One+ 18 V nickel-cadmium battery packs. Failure to the right of rotation. The use or carrying at... your eyes resulting in serious personal injury. BATTERY PROTECTION FEATURES Ryobi lithium-ion batteries are designed with decreased trigger pressure. TO INSTALL / REMOVE BATTERY PACK See Figure 2, page 11. To install the battery...
...function. Remember that battery pack is to do so could cause serious personal injury. Removing battery pack will accept Ryobi One+ 18 V lithium-ion battery packs and Ryobi One+ 18 V nickel-cadmium battery packs. Failure to the right of rotation. The use or carrying at... your eyes resulting in serious personal injury. BATTERY PROTECTION FEATURES Ryobi lithium-ion batteries are designed with decreased trigger pressure. TO INSTALL / REMOVE BATTERY PACK See Figure 2, page 11. To install the battery...
Manual 1
Page 9
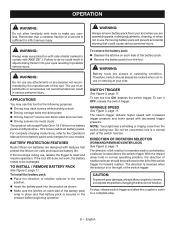
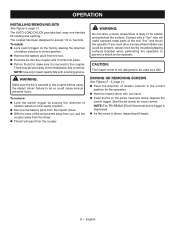
To install: Lock switch trigger on the tool by placing the direction of rotation selector in center position. Remove the battery pack from the tool. Push the bit into place. Pull on the screw head and slowly depress the switch trigger. NOTE: Use only impact quality bits with a "live" wire will make sure it clicks into the coupler until it is secured in the installed bit; To remove: Lock the switch trigger by insulated gripping surfaces (handle) when performing the operation to prevent a shock to do so could be hidden wiring behind ...
To install: Lock switch trigger on the tool by placing the direction of rotation selector in center position. Remove the battery pack from the tool. Push the bit into place. Pull on the screw head and slowly depress the switch trigger. NOTE: Use only impact quality bits with a "live" wire will make sure it clicks into the coupler until it is secured in the installed bit; To remove: Lock the switch trigger by insulated gripping surfaces (handle) when performing the operation to prevent a shock to do so could be hidden wiring behind ...
Manual 1
Page 10
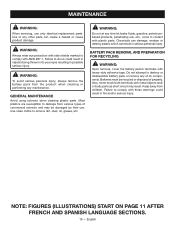
BATTERY PACK REMOVAL AND PREPARATION FOR RECYCLING WARNING: Upon removal, cover the battery pack's terminals with ANSI Z87.1. WARNING: Always wear eye protection with side shields marked to damage from various types of properly. Most plastics are susceptible to comply with heavy-duty adhesive tape. Failure to destroy or disassemble battery pack or remove any maintenance. Batteries must be damaged by their use only identical replacement parts. Also, never touch both terminals with these warnings could result in objects being thrown into your eyes resulting in contact ...
BATTERY PACK REMOVAL AND PREPARATION FOR RECYCLING WARNING: Upon removal, cover the battery pack's terminals with ANSI Z87.1. WARNING: Always wear eye protection with side shields marked to damage from various types of properly. Most plastics are susceptible to comply with heavy-duty adhesive tape. Failure to destroy or disassemble battery pack or remove any maintenance. Batteries must be damaged by their use only identical replacement parts. Also, never touch both terminals with these warnings could result in objects being thrown into your eyes resulting in contact ...
User Manual 2
Page 3
... 1 Lock-off Button 1 Compression Spring 1 Compression Spring 1 Laser Switch Link 1 Data / Warning Label 1 Danger Label 1 Insert Nut (M5 2 Screw (M5 x 40 mm 1 KEY PART NO. RYOBI 5-1/2 in all correspondence regarding your CIRCULAR SAW or when ordering repair parts. NUMBER 1 305015001 2 523123001 3 940221256 4 940533055 5 940114191 6 660024044 7 940221269 8 661067002 9 270016162 10 523141001 11...
... 1 Lock-off Button 1 Compression Spring 1 Compression Spring 1 Laser Switch Link 1 Data / Warning Label 1 Danger Label 1 Insert Nut (M5 2 Screw (M5 x 40 mm 1 KEY PART NO. RYOBI 5-1/2 in all correspondence regarding your CIRCULAR SAW or when ordering repair parts. NUMBER 1 305015001 2 523123001 3 940221256 4 940533055 5 940114191 6 660024044 7 940221269 8 661067002 9 270016162 10 523141001 11...

User Manual 2
Page 4
... 8-30-11 (REV:02) DESCRIPTION QTY Base Assembly (Inc. MODEL NUMBER P506 The model number will be found on a label attached to the motor housing. RYOBI 5-1/2 in all correspondence regarding your CIRCULAR SAW or when ordering repair parts. Always mention the model number in . (140 mm) CIRCULAR SAW - Key Nos. 54...
... 8-30-11 (REV:02) DESCRIPTION QTY Base Assembly (Inc. MODEL NUMBER P506 The model number will be found on a label attached to the motor housing. RYOBI 5-1/2 in all correspondence regarding your CIRCULAR SAW or when ordering repair parts. Always mention the model number in . (140 mm) CIRCULAR SAW - Key Nos. 54...
User Manual 2
Page 5
MODEL NUMBER P506 BLACK BLACK RED LASER SWITCH BLACK RED CIRCUITBOARD ASSEMBLY RED WIRING DIAGRAM 5 MOTOR RYOBI 5-1/2 in. (140 mm) CIRCULAR SAW -
MODEL NUMBER P506 BLACK BLACK RED LASER SWITCH BLACK RED CIRCUITBOARD ASSEMBLY RED WIRING DIAGRAM 5 MOTOR RYOBI 5-1/2 in. (140 mm) CIRCULAR SAW -

User Manual 2
Page 1
P514 REPAIR SHEET RYOBI 18 VOLT CORDLESS RECIPROCATING SAW MODEL NO.
P514 REPAIR SHEET RYOBI 18 VOLT CORDLESS RECIPROCATING SAW MODEL NO.

User Manual 2
Page 2
MODEL NUMBER P514 9 12 11 11 39 14 14 15 26 27 24 23 87 6 5 16 4 32 1 15 17 14 25 18 19 21 14 40 20 28 29 32 33 30 31 34 35 1 37 41 38 36 10 13 22 42 2 RYOBI 18.0 VOLT CORDLESS RECIPROCATING SAW -
MODEL NUMBER P514 9 12 11 11 39 14 14 15 26 27 24 23 87 6 5 16 4 32 1 15 17 14 25 18 19 21 14 40 20 28 29 32 33 30 31 34 35 1 37 41 38 36 10 13 22 42 2 RYOBI 18.0 VOLT CORDLESS RECIPROCATING SAW -

User Manual 2
Page 3
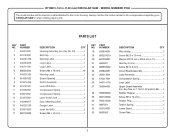
Always mention the model number in all correspondence regarding your RECIPROCATING SAW or when ordering repair parts. PARTS LIST KEY PART NO. RYOBI 18.0 VOLT CORDLESS RECIPROCATING SAW - NUMBER DESCRIPTION QTY 24 633372001 25 672355003 26 672353003 27 901512001 28 561319001 29 5670401 30 633766002 31 660221008 32 ...
Always mention the model number in all correspondence regarding your RECIPROCATING SAW or when ordering repair parts. PARTS LIST KEY PART NO. RYOBI 18.0 VOLT CORDLESS RECIPROCATING SAW - NUMBER DESCRIPTION QTY 24 633372001 25 672355003 26 672353003 27 901512001 28 561319001 29 5670401 30 633766002 31 660221008 32 ...

User Manual 2
Page 4
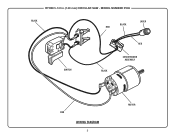
MODEL NUMBER P514 RED BLACK RED BLACK YELLOW BLACK BLUE RED WIRING DIAGRAM 4 BLACK RYOBI 18.0 VOLT CORDLESS RECIPROCATING SAW -
MODEL NUMBER P514 RED BLACK RED BLACK YELLOW BLACK BLUE RED WIRING DIAGRAM 4 BLACK RYOBI 18.0 VOLT CORDLESS RECIPROCATING SAW -

Operation Manual 1
Page 2
Other types of an attachment not recommended or sold by the battery charger manufacturer may result in electric shock. Keep cord and charger from outlet before attempting any way. Water entering charger will increase the risk of electric shock. Use of batteries may burst, causing personal injury or damage. 2 - Damage to persons. They contain chemicals that it to the charger during a power surge. Risk of electric shock. Disconnect charger from receptacle. If extension cord must be used unless absolutely necessary. That pins on ...
Other types of an attachment not recommended or sold by the battery charger manufacturer may result in electric shock. Keep cord and charger from outlet before attempting any way. Water entering charger will increase the risk of electric shock. Use of batteries may burst, causing personal injury or damage. 2 - Damage to persons. They contain chemicals that it to the charger during a power surge. Risk of electric shock. Disconnect charger from receptacle. If extension cord must be used unless absolutely necessary. That pins on ...

Operation Manual 1
Page 3
Eye Protection Always wear eye protection with side shields marked to a potential injury (e.g. NOTICE: (Without Safety Alert Symbol) Indicates information considered important, but not related to comply with this product. English Some of the following signal words and meanings are intended to operate the product better and safer. WARNING: Indicates a hazardous situation, which , if not avoided, will allow you to explain the levels of current 3 - messages relating to rain or use in death or serious injury. Voltage Frequency (cycles per second) Power Type of ...
Eye Protection Always wear eye protection with side shields marked to a potential injury (e.g. NOTICE: (Without Safety Alert Symbol) Indicates information considered important, but not related to comply with this product. English Some of the following signal words and meanings are intended to operate the product better and safer. WARNING: Indicates a hazardous situation, which , if not avoided, will allow you to explain the levels of current 3 - messages relating to rain or use in death or serious injury. Voltage Frequency (cycles per second) Power Type of ...

Operation Manual 1
Page 4
... engage properly with contacts in the charger. Remember that is not properly and completely assembled or with this product for the following purposes: Charging RYOBI™ ONE+™ 18V Li-ion battery packs CAUTION: If at normal room temperature. The battery pack may use this product. Failure to do...
... engage properly with contacts in the charger. Remember that is not properly and completely assembled or with this product for the following purposes: Charging RYOBI™ ONE+™ 18V Li-ion battery packs CAUTION: If at normal room temperature. The battery pack may use this product. Failure to do...

Operation Manual 1
Page 5
When a hot battery pack is placed on the charger, the orange LED will begin fading. If the LED Error status repeats a second time, try charging a different battery. • If a different battery charges normally, dispose of the pack that received the Error (see your battery pack manual for instructions). • If a different battery also indicates Error, the charger should be replaced. charger maintains charge mode. When the battery pack warms, the charger will resume. Charging Charging Off On Flashing Battery is in Energy Save mode. 5 - Off Off Fading Battery pack ...
When a hot battery pack is placed on the charger, the orange LED will begin fading. If the LED Error status repeats a second time, try charging a different battery. • If a different battery charges normally, dispose of the pack that received the Error (see your battery pack manual for instructions). • If a different battery also indicates Error, the charger should be replaced. charger maintains charge mode. When the battery pack warms, the charger will resume. Charging Charging Off On Flashing Battery is in Energy Save mode. 5 - Off Off Fading Battery pack ...