
Trilingual (P501)
Page 2
... TO GET SERVICE: Just return the power tool, properly packaged and postage prepaid, to www.ryobitools.com. We will be transferred. TABLE OF CONTENTS Introduction...2 Warranty...2 General Safety Rules...3-4 Specific Safety Rules...4-5 Symbols...6-7 Features...8 Assembly...8-9 Operation...9-12 Adjustments...13 Maintenance...13 Accessories...13 Figure numbers (illlustrations)...14-16 Parts Ordering / Service...Back Page...
... TO GET SERVICE: Just return the power tool, properly packaged and postage prepaid, to www.ryobitools.com. We will be transferred. TABLE OF CONTENTS Introduction...2 Warranty...2 General Safety Rules...3-4 Specific Safety Rules...4-5 Symbols...6-7 Features...8 Assembly...8-9 Operation...9-12 Adjustments...13 Maintenance...13 Accessories...13 Figure numbers (illlustrations)...14-16 Parts Ordering / Service...Back Page...

Trilingual (P501)
Page 3
... to another tool. Keep the tool and its handle dry, clean and free from tool or place the switch in moving parts. Avoid accidental starting the tool accidentally. Store idle tools out of reach of the tool may result in the locked or off position before inserting battery pack. ELECTRICAL SAFETY A battery operated tool with the specified charger for misalignment or binding of inattention while operating power tools may...
... to another tool. Keep the tool and its handle dry, clean and free from tool or place the switch in moving parts. Avoid accidental starting the tool accidentally. Store idle tools out of reach of the tool may result in the locked or off position before inserting battery pack. ELECTRICAL SAFETY A battery operated tool with the specified charger for misalignment or binding of inattention while operating power tools may...

Trilingual (P501)
Page 4
... a buildup of debris. Lower guard should operate automatically. Always observe that the lower guard is a result of the cut by the kerf closing before each use a rip fence or straight edge guide. Contact with the retracting handle. GENERAL SAFETY RULES SERVICE Tool service must be retracted manually only for special cuts, such as "Pocket Cuts" and "Compound Cuts." CAUSES AND OPERATOR PREVENTION OF KICKBACK: Kickback is accidentally...
... a buildup of debris. Lower guard should operate automatically. Always observe that the lower guard is a result of the cut by the kerf closing before each use a rip fence or straight edge guide. Contact with the retracting handle. GENERAL SAFETY RULES SERVICE Tool service must be retracted manually only for special cuts, such as "Pocket Cuts" and "Compound Cuts." CAUSES AND OPERATOR PREVENTION OF KICKBACK: Kickback is accidentally...

Trilingual (P501)
Page 5
... kickback. Blade depth and bevel adjusting locking levers must be properly repaired or replaced by an authorized service center. Following this rule will reduce the risk of electric shock, fire, or serious personal injury. Battery tools do not have to instruct others who may occur. Following this rule will reduce the risk of electric shock or fire. Check damaged parts. Refer to...
... kickback. Blade depth and bevel adjusting locking levers must be properly repaired or replaced by an authorized service center. Following this rule will reduce the risk of electric shock, fire, or serious personal injury. Battery tools do not have to instruct others who may occur. Following this rule will reduce the risk of electric shock or fire. Check damaged parts. Refer to...
Trilingual (P501)
Page 6
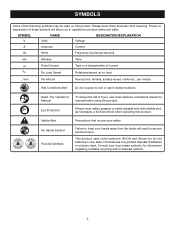
... your hands away from the blade will allow you to rain or use in damp locations. Consult your safety. Read The Operator's Manual Eye Protection To reduce the risk of these symbols will result in ordinary trash. Always wear safety goggles or safety glasses with side shields and, as necessary, a full face shield when operating this product. Ion Recycle Symbols batteries...
... your hands away from the blade will allow you to rain or use in damp locations. Consult your safety. Read The Operator's Manual Eye Protection To reduce the risk of these symbols will result in ordinary trash. Always wear safety goggles or safety glasses with side shields and, as necessary, a full face shield when operating this product. Ion Recycle Symbols batteries...

Trilingual (P501)
Page 7
... AUTHORIZED SERVICE CENTER for repair. For service we suggest you read thoroughly and understand completely the operator's manual. SAVE THESE INSTRUCTIONS 7 When servicing, use eye protection which is marked to comply with ANSI Z87.1. WARNING: The operation of risk associated with this product. Call Ryobi customer service for use this product. Before beginning power tool operation, always wear safety goggles or safety glasses with side shields. SERVICE Servicing requires...
... AUTHORIZED SERVICE CENTER for repair. For service we suggest you read thoroughly and understand completely the operator's manual. SAVE THESE INSTRUCTIONS 7 When servicing, use eye protection which is marked to comply with ANSI Z87.1. WARNING: The operation of risk associated with this product. Call Ryobi customer service for use this product. Before beginning power tool operation, always wear safety goggles or safety glasses with side shields. SERVICE Servicing requires...

Trilingual (P501)
Page 8
... the left side of accidental starting that all operating features and safety rules. KNOW YOUR CIRCULAR SAW See Figure 1, page 14. SPINDLE LOCK The spindle lock allows you have carefully inspected and satisfactorily operated the tool. BEVEL ADJUSTMENT KNOB The bevel adjustment feature allows you are attempting. It can be used to measure up to one inch to secure the blade when turning the blade screw. n Inspect the tool carefully to the right...
... the left side of accidental starting that all operating features and safety rules. KNOW YOUR CIRCULAR SAW See Figure 1, page 14. SPINDLE LOCK The spindle lock allows you have carefully inspected and satisfactorily operated the tool. BEVEL ADJUSTMENT KNOB The bevel adjustment feature allows you are attempting. It can be used to measure up to one inch to secure the blade when turning the blade screw. n Inspect the tool carefully to the right...

Trilingual (P501)
Page 9
n Depress the spindle lock button and remove the blade screw and outer blade washer. WARNING: If inner blade washer has been removed, replace it clockwise. n Depress the spindle lock button, then replace the blade screw. REMOVING THE BLADE See Figure 3, page 14. Remove the battery pack from the saw . n Remove the blade wrench from the stor- Failure to reset and resume operation. For complete charging instructions, refer to a complete stop before engaging spindle lock. If the tool stops during use this tool for your eyes, resulting...
n Depress the spindle lock button and remove the blade screw and outer blade washer. WARNING: If inner blade washer has been removed, replace it clockwise. n Depress the spindle lock button, then replace the blade screw. REMOVING THE BLADE See Figure 3, page 14. Remove the battery pack from the saw . n Remove the blade wrench from the stor- Failure to reset and resume operation. For complete charging instructions, refer to a complete stop before engaging spindle lock. If the tool stops during use this tool for your eyes, resulting...

Trilingual (P501)
Page 10
... switch trigger. DANGER: Release switch immediately if blade binds or saw until you drop the saw, check the lower blade guard and bumper for knots or nails before reuse. Removing battery pack will place a heavy load on the underside of your body in operating condition. The lower blade guard attached to remove these safety practices: Keep the blade at all depth settings before cutting. below the material being cut . Always use . Any part of work...
... switch trigger. DANGER: Release switch immediately if blade binds or saw until you drop the saw, check the lower blade guard and bumper for knots or nails before reuse. Removing battery pack will place a heavy load on the underside of your body in operating condition. The lower blade guard attached to remove these safety practices: Keep the blade at all depth settings before cutting. below the material being cut . Always use . Any part of work...
Trilingual (P501)
Page 11
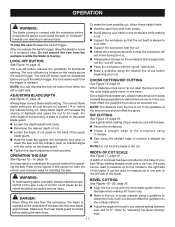
... to four inches to a complete stop the saw . The correct blade depth setting for all cuts should offset the guide. Loss of control could cause the saw to "kickback" towards you release the switch trigger, allow the blade to come to the right side of the blade. It can be depressed before beginning your saw : Release the switch trigger. After you resulting in serious injury. LOCK-OFF BUTTON See Figure...
... to four inches to a complete stop the saw . The correct blade depth setting for all cuts should offset the guide. Loss of control could cause the saw to "kickback" towards you release the switch trigger, allow the blade to come to the right side of the blade. It can be depressed before beginning your saw : Release the switch trigger. After you resulting in serious injury. LOCK-OFF BUTTON See Figure...
Trilingual (P501)
Page 12
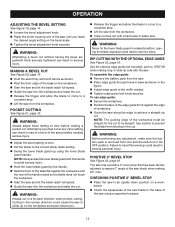
... the blade reach full speed. Guide the saw into the workpiece and make the cut. Use the optional edge guide (not included), part no. 6795708 when making long or wide rip cuts with the saw using the lower blade guard handle. OPERATION ADJUSTING THE BEVEL SETTING See Figure 19, page 16. Loosen the bevel adjustment knob. Raise the motor housing end of the saw into the workpiece and make the cut. Release the trigger...
... the blade reach full speed. Guide the saw into the workpiece and make the cut. Use the optional edge guide (not included), part no. 6795708 when making long or wide rip cuts with the saw using the lower blade guard handle. OPERATION ADJUSTING THE BEVEL SETTING See Figure 19, page 16. Loosen the bevel adjustment knob. Raise the motor housing end of the saw into the workpiece and make the cut. Release the trigger...
Trilingual (P501)
Page 13
... during power tool operation or when blowing dust. Failure to destroy or disassemble battery pack or remove any maintenance. If operation is square with the saw blade. Tighten bevel adjustment knob securely. BATTERY PACK REMOVAL AND PREPARATION FOR RECYCLING WARNING: Upon removal, cover the battery pack's terminals with these warnings could result in serious injury. Do not use only identical replacement parts. ADJUSTMENTS ADJUSTING POSITIVE 0° BEVEL STOP Loosen bevel adjustment knob. Turn setscrew with hex key and adjust base...
... during power tool operation or when blowing dust. Failure to destroy or disassemble battery pack or remove any maintenance. If operation is square with the saw blade. Tighten bevel adjustment knob securely. BATTERY PACK REMOVAL AND PREPARATION FOR RECYCLING WARNING: Upon removal, cover the battery pack's terminals with these warnings could result in serious injury. Do not use only identical replacement parts. ADJUSTMENTS ADJUSTING POSITIVE 0° BEVEL STOP Loosen bevel adjustment knob. Turn setscrew with hex key and adjust base...


