
Operation Manual
Page 3
...176;F), do not try to pull or lift the equipment. 3 - WARNING: To reduce the risk of the body. Always use a paint or a solvent containing halogenated hydrocarbons. Keep spray area well ventilated. Do not spray pump assembly. Do not smoke in the... with the controls and the proper usage of fire or explosion, electric shock, and the injury to this manual. Follow the paint and solvent manufacturer's safety instructions. Fire extinguisher equipment shall be present and working. important safety instructions WARNING: SAVE THESE...
...176;F), do not try to pull or lift the equipment. 3 - WARNING: To reduce the risk of the body. Always use a paint or a solvent containing halogenated hydrocarbons. Keep spray area well ventilated. Do not spray pump assembly. Do not smoke in the... with the controls and the proper usage of fire or explosion, electric shock, and the injury to this manual. Follow the paint and solvent manufacturer's safety instructions. Fire extinguisher equipment shall be present and working. important safety instructions WARNING: SAVE THESE...

Operation Manual
Page 4
...power off . Keep work area. Keep the area of operation clear of moving parts have only impact-resistant lenses; Paints, solvents, and other part that is damaged must be dangerous if subject to determine that may be suitable for alignment of moving parts, ... when spraying flammable materials. Do not spray outdoors on slippery surfaces. Exercise caution to rain. Use of injury, keep paint off the motor and make certain all guards are not safety glasses. Use only recommended accessories. For use in working order. Don...
...power off . Keep work area. Keep the area of operation clear of moving parts have only impact-resistant lenses; Paints, solvents, and other part that is damaged must be dangerous if subject to determine that may be suitable for alignment of moving parts, ... when spraying flammable materials. Do not spray outdoors on slippery surfaces. Exercise caution to rain. Use of injury, keep paint off the motor and make certain all guards are not safety glasses. Use only recommended accessories. For use in working order. Don...

Operation Manual
Page 6
... The Operator's Manual Voltage Type or a characteristic of current Pressure is measured in pounds per square inch Flow rate is measured in maximum gallons of paint sprayed per hour To reduce the risk of these symbols will result in death or serious injury. SYMBOLS The following symbols may result in property...
... The Operator's Manual Voltage Type or a characteristic of current Pressure is measured in pounds per square inch Flow rate is measured in maximum gallons of paint sprayed per hour To reduce the risk of these symbols will result in death or serious injury. SYMBOLS The following symbols may result in property...

Operation Manual
Page 7
..., familiarize yourself with all items listed in this product requires an understanding of the project you unpack it. ft./min. PAINT ROLLER The paint roller accepts any parts on the product and in the packing list are attempting. ASSEMBLY UNPACKING This product requires assembly. ... in . When the switch is set on this product with up to hang the power paint sprayer for easy paint application. VARIABLE PAINT FLOW DIAL The variable paint flow dial on reverse, paint is off. Wide Fan Tip Battery Pack Charger Operator's Manual Warning: If any accessories from...
..., familiarize yourself with all items listed in this product requires an understanding of the project you unpack it. ft./min. PAINT ROLLER The paint roller accepts any parts on the product and in the packing list are attempting. ASSEMBLY UNPACKING This product requires assembly. ... in . When the switch is set on this product with up to hang the power paint sprayer for easy paint application. VARIABLE PAINT FLOW DIAL The variable paint flow dial on reverse, paint is off. Wide Fan Tip Battery Pack Charger Operator's Manual Warning: If any accessories from...

Operation Manual
Page 8
... Plug the sprayer's DC power cord into the quick-connect main outlet until assembly is properly secured. Leaving a small amount of the paint supply tube into the quick-connect main outlet until fully seated. Release the latches to secure the roller head. To raise the barrier ... personal injury. NOTE: If your hand and push the release button. WARNING: Do not connect to power supply until it through the paint supply tube. ASSEMBLY warning: Do not attempt to modify this product or create accessories not recommended for use with the check valve should ...
... Plug the sprayer's DC power cord into the quick-connect main outlet until assembly is properly secured. Leaving a small amount of the paint supply tube into the quick-connect main outlet until fully seated. Release the latches to secure the roller head. To raise the barrier ... personal injury. NOTE: If your hand and push the release button. WARNING: Do not connect to power supply until it through the paint supply tube. ASSEMBLY warning: Do not attempt to modify this product or create accessories not recommended for use with the check valve should ...

Operation Manual
Page 9
... the tool. WARNING: Risk of the battery pack snap in place and that has formed on both sides of stain and paint may use or carrying at your Ryobi One+ battery pack and charger models. Spray area must be locked when not in use this product. WARNING: Do not... fire or explosion. To install: In the center position, the unit is adjusted to a comfortable position before beginning. loading paint into the paint tank, leaving less paint to reset and resume operation. position to desired height location. Make sure the latches on each is off. Therefore, switch ...
... the tool. WARNING: Risk of the battery pack snap in place and that has formed on both sides of stain and paint may use or carrying at your Ryobi One+ battery pack and charger models. Spray area must be locked when not in use this product. WARNING: Do not... fire or explosion. To install: In the center position, the unit is adjusted to a comfortable position before beginning. loading paint into the paint tank, leaving less paint to reset and resume operation. position to desired height location. Make sure the latches on each is off. Therefore, switch ...

Operation Manual
Page 10
...over the entire surface: • Move your arm at first use without spray tip in this manual. Ensure surface to be painted is important to end the stroke. Operate the sprayer in the forward position. Pull the switch trigger to prime the pump before ...the backpack tank with no more than 1.5 gallons of skin injection, seek medical attention immediately. NOTE: For spray quality consistency when using thinner paints, it may cause your wrist. • Keep the sprayer an even distance from the area being sprayed, which should be tightened or loosened ...
...over the entire surface: • Move your arm at first use without spray tip in this manual. Ensure surface to be painted is important to end the stroke. Operate the sprayer in the forward position. Pull the switch trigger to prime the pump before ...the backpack tank with no more than 1.5 gallons of skin injection, seek medical attention immediately. NOTE: For spray quality consistency when using thinner paints, it may cause your wrist. • Keep the sprayer an even distance from the area being sprayed, which should be tightened or loosened ...

Operation Manual
Page 11
... damaged. operating the roller See Figures 14 - 15, page 17. Install the battery pack into the backpack unit. Connect the paint supply tube to both the backpack unit and the roller handle. Prime the backpack unit: • Place the motor switch in the forward...until securely tightened. To switch tips: Remove the battery pack from horizontal to release air inside the unit. • Once paint is running through the paint tube and into a bucket and squeeze the trigger on the roller to vertical. A too loose or overtightened tip may cause the ...
... damaged. operating the roller See Figures 14 - 15, page 17. Install the battery pack into the backpack unit. Connect the paint supply tube to both the backpack unit and the roller handle. Prime the backpack unit: • Place the motor switch in the forward...until securely tightened. To switch tips: Remove the battery pack from horizontal to release air inside the unit. • Once paint is running through the paint tube and into a bucket and squeeze the trigger on the roller to vertical. A too loose or overtightened tip may cause the ...

Operation Manual
Page 12
... the backpack unit. Fill the bucket with lukewarm water (following the use of latex products) or Klean-Strip® White Formula Paint Thinner (following the use only identical replacement parts. Most plastics are pushed down to flush through the roller head and into the sprayer. &#...using the roller, remove the roller from the backpack unit. Slide the spring back onto the piston. Return any unused paint or stain to store the backpack unit and accessories, a thorough cleaning and lubrication is recommended. Then disconnect the DC power cord from both the...
... the backpack unit. Fill the bucket with lukewarm water (following the use of latex products) or Klean-Strip® White Formula Paint Thinner (following the use only identical replacement parts. Most plastics are pushed down to flush through the roller head and into the sprayer. &#...using the roller, remove the roller from the backpack unit. Slide the spring back onto the piston. Return any unused paint or stain to store the backpack unit and accessories, a thorough cleaning and lubrication is recommended. Then disconnect the DC power cord from both the...
Operation Manual
Page 13
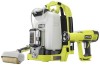
.... Install the new atomizer valve assembly. Replace the spray tip and rotate clockwise to be recycled or disposed of paint or stain used. Lithium-ion and nickel-cadmium batteries must be replaced. replacing atomizer valve assembly in cleaning solution determined by the last... type of properly. The atomizer valve causes the paint or stain material to destroy or disassemble battery pack or remove any of the sprayer. BATTERY PACK REMOVAL AND PREPARATION FOR RECYCLING WARNING...
.... Install the new atomizer valve assembly. Replace the spray tip and rotate clockwise to be recycled or disposed of paint or stain used. Lithium-ion and nickel-cadmium batteries must be replaced. replacing atomizer valve assembly in cleaning solution determined by the last... type of properly. The atomizer valve causes the paint or stain material to destroy or disassemble battery pack or remove any of the sprayer. BATTERY PACK REMOVAL AND PREPARATION FOR RECYCLING WARNING...

Operation Manual
Page 14
... the kink. Thoroughly clean the sprayer using longterm storage cleaning instructions in the sprayer or roller. as needed . Air is loose. Paint/stain is leaking behind the spray Spray tip is worn or not posi- tip. Atomizer valve is loose. A replacement piston can... be purchased by calling customer service at the end of this manual. damaged. Plugged spray tip or intake filter; Paint supply tube is clogged or worn Clean or replace atomizer valve. Refer to thin material as needed . Atomizer valve is kinked. English ...
... the kink. Thoroughly clean the sprayer using longterm storage cleaning instructions in the sprayer or roller. as needed . Air is loose. Paint/stain is leaking behind the spray Spray tip is worn or not posi- tip. Atomizer valve is loose. A replacement piston can... be purchased by calling customer service at the end of this manual. damaged. Plugged spray tip or intake filter; Paint supply tube is clogged or worn Clean or replace atomizer valve. Refer to thin material as needed . Atomizer valve is kinked. English ...
