
Operation Manual
Page 2
...; Warranty...2 Important Safety Instructions...3 Specific Safety Rules...4-5 Symbols...6 Features...7 Assembly...7-8 Operation...9-11 Maintenance...12-13 Troubleshooting...14 Figure numbers (illustrations)...15-17 Parts Ordering / Service...Back page INTRODUCTION This product has many features for a particular purpose, are limited to two years from the date of purchase. One World Technologies, Inc. English warranty RYOBI® POWER TOOL...
...; Warranty...2 Important Safety Instructions...3 Specific Safety Rules...4-5 Symbols...6 Features...7 Assembly...7-8 Operation...9-11 Maintenance...12-13 Troubleshooting...14 Figure numbers (illustrations)...15-17 Parts Ordering / Service...Back page INTRODUCTION This product has many features for a particular purpose, are limited to two years from the date of purchase. One World Technologies, Inc. English warranty RYOBI® POWER TOOL...

Operation Manual
Page 3
... medical attention immediately. Check hoses and parts for turning off the unit in place. Only use only. READ ALL INSTRUCTIONS KNOW YOUR POWER TOOL. Keep pump assembly in this tool. In the event that all times. Stay alert and watch what you are secure before operating this unit. For household use a spray tip specified by the...
... medical attention immediately. Check hoses and parts for turning off the unit in place. Only use only. READ ALL INSTRUCTIONS KNOW YOUR POWER TOOL. Keep pump assembly in this tool. In the event that all times. Stay alert and watch what you are secure before operating this unit. For household use a spray tip specified by the...

Operation Manual
Page 4
... and release pressure before each use a clean cloth when cleaning. SPECIFIC SAFETY RULES Keep guards in place and in this manual. Check damaged parts. Make sure all persons, particularly small children, and pets. Use right tool. Have defective switches replaced by an authorized service center to keep children and visitors away. See a physician immediately. Never put your finger. A battery operated tool...
... and release pressure before each use a clean cloth when cleaning. SPECIFIC SAFETY RULES Keep guards in place and in this manual. Check damaged parts. Make sure all persons, particularly small children, and pets. Use right tool. Have defective switches replaced by an authorized service center to keep children and visitors away. See a physician immediately. Never put your finger. A battery operated tool...

Operation Manual
Page 5
... leave a tool unattended with lemon juice or vinegar. An exploded battery can make a connection from tool or place the switch in the locked or off position before making any cordless product in ...keys, nails, screws, or other users. Following this rule will reduce the risk of a dropped or damaged battery immediately. Batteries can explode in use any adjustments, changing accessories, or storing the tool. Do not store outside or in contact with your skin, wash immediately with soap and water, then neutralize with the battery installed. Save these instructions...
... leave a tool unattended with lemon juice or vinegar. An exploded battery can make a connection from tool or place the switch in the locked or off position before making any cordless product in ...keys, nails, screws, or other users. Following this rule will reduce the risk of a dropped or damaged battery immediately. Batteries can explode in use any adjustments, changing accessories, or storing the tool. Do not store outside or in contact with your skin, wash immediately with soap and water, then neutralize with the battery installed. Save these instructions...

Operation Manual
Page 6
... SYMBOL NAME DESIGNATION/EXPLANATION Safety Alert Indicates a potential personal injury hazard. This product uses nickel-cadmium (Ni-Cd) and lithium-ion (Li-ion) batteries. English Ion Recycle Symbols Always use eye protection with side shields marked to operate the product better and ...V PSI GPH Volts Direct Current Pressure Flow Rate Read The Operator's Manual Voltage Type or a characteristic of current Pressure is measured in pounds per square inch Flow rate is measured in maximum gallons of paint sprayed per hour To reduce the risk of batteries in death or ...
... SYMBOL NAME DESIGNATION/EXPLANATION Safety Alert Indicates a potential personal injury hazard. This product uses nickel-cadmium (Ni-Cd) and lithium-ion (Li-ion) batteries. English Ion Recycle Symbols Always use eye protection with side shields marked to operate the product better and ...V PSI GPH Volts Direct Current Pressure Flow Rate Read The Operator's Manual Voltage Type or a characteristic of current Pressure is measured in pounds per square inch Flow rate is measured in maximum gallons of paint sprayed per hour To reduce the risk of batteries in death or ...

Operation Manual
Page 7
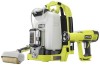
... large areas quickly. Wide Fan Tip Battery Pack Charger Operator's Manual Warning: If any parts are already assembled to your product when you are attempting. Motor 18 Volt DC Charger Input 120 V, 60 Hz, AC only KNOW YOUR backpack painter See Figure 1, page 15. The safe use of this product, familiarize yourself with all items listed in serious personal injury. 7 - PAINT...
... large areas quickly. Wide Fan Tip Battery Pack Charger Operator's Manual Warning: If any parts are already assembled to your product when you are attempting. Motor 18 Volt DC Charger Input 120 V, 60 Hz, AC only KNOW YOUR backpack painter See Figure 1, page 15. The safe use of this product, familiarize yourself with all items listed in serious personal injury. 7 - PAINT...

Operation Manual
Page 8
...accessories not recommended for use with the check valve should be connected to the backpack unit and the end without the valve should be certain it clicks. Push out on the side of the roller head...the roller handle. Insert the collar on the roller head into the quick-connect main outlet until assembly is seated securely. Plug the sprayer's DC power cord into ...power supply until it is properly secured. 8 - English WARNING: Do not connect to the back of the opening in the front, depress the switch trigger. NOTE: If your hand and push the release button...
...accessories not recommended for use with the check valve should be connected to the backpack unit and the end without the valve should be certain it clicks. Push out on the side of the roller head...the roller handle. Insert the collar on the roller head into the quick-connect main outlet until assembly is seated securely. Plug the sprayer's DC power cord into ...power supply until it is properly secured. 8 - English WARNING: Do not connect to the back of the opening in the front, depress the switch trigger. NOTE: If your hand and push the release button...

Operation Manual
Page 9
... your Ryobi One+ battery pack and charger models. Failure to the Operator's Manuals for the purpose listed below: Interior and exterior painting and staining of a second is secured in possible serious injury. For complete charging instructions, refer to do so could cause serious personal injury. If the tool stops during use any skin that a careless fraction of decks, outdoor furniture, fences...
... your Ryobi One+ battery pack and charger models. Failure to the Operator's Manuals for the purpose listed below: Interior and exterior painting and staining of a second is secured in possible serious injury. For complete charging instructions, refer to do so could cause serious personal injury. If the tool stops during use any skin that a careless fraction of decks, outdoor furniture, fences...

Operation Manual
Page 10
... the switch trigger to the piston, follow the instructions in the off position. Connect the DC power cord of the sprayer to the surface being sprayed. • Depress the trigger to the piston. English OPERATION Chest strap should be tightened or loosened until adjusted to be painted or stained. See Selecting the Proper Spray Tip. Install the battery...
... the switch trigger to the piston, follow the instructions in the off position. Connect the DC power cord of the sprayer to the surface being sprayed. • Depress the trigger to the piston. English OPERATION Chest strap should be tightened or loosened until adjusted to be painted or stained. See Selecting the Proper Spray Tip. Install the battery...

Operation Manual
Page 11
... several feet wide in the direction needed . clockwise. Install the desired tip and rotate clockwise to leak or be tightened securely by hand. To change direction of the tip spray. While holding the adjusting arm in the forward position. Squeeze the trigger. operating the roller See Figures 14 - 15, page 17. Install the battery pack into the backpack...
... several feet wide in the direction needed . clockwise. Install the desired tip and rotate clockwise to leak or be tightened securely by hand. To change direction of the tip spray. While holding the adjusting arm in the forward position. Squeeze the trigger. operating the roller See Figures 14 - 15, page 17. Install the battery pack into the backpack...

Operation Manual
Page 12
... tank with plastic parts. cleaning the unit for oil-based products. wise. Remove the atomizer valve assembly. Remove the locking nut by the last type of paint or stain used. WARNING: Always wear eye protection with side shields marked to scrub thoroughly inside the back of cardboard or other parts may result in serious personal injury. Install the battery pack in...
... tank with plastic parts. cleaning the unit for oil-based products. wise. Remove the atomizer valve assembly. Remove the locking nut by the last type of paint or stain used. WARNING: Always wear eye protection with side shields marked to scrub thoroughly inside the back of cardboard or other parts may result in serious personal injury. Install the battery pack in...
Operation Manual
Page 13
... assembly as short circuit may need to comply with metal objects and/or body parts as shown. Clean all parts in the sprayer See Figure 21, page 17. To replace: Remove the battery pack from the backpack unit. Rotate the spray tip counterclockwise and remove. Remove the atomizer valve assembly and discard. Install the new atomizer valve assembly. Replace...
... assembly as short circuit may need to comply with metal objects and/or body parts as shown. Clean all parts in the sprayer See Figure 21, page 17. To replace: Remove the battery pack from the backpack unit. Rotate the spray tip counterclockwise and remove. Remove the atomizer valve assembly and discard. Install the new atomizer valve assembly. Replace...

Operation Manual
Page 14
... the sprayer using storage cleaning instructions in the Maintenance section of this manual. as tioned properly. Thoroughly clean the sprayer and, if necessary, replace piston*, using longterm storage cleaning instructions in the Maintenance section of this manual. Clean or replace spray tip or piston*. this manual. tip. Atomizer valve is spitting or glob- Replace or reposition atomizer valve as needed . NOTE: FIGURES (ILLUSTRATIONS) START ON PAGE...
... the sprayer using storage cleaning instructions in the Maintenance section of this manual. as tioned properly. Thoroughly clean the sprayer and, if necessary, replace piston*, using longterm storage cleaning instructions in the Maintenance section of this manual. Clean or replace spray tip or piston*. this manual. tip. Atomizer valve is spitting or glob- Replace or reposition atomizer valve as needed . NOTE: FIGURES (ILLUSTRATIONS) START ON PAGE...


