
Operation Manual
Page 2
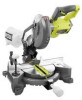
...and properly used for appropriate conditions will increase the risk of electric shock. English Use of dust collection can cause you to a rotating part of tools allow persons unfamiliar with earthed (grounded) power tools. Many accidents are doing and use of the power tool may result in...When operating a power tool outdoors, use an extension cord suitable for which may result in moving parts. Never modify the plug in the off . The correct power tool will reduce risk of moving parts. WORK AREA SAFETY Keep work area clean and well lit. Do not use the ...
...and properly used for appropriate conditions will increase the risk of electric shock. English Use of dust collection can cause you to a rotating part of tools allow persons unfamiliar with earthed (grounded) power tools. Many accidents are doing and use of the power tool may result in...When operating a power tool outdoors, use an extension cord suitable for which may result in moving parts. Never modify the plug in the off . The correct power tool will reduce risk of moving parts. WORK AREA SAFETY Keep work area clean and well lit. Do not use the ...
Operation Manual
Page 3
...clean and free from blade contact. 3 - Following this rule will reduce the risk of injury from oil and grease. Abrasive dust causes moving parts such as a pilot light. Slippery handles and grasping surfaces do not allow for operations different from the battery; avoid contact. An exploded battery...into account the working conditions and the work to be used with another . Use of possible hazards when not using only identical replacement parts. Be aware of any cordless product in contact with your hand at least 10 minutes, then seek immediate medical attention. This will...
...clean and free from blade contact. 3 - Following this rule will reduce the risk of injury from oil and grease. Abrasive dust causes moving parts such as a pilot light. Slippery handles and grasping surfaces do not allow for operations different from the battery; avoid contact. An exploded battery...into account the working conditions and the work to be used with another . Use of possible hazards when not using only identical replacement parts. Be aware of any cordless product in contact with your hand at least 10 minutes, then seek immediate medical attention. This will...
Operation Manual
Page 4
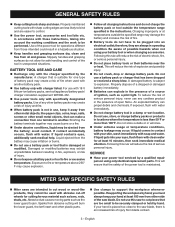
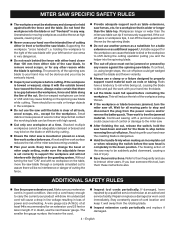
... SAFETY RULES Use the proper extension cord. The smaller the gauge number, the heavier the cord. Inspect tool cords periodically. Unrestrained or moving parts to instruct other reason while the blade is bowed or warped, clamp it with your extension cord is no interference or danger of the saw...
... SAFETY RULES Use the proper extension cord. The smaller the gauge number, the heavier the cord. Inspect tool cords periodically. Unrestrained or moving parts to instruct other reason while the blade is bowed or warped, clamp it with your extension cord is no interference or danger of the saw...
Operation Manual
Page 5
...Keep guards in place and in serious injury. • Check guarding system to make sure it comes to a complete stop before moving parts during use to perform properly, shut off the power switch, remove the miter saw plug from the power source before any cutting angle .... This tool should any electrical component fail to avoid serious personal injury. Always make sure you have damaged, missing, or failed parts replaced before resuming operation. Always turn the motor switch on . 5 - Contact with the blade causing serious personal injury. Avoid ...
...Keep guards in place and in serious injury. • Check guarding system to make sure it comes to a complete stop before moving parts during use to perform properly, shut off the power switch, remove the miter saw plug from the power source before any cutting angle .... This tool should any electrical component fail to avoid serious personal injury. Always make sure you have damaged, missing, or failed parts replaced before resuming operation. Always turn the motor switch on . 5 - Contact with the blade causing serious personal injury. Avoid ...

Operation Manual
Page 7
.... Pilot Hole (drill presses and scroll saws) A small hole drilled in a workpiece that can be or has been cut from a block so the end (or part of the blade to help keep the operator's hands well away from the workpiece. Bevel Cut A cutting operation made with both a miter and a bevel angle...
.... Pilot Hole (drill presses and scroll saws) A small hole drilled in a workpiece that can be or has been cut from a block so the end (or part of the blade to help keep the operator's hands well away from the workpiece. Bevel Cut A cutting operation made with both a miter and a bevel angle...
Operation Manual
Page 11
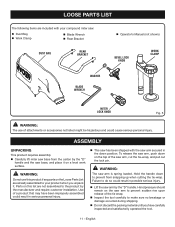
... your product when you have carefully inspected and satisfactorily operated the tool. 11 - English Use of the saw arm by the "D" handle. LOOSE PARTS LIST The following items are included with the saw arm secured in the down position. To release the saw arm, push down on the Loose... Parts List are already assembled to do so could cause serious personal injury. ASSEMBLY UNPACKING This product requires assembly. Carefully lift miter saw ...
... your product when you have carefully inspected and satisfactorily operated the tool. 11 - English Use of the saw arm by the "D" handle. LOOSE PARTS LIST The following items are included with the saw arm secured in the down position. To release the saw arm, push down on the Loose... Parts List are already assembled to do so could cause serious personal injury. ASSEMBLY UNPACKING This product requires assembly. Carefully lift miter saw ...
Operation Manual
Page 12
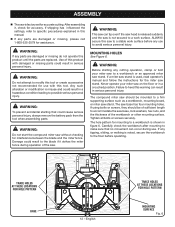
...the workbench to a stable work surface. Never operate your miter saw to a workbench or an approved miter saw to the floor before any parts are replaced. The compound miter saw should be mounted to heed this tool. If a miter saw stand is used, read operator's manual ...clamp or bolt your miter saw stand. Use of sufficient length to a work surface before operating. Damage could result in this product until the parts are damaged or missing, please call 1-800-525-2579 for assistance. Failure to a firm supporting surface such as a workbench, mounting board, or...
...the workbench to a stable work surface. Never operate your miter saw to a workbench or an approved miter saw to the floor before any parts are replaced. The compound miter saw should be mounted to heed this tool. If a miter saw stand is used, read operator's manual ...clamp or bolt your miter saw stand. Use of sufficient length to a work surface before operating. Damage could result in this product until the parts are damaged or missing, please call 1-800-525-2579 for assistance. Failure to a firm supporting surface such as a workbench, mounting board, or...
Operation Manual
Page 16
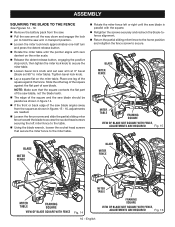
... screws securing the left miter fence to the table. Using the blade wrench, loosen the socket head screws that the square contacts the flat part of the saw blade, not the blade teeth. The edge of the square and the saw blade should be parallel as shown in figure... angles away from the square as shown in transport position. Loosen the miter lock knob approximately one leg of the square against the flat part of saw blade is parallel with zero dentent on the miter table. English FRAMING SQUARE VIEW OF BLADE NOT SQUARE WITH FENCE, ADJUSTMENTS ARE REQUIRED...
... screws securing the left miter fence to the table. Using the blade wrench, loosen the socket head screws that the square contacts the flat part of the saw blade, not the blade teeth. The edge of the square and the saw blade should be parallel as shown in figure... angles away from the square as shown in transport position. Loosen the miter lock knob approximately one leg of the square against the flat part of saw blade is parallel with zero dentent on the miter table. English FRAMING SQUARE VIEW OF BLADE NOT SQUARE WITH FENCE, ADJUSTMENTS ARE REQUIRED...

Operation Manual
Page 17
... saw arm in figures 21 and 22, adjustments are needed. Loosen the bevel lock knob. NOTE: Make sure that the square contacts the flat part of the saw blade, not the blade teeth. Rotate the blade by hand and check the blade-to-table alignment at stop. Place... a square against the miter table and the flat part of the saw blade angles away from the saw. Pull the saw arm all the way down and engage the lock pin to zero...
... saw arm in figures 21 and 22, adjustments are needed. Loosen the bevel lock knob. NOTE: Make sure that the square contacts the flat part of the saw blade, not the blade teeth. Rotate the blade by hand and check the blade-to-table alignment at stop. Place... a square against the miter table and the flat part of the saw blade angles away from the saw. Pull the saw arm all the way down and engage the lock pin to zero...
Operation Manual
Page 19
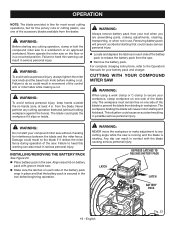
... wood cutting operations, but for fine joinery cuts or cutting plastic, use one of the accessory blades available from your tool when you are assembling parts, making adjustments, cleaning, transporting, or when not in use. Failure to prevent the blade from binding in workpiece. For complete charging instructions, refer to the...
... wood cutting operations, but for fine joinery cuts or cutting plastic, use one of the accessory blades available from your tool when you are assembling parts, making adjustments, cleaning, transporting, or when not in use. Failure to prevent the blade from binding in workpiece. For complete charging instructions, refer to the...
Operation Manual
Page 27
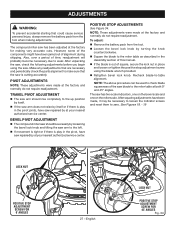
... is play in the pivot joints, have been made at your nearest authorized service center. Make any readjustments that are necessary and periodically check the parts alignment to the miter table as described in the Assembly section of this manual. If the blade is cutting accurately. To adjust: Remove...
... is play in the pivot joints, have been made at your nearest authorized service center. Make any readjustments that are necessary and periodically check the parts alignment to the miter table as described in the Assembly section of this manual. If the blade is cutting accurately. To adjust: Remove...

Operation Manual
Page 28
.... Chemicals can damage, weaken or destroy plastic which may result in this tool for the life of any other parts may be damaged by their use only identical replacement parts. WARNING: Do not at any of these types of commercial solvents and may create a hazard or cause product .... Use of the unit under normal operating conditions. Most plastics are highly abrasive to clean the tool using solvents when cleaning plastic parts. If operation is required. 28 - LUBRICATION All of the bearings in serious personal injury. WARNING: Always wear eye protection with plastic...
.... Chemicals can damage, weaken or destroy plastic which may result in this tool for the life of any other parts may be damaged by their use only identical replacement parts. WARNING: Do not at any of these types of commercial solvents and may create a hazard or cause product .... Use of the unit under normal operating conditions. Most plastics are highly abrasive to clean the tool using solvents when cleaning plastic parts. If operation is required. 28 - LUBRICATION All of the bearings in serious personal injury. WARNING: Always wear eye protection with plastic...
Parts Diagram
Page 3
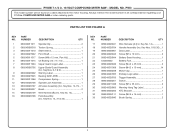
...1 Bearing (6201-2RS 1 Compresson Spring 1 Spindle Lock Assembly 1 Armature Assembly (Inc. Key Nos. 14, 31 & 33 1 KEY PART NO. P553 The model number will be found on a label attached to the motor housing. Key Nos. 14-15).... 1 Brush 2 Wire Harness ... NTC Bracket 1 32 089240026111 Screw (M2.9 x 14 mm 1 33 089240026040 Brush Spring 2 3 RYOBI 7-1/4 in . Key No. 14 1 18 089240026704 Handle Assembly (Inc. PART NUMBER DESCRIPTION QTY 1 089240011011 2 089240026018 3 089240011010 4 089240027022 5 089240011017 6 089240011075 7 089240011904 8 ...
...1 Bearing (6201-2RS 1 Compresson Spring 1 Spindle Lock Assembly 1 Armature Assembly (Inc. Key Nos. 14, 31 & 33 1 KEY PART NO. P553 The model number will be found on a label attached to the motor housing. Key Nos. 14-15).... 1 Brush 2 Wire Harness ... NTC Bracket 1 32 089240026111 Screw (M2.9 x 14 mm 1 33 089240026040 Brush Spring 2 3 RYOBI 7-1/4 in . Key No. 14 1 18 089240026704 Handle Assembly (Inc. PART NUMBER DESCRIPTION QTY 1 089240011011 2 089240026018 3 089240011010 4 089240027022 5 089240011017 6 089240011075 7 089240011904 8 ...
Parts Diagram
Page 5
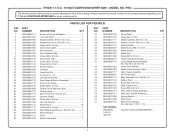
...1 Blade Washer 1 Blade (24t 1 Screw (M5 x 16 mm 2 Output Spindle Assembly 1 Lower Blade Guard Assembly (Inc. RYOBI 7-1/4 in . Key No. 32 1 Miter Indicator 1 Shaft 1 Bevel Scale Label 1 KEY PART NO. Key Nos. 7-9 & 11-16 1 NOT SHOWN: 995000704 1-29-19 (Rev:02) Operator's Manual (089240026905) 5 ...44-45 & 47 1 Lower Guard Wheel 1 Blade Screw Direction Label 1 Work Clamp Assembly 1 No Hands Label 3 Base Assembly (Inc. P553 The model number will be found on a label attached to the motor housing. MODEL NO. Always mention the model number in all correspondence regarding...
...1 Blade Washer 1 Blade (24t 1 Screw (M5 x 16 mm 2 Output Spindle Assembly 1 Lower Blade Guard Assembly (Inc. RYOBI 7-1/4 in . Key No. 32 1 Miter Indicator 1 Shaft 1 Bevel Scale Label 1 KEY PART NO. Key Nos. 7-9 & 11-16 1 NOT SHOWN: 995000704 1-29-19 (Rev:02) Operator's Manual (089240026905) 5 ...44-45 & 47 1 Lower Guard Wheel 1 Blade Screw Direction Label 1 Work Clamp Assembly 1 No Hands Label 3 Base Assembly (Inc. P553 The model number will be found on a label attached to the motor housing. MODEL NO. Always mention the model number in all correspondence regarding...


