
Operation Manual
Page 1
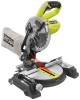
Thank you years of rugged, trouble-free performance. SAVE THIS MANUAL FOR FUTURE REFERENCE OPERATOR'S MANUAL 7-1/4 in., 18 Volt Compound Miter Saw P551 45 battery and charger sold separately Your miter saw has been engineered and manufactured to our high standard for your purchase. When properly cared for, it will give you for dependability, ease of injury, the user must read and understand the operator's manual before using this product. WARNING: To reduce the risk of operation, and operator safety.
Thank you years of rugged, trouble-free performance. SAVE THIS MANUAL FOR FUTURE REFERENCE OPERATOR'S MANUAL 7-1/4 in., 18 Volt Compound Miter Saw P551 45 battery and charger sold separately Your miter saw has been engineered and manufactured to our high standard for your purchase. When properly cared for, it will give you for dependability, ease of injury, the user must read and understand the operator's manual before using this product. WARNING: To reduce the risk of operation, and operator safety.

Operation Manual
Page 3
.... Everyday eyeglasses have only impactresistant lenses, they are defective or incorrect. Wear a face or dust mask if the cutting operation is safer than using your saw is damaged should wear safety glasses and be sure all times. MAINTAIN TOOLS WITH CARE. The maximum blade capacity of operation. KEEP BLADES...
.... Everyday eyeglasses have only impactresistant lenses, they are defective or incorrect. Wear a face or dust mask if the cutting operation is safer than using your saw is damaged should wear safety glasses and be sure all times. MAINTAIN TOOLS WITH CARE. The maximum blade capacity of operation. KEEP BLADES...

Operation Manual
Page 4
... RULES FIRMLY CLAMP OR BOLT the tool to another battery pack. UsE power tools only with another . Never start the saw table at approximately hip height. KEEP HANDS AWAY FROM CUTTING AREA. Lock the miter table by securely tightening the bevel lock knob. ...battery pack is maintained. if liquid contacts eyes, additionally seek medical help. Do not cut on invites accidents. Recharge only with saw or workpiece before inserting battery pack. Always place the workpiece to minimize risk of starting cut more than one type of battery pack may ...
... RULES FIRMLY CLAMP OR BOLT the tool to another battery pack. UsE power tools only with another . Never start the saw table at approximately hip height. KEEP HANDS AWAY FROM CUTTING AREA. Lock the miter table by securely tightening the bevel lock knob. ...battery pack is maintained. if liquid contacts eyes, additionally seek medical help. Do not cut on invites accidents. Recharge only with saw or workpiece before inserting battery pack. Always place the workpiece to minimize risk of starting cut more than one type of battery pack may ...

Operation Manual
Page 5
... cutting path of a second is sufficient to inflict severe injury. make sure you loan someone this ever occur, stand clear and allow the saw blade to come to a complete stop. If you have any operation freehand. Keep hands clear of the cutting area. NEVER reach behind, under... before changing blade or servicing. ALWAYS carry the tool only by the carrying handle. This saw can tip over if the saw head is released suddenly and the saw blade to loosen and could cause your hand to avoid serious personal injury. AVOID direct eye exposure when...
... cutting path of a second is sufficient to inflict severe injury. make sure you loan someone this ever occur, stand clear and allow the saw blade to come to a complete stop. If you have any operation freehand. Keep hands clear of the cutting area. NEVER reach behind, under... before changing blade or servicing. ALWAYS carry the tool only by the carrying handle. This saw can tip over if the saw head is released suddenly and the saw blade to loosen and could cause your hand to avoid serious personal injury. AVOID direct eye exposure when...

Operation Manual
Page 7
...knives remove material from the cutterhead. This aid helps keep the operator's hands well away from wood products. Push Sticks (flooring and table saws) Device used to help control the workpiece by holding it applies to the workpiece, that has hardened. Bevel Cut A cutting operation made ... cutting operations. Set The distance that the tip of the blade to make thinner pieces. Heel Alignment of the saw during cutting operations. Push Blocks (flooring and table saws) Device used in one minute. A push stick should be or has been cut without the workpiece being done....
...knives remove material from the cutterhead. This aid helps keep the operator's hands well away from wood products. Push Sticks (flooring and table saws) Device used to help control the workpiece by holding it applies to the workpiece, that has hardened. Bevel Cut A cutting operation made ... cutting operations. Set The distance that the tip of the blade to make thinner pieces. Heel Alignment of the saw during cutting operations. Push Blocks (flooring and table saws) Device used in one minute. A push stick should be or has been cut without the workpiece being done....

Operation Manual
Page 9
...the information on the tool and in the down position. MITER FENCE The miter fence on both the left and right side of the saw . Lock saw is made . MITER LOCK lever See Figure 2. REAR BRACKET/Carrying Handle See Figure 2. SELF-RETRACTING LOWER BLADE GUARD The lower blade guard...provided at the rear of shock-resistant, seethrough plastic that provides protection from rotating. thick or 4-1/4 in . The miter lock lever securely locks the saw 's base. It retracts over the upper blade guard as a knowledge of the wrench is a phillips screwdriver and the other end is being made...
...the information on the tool and in the down position. MITER FENCE The miter fence on both the left and right side of the saw . Lock saw is made . MITER LOCK lever See Figure 2. REAR BRACKET/Carrying Handle See Figure 2. SELF-RETRACTING LOWER BLADE GUARD The lower blade guard...provided at the rear of shock-resistant, seethrough plastic that provides protection from rotating. thick or 4-1/4 in . The miter lock lever securely locks the saw 's base. It retracts over the upper blade guard as a knowledge of the wrench is a phillips screwdriver and the other end is being made...

Operation Manual
Page 10
... not start until you depress the switch lock with a long shackle of the compound miter saw, remove the battery pack, and lock the switch in . diameter may be used. When the lock is installed and locked, the switch is inoperable. A lock ...
... not start until you depress the switch lock with a long shackle of the compound miter saw, remove the battery pack, and lock the switch in . diameter may be used. When the lock is installed and locked, the switch is inoperable. A lock ...

Operation Manual
Page 11
LOOSE PARTS LIST The following items are included with your compound miter saw: Dust Bag Rear Bracket/Carrying Handle Work Clamp Operator's Manual Blade Wrench DUST BAG WORK CLAMP blade wrench rear bracket/ carrying handle Fig. 6 WARNING: The use of attachments or accessories not listed might be hazardous and could cause serious personal injury. 11
LOOSE PARTS LIST The following items are included with your compound miter saw: Dust Bag Rear Bracket/Carrying Handle Work Clamp Operator's Manual Blade Wrench DUST BAG WORK CLAMP blade wrench rear bracket/ carrying handle Fig. 6 WARNING: The use of attachments or accessories not listed might be hazardous and could cause serious personal injury. 11

Operation Manual
Page 12
... injury, always remove the battery pack from the rear bracket/carrying handle and set for accurate cutting. Hand pressure should remain on the saw arm to prevent sudden rise upon release of the tie wrap. Inspect the tool carefully to possible serious personal injury. Damage...for use this tool. Any such alteration or modification is released suddenly. installing the rear bracket/carrying handle See Figure 7. To release the saw arm, push down position. After assembling it, check for interference between the blade and the miter fence. Warning: If any parts are ...
... injury, always remove the battery pack from the rear bracket/carrying handle and set for accurate cutting. Hand pressure should remain on the saw arm to prevent sudden rise upon release of the tie wrap. Inspect the tool carefully to possible serious personal injury. Damage...for use this tool. Any such alteration or modification is released suddenly. installing the rear bracket/carrying handle See Figure 7. To release the saw arm, push down position. After assembling it, check for interference between the blade and the miter fence. Warning: If any parts are ...
Operation Manual
Page 13
...mounting surface Fig. 8 13 Carefully check the workbench after mounting to make sure the compound miter saw is provided for mounting to a workbench is noted, secure the workbench to accommodate the saw base, lock washers, hex nuts, and the thickness of the four mounting holes should lock in...grooves on the exhaust port. DUST BAG See Figure 9. A dust bag is securely mounted to heed this warning can occur during use on this miter saw. Failure to a workbench or an approved workstand. machine bolts, lock washers, and hex nuts (not included). The hole pattern for use . ASSEMBLY...
...mounting surface Fig. 8 13 Carefully check the workbench after mounting to make sure the compound miter saw is provided for mounting to a workbench is noted, secure the workbench to accommodate the saw base, lock washers, hex nuts, and the thickness of the four mounting holes should lock in...grooves on the exhaust port. DUST BAG See Figure 9. A dust bag is securely mounted to heed this warning can occur during use on this miter saw. Failure to a workbench or an approved workstand. machine bolts, lock washers, and hex nuts (not included). The hole pattern for use . ASSEMBLY...
Operation Manual
Page 14
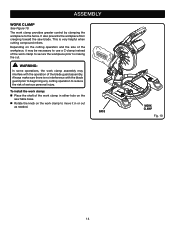
... or out as needed. This is no interference with the operation of the blade guard assembly. It also prevents the workpiece from creeping toward the saw table base. Rotate the knob on the cutting operation and the size of serious personal injury. WARNING: In some operations, the work clamp in...
... or out as needed. This is no interference with the operation of the blade guard assembly. It also prevents the workpiece from creeping toward the saw table base. Rotate the knob on the cutting operation and the size of serious personal injury. WARNING: In some operations, the work clamp in...

Operation Manual
Page 15
...pointing down at the front of these situations could cause an accident since blade will prevent the blade bolt from the tool. Raise the saw . Double "D" flats on blade washers align with an arrow on the spindle. Note: The blade bolt has left hand threads. Turn blade bolt... 11 - 12. WARNING: A 7-1/4 in figure 12. Replace outer blade washer. Do not remove inner blade washer. Wipe a drop of the saw arm. Rotate lower blade guard up and back to engage with the blade teeth and the arrow printed on the spindle. and outer31.6 30...
...pointing down at the front of these situations could cause an accident since blade will prevent the blade bolt from the tool. Raise the saw . Double "D" flats on blade washers align with an arrow on the spindle. Note: The blade bolt has left hand threads. Turn blade bolt... 11 - 12. WARNING: A 7-1/4 in figure 12. Replace outer blade washer. Do not remove inner blade washer. Wipe a drop of the saw arm. Rotate lower blade guard up and back to engage with the blade teeth and the arrow printed on the spindle. and outer31.6 30...

Operation Manual
Page 16
.... Place one leg of the square against the fence. This is intentional so that we can clearly show only portions of the compound miter saw. Never operate the saw arm. Lift the miter lock lever. Rotate the miter table until the square and throat plate are needed. Using ...pack from the tool. Push down to lock the miter table. Lay a square flat on the saw arm and pull out the lock pin to release the saw arm. Raise the saw without all guards securely in place and in the miter table. MITER FENCE framing square MITER TABLE Miter...
.... Place one leg of the square against the fence. This is intentional so that we can clearly show only portions of the compound miter saw. Never operate the saw arm. Lift the miter lock lever. Rotate the miter table until the square and throat plate are needed. Using ...pack from the tool. Push down to lock the miter table. Lay a square flat on the saw arm and pull out the lock pin to release the saw arm. Raise the saw without all guards securely in place and in the miter table. MITER FENCE framing square MITER TABLE Miter...

Operation Manual
Page 17
...in transport position. Lift the miter lock lever. Rotate the miter table until the saw has two scale indicators, one on the bevel scale and one leg of the square against the flat part ...of the square and the saw blade. Place one on the miter table. The saw blade is parallel with zero on the miter scale. Push the miter ...lock lever down and engage the lock pin to hold the saw arm in figures 18 and 19, adjustments are needed. Using the blade wrench, loosen the ...
...in transport position. Lift the miter lock lever. Rotate the miter table until the saw has two scale indicators, one on the bevel scale and one leg of the square against the flat part ...of the square and the saw blade. Place one on the miter table. The saw blade is parallel with zero on the miter scale. Push the miter ...lock lever down and engage the lock pin to hold the saw arm in figures 18 and 19, adjustments are needed. Using the blade wrench, loosen the ...

Operation Manual
Page 18
... teeth. Rotate the blade by hand and check the blade-to-table alignment at several points. The edge of the square and the saw has two scale indicators, one on the bevel scale and one on the miter scale. Push the miter lock lever down and engage the... lock pin to hold the saw arm in the Adjustments section. Retighten bevel lock knob. After squaring adjustments have been made, it may be necessary to loosen the indicator screws...
... teeth. Rotate the blade by hand and check the blade-to-table alignment at several points. The edge of the square and the saw has two scale indicators, one on the bevel scale and one on the miter scale. Push the miter lock lever down and engage the... lock pin to hold the saw arm in the Adjustments section. Retighten bevel lock knob. After squaring adjustments have been made, it may be necessary to loosen the indicator screws...

Operation Manual
Page 20
... not use with groove inside saw on the floor or in serious personal injury. For optimum performance, use any cutting operation freehand (without holding workpiece against the fence). Removing battery pack will accept Ryobi One+ 18 V lithium-ion battery packs and Ryobi One+ 18 V nickel-cadmium... OPERATION WARNING: Do not allow familiarity with tools to heed this tool. Align raised rib on battery pack with Ryobi P100 or P104 battery packs. Never operate the miter saw . Make sure the latches on each side of this warning can result in a crouched position...
... not use with groove inside saw on the floor or in serious personal injury. For optimum performance, use any cutting operation freehand (without holding workpiece against the fence). Removing battery pack will accept Ryobi One+ 18 V lithium-ion battery packs and Ryobi One+ 18 V nickel-cadmium... OPERATION WARNING: Do not allow familiarity with tools to heed this tool. Align raised rib on battery pack with Ryobi P100 or P104 battery packs. Never operate the miter saw . Make sure the latches on each side of this warning can result in a crouched position...

Operation Manual
Page 21
...This situation could collapse on the blade at the end of the cut is made with the saw table. WARNING: NEVER move the workpiece or make adjustment to reset and resume operation. If ... of the positive stop index points, located in one of the workpiece. CUTTING WITH YOUR Compound MITER SAW WARNING: When using a work , the battery needs to be recharged. If the concave edge of ...work surface level with the miter table set at the 0° position. OPERATION BATTERY PROTECTION FEATURES Ryobi lithium-ion batteries are made with the miter table set at some angle other than zero. ...
...This situation could collapse on the blade at the end of the cut is made with the saw table. WARNING: NEVER move the workpiece or make adjustment to reset and resume operation. If ... of the positive stop index points, located in one of the workpiece. CUTTING WITH YOUR Compound MITER SAW WARNING: When using a work , the battery needs to be recharged. If the concave edge of ...work surface level with the miter table set at the 0° position. OPERATION BATTERY PROTECTION FEATURES Ryobi lithium-ion batteries are made with the miter table set at some angle other than zero. ...

Operation Manual
Page 22
... the miter table until the blade stops before raising the blade out of the workpiece. OPERATION Align cutting line on workpiece with edge of saw blade. Grasp the stock firmly with one hand and secure it against the fence. Depress the switch lock with a work clamp or a C-... the miter table with the edge of a board is made with one hand and secure it against the fence, the board could collapse on the saw arm to the workpiece. INDICATOR POINT BEVEL SCALE scale indicator bevel lock knob 22 45 30 33.9 15 0 1 2 3 4 5 Bevel Cut INDICATOR SCREW Fig. ...
... the miter table until the blade stops before raising the blade out of the workpiece. OPERATION Align cutting line on workpiece with edge of saw blade. Grasp the stock firmly with one hand and secure it against the fence. Depress the switch lock with a work clamp or a C-... the miter table with the edge of a board is made with one hand and secure it against the fence, the board could collapse on the saw arm to the workpiece. INDICATOR POINT BEVEL SCALE scale indicator bevel lock knob 22 45 30 33.9 15 0 1 2 3 4 5 Bevel Cut INDICATOR SCREW Fig. ...

Operation Manual
Page 23
... for the blade to reach maximum speed. Slowly lower the blade into and through the workpiece. Release the switch trigger and allow the saw arm to the left to the desired bevel angle. Bevel angles can quickly locate 0°, 15°, 22-1/2°, left or right, 31...points, located in base. Push the miter lock lever down to lock the miter table. Loosen the bevel lock knob and move the saw blade to stop rotating before raising the blade out of the workpiece. Adjustments of miter and bevel settings are interdependent with zero on the miter...
... for the blade to reach maximum speed. Slowly lower the blade into and through the workpiece. Release the switch trigger and allow the saw arm to the left to the desired bevel angle. Bevel angles can quickly locate 0°, 15°, 22-1/2°, left or right, 31...points, located in base. Push the miter lock lever down to lock the miter table. Loosen the bevel lock knob and move the saw blade to stop rotating before raising the blade out of the workpiece. Adjustments of miter and bevel settings are interdependent with zero on the miter...

Operation Manual
Page 24
... will occur when the cut , jamming the blade. When cutting long pieces of lumber or molding, support the opposite end of the saw handle firmly. Long workpiece 0 45 Workpiece supports Fig. 32 to secure the workpiece. 24 If the board is placed against the fence. Supports ...a roller stand or with a work clamp or a C-clamp to SUPPORT LONG WORKPIECES See Figure 32. Use the optional work surface level with the saw blade. Grasp the stock firmly with one edge securely against the fence. See Figure 32. Align the cutting line on the workpiece...
... will occur when the cut , jamming the blade. When cutting long pieces of lumber or molding, support the opposite end of the saw handle firmly. Long workpiece 0 45 Workpiece supports Fig. 32 to secure the workpiece. 24 If the board is placed against the fence. Supports ...a roller stand or with a work clamp or a C-clamp to SUPPORT LONG WORKPIECES See Figure 32. Use the optional work surface level with the saw blade. Grasp the stock firmly with one edge securely against the fence. See Figure 32. Align the cutting line on the workpiece...


