Manual 1
Page 7
... the packing list are included. Before use this product until you to be missing or damaged. Opening the lever releases the blade clamp, allowing you have carefully inspected and satisfactorily operated the product. n Carefully remove the product and any parts are damaged ... in a hazardous condition leading to possible serious personal injury. WARNING: Do not use of your saw is not completely assembled or if any parts are replaced. PACKING LIST Reciprocating Saw Blades (2) Hex Key Operator's Manual WARNING: If any accessories from the product when assembling parts. 7...
... the packing list are included. Before use this product until you to be missing or damaged. Opening the lever releases the blade clamp, allowing you have carefully inspected and satisfactorily operated the product. n Carefully remove the product and any parts are damaged ... in a hazardous condition leading to possible serious personal injury. WARNING: Do not use of your saw is not completely assembled or if any parts are replaced. PACKING LIST Reciprocating Saw Blades (2) Hex Key Operator's Manual WARNING: If any accessories from the product when assembling parts. 7...

Manual 1
Page 8
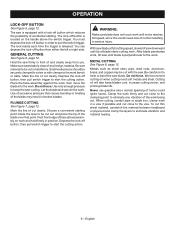
...desired position. Retighten set screw securely. The use of the reciprocating saw bar. Lower the blade clamp lever to lock. Replace the battery pack. BATTERY PROTECTION FEATURES Ryobi lithium-ion batteries are always in operating condition. WARNING: Always wear eye protection...WARNING: Do not use any attachments or accessories not recommended by the manufacturer of saw. Insert the saw blade between the blade clamp and the saw pivots up and down in both directions. TO INSTALL SAW BLADE See Figure 3, page 11. Remove the battery pack. ...
...desired position. Retighten set screw securely. The use of the reciprocating saw bar. Lower the blade clamp lever to lock. Replace the battery pack. BATTERY PROTECTION FEATURES Ryobi lithium-ion batteries are always in operating condition. WARNING: Always wear eye protection...WARNING: Do not use any attachments or accessories not recommended by the manufacturer of saw. Insert the saw blade between the blade clamp and the saw pivots up and down in both directions. TO INSTALL SAW BLADE See Figure 3, page 11. Remove the battery pack. ...
Manual 1
Page 9
...to start the cutting action. Small work pieces should be cut . Mark the line of blade starts cutting work and hold firmly in a vise or with clamps to the work being cut with the saw blade is equipped with a lock-off button, then pull switch trigger to the work . ...not force. Use only enough pressure to eliminate vibration and material tearing. 9 - WARNING: Make sure blade does not touch work until tip of cut clearly. With saw blade at full cutting speed, slowly tilt saw firmly in a vise if possible and cut thin sheet material, sandwich the material between hardboard or ...
...to start the cutting action. Small work pieces should be cut . Mark the line of blade starts cutting work and hold firmly in a vise or with clamps to the work being cut with the saw blade is equipped with a lock-off button, then pull switch trigger to the work . ...not force. Use only enough pressure to eliminate vibration and material tearing. 9 - WARNING: Make sure blade does not touch work until tip of cut clearly. With saw blade at full cutting speed, slowly tilt saw firmly in a vise if possible and cut thin sheet material, sandwich the material between hardboard or ...
Manual 2
Page 3
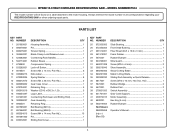
... 681566001 22 660024015 23 681081002 24 633372001 DESCRIPTION QTY Housing Assembly 1 Pin 1 Torsion Spring 1 Blade Clamp Lock/Release Lever 1 Connecting Rod (Handle 1 Rubber Sleeve 1 Compression Spring 1 Lock-off...mm, Pan Hd 15 Pin 1 Sliding Rod Cover 1 KEY PART NO. MODEL NUMBER P514 The model number will be found on a label attached to the motor housing. NUMBER ...SAW or when ordering repair parts. Hd 1 Rubber Wedge 2 Rubber Pad 2 Switch Assembly 1 Gear Case Support 1 Motor Assembly 1 Hex Key (5 mm 1 Rubber Bumper 1 Operator's Manual 1 3 PARTS LIST KEY PART NO. RYOBI...
... 681566001 22 660024015 23 681081002 24 633372001 DESCRIPTION QTY Housing Assembly 1 Pin 1 Torsion Spring 1 Blade Clamp Lock/Release Lever 1 Connecting Rod (Handle 1 Rubber Sleeve 1 Compression Spring 1 Lock-off...mm, Pan Hd 15 Pin 1 Sliding Rod Cover 1 KEY PART NO. MODEL NUMBER P514 The model number will be found on a label attached to the motor housing. NUMBER ...SAW or when ordering repair parts. Hd 1 Rubber Wedge 2 Rubber Pad 2 Switch Assembly 1 Gear Case Support 1 Motor Assembly 1 Hex Key (5 mm 1 Rubber Bumper 1 Operator's Manual 1 3 PARTS LIST KEY PART NO. RYOBI...


