
Repair Sheet
Page 3
... (M4.2 X 60 mm 2 32 019012001032 BALL BEARING (627Z 1 KEY NO. MAY BE PURCHASED LOCALLY 3 Always mention the model number in all correspondence regarding your ANGLE GRINDER or when ordering repair parts. PART NUMBER DESCRIPTION QTY 33 019012001033 FAN BUFFER 1 34 019012001034 FIELD 1 35 019012001035 MOTOR HOUSING 1 36 019012001056 BACK PLATE 1 37...-31-06 * STANDARD HARDWARE ITEM - PARTS LIST KEY NO. MODEL NUMBER P420 The model number will be found on a plate attached to the motor housing. RYOBI 18V ANGLE GRINDER -
... (M4.2 X 60 mm 2 32 019012001032 BALL BEARING (627Z 1 KEY NO. MAY BE PURCHASED LOCALLY 3 Always mention the model number in all correspondence regarding your ANGLE GRINDER or when ordering repair parts. PART NUMBER DESCRIPTION QTY 33 019012001033 FAN BUFFER 1 34 019012001034 FIELD 1 35 019012001035 MOTOR HOUSING 1 36 019012001056 BACK PLATE 1 37...-31-06 * STANDARD HARDWARE ITEM - PARTS LIST KEY NO. MODEL NUMBER P420 The model number will be found on a plate attached to the motor housing. RYOBI 18V ANGLE GRINDER -
Trilingual Manual
Page 1
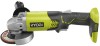
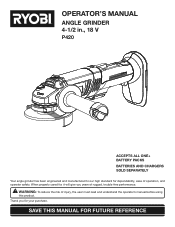
When properly cared for, it will give you for dependability, ease of operation, and operator safety. SAVE THIS MANUAL FOR FUTURE REFERENCE WARNING: To reduce the risk of rugged, trouble-free performance. Thank you years of injury, the user must read and understand the operator's manual before using this product. OPERATOR'S MANUAL ANGLE GRINDER 4-1/2 in., 18 V P420 ACCEPTS ALL ONE+ BATTERY PACKS BATTERIES AND CHARGERS SOLD SEPARATELY Your angle grinder has been engineered and manufactured to our high standard for your purchase.
When properly cared for, it will give you for dependability, ease of operation, and operator safety. SAVE THIS MANUAL FOR FUTURE REFERENCE WARNING: To reduce the risk of rugged, trouble-free performance. Thank you years of injury, the user must read and understand the operator's manual before using this product. OPERATOR'S MANUAL ANGLE GRINDER 4-1/2 in., 18 V P420 ACCEPTS ALL ONE+ BATTERY PACKS BATTERIES AND CHARGERS SOLD SEPARATELY Your angle grinder has been engineered and manufactured to our high standard for your purchase.
Trilingual Manual
Page 8
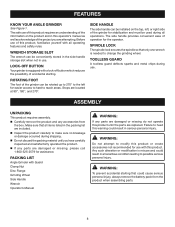
... warning could result in the packing list are damaged or missing, please call 1-800-525-2579 for the operator. PACKING LIST Angle Grinder with this product. Any such alteration or modification is misuse and could cause serious personal injury, always remove the battery pack from the... parts are included. SPINDLE LOCK The spindle lock secures the spindle so that all operating features and safety rules. LOCK-OFF BUTTON Your grinder is needed to possible serious personal injury. Make sure that only one wrench is equipped with all items listed in serious personal injury. ...
... warning could result in the packing list are damaged or missing, please call 1-800-525-2579 for the operator. PACKING LIST Angle Grinder with this product. Any such alteration or modification is misuse and could cause serious personal injury, always remove the battery pack from the... parts are included. SPINDLE LOCK The spindle lock secures the spindle so that all operating features and safety rules. LOCK-OFF BUTTON Your grinder is needed to possible serious personal injury. Make sure that only one wrench is equipped with all items listed in serious personal injury. ...
Trilingual Manual
Page 9
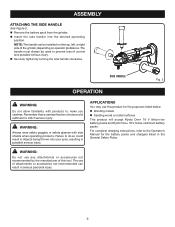
... into the desired operating position. ASSEMBLY ATTACHING THE SIDE HANDLE See Figure 2. Remove the battery pack from the grinder. Insert the side handle into your eyes, resulting in possible serious injury. SIDE HANDLE Fig. 2 OPERATION WARNING:...Ryobi One+ 18 V nickel-cadmium battery packs. The handle must always be installed on operator preference. For complete charging instructions, refer to make you careless. The use any attachments or accessories not recommended by the manufacturer of a second is sufficient to prevent loss of the grinder...
... into the desired operating position. ASSEMBLY ATTACHING THE SIDE HANDLE See Figure 2. Remove the battery pack from the grinder. Insert the side handle into your eyes, resulting in possible serious injury. SIDE HANDLE Fig. 2 OPERATION WARNING:...Ryobi One+ 18 V nickel-cadmium battery packs. The handle must always be installed on operator preference. For complete charging instructions, refer to make you careless. The use any attachments or accessories not recommended by the manufacturer of a second is sufficient to prevent loss of the grinder...

Trilingual Manual
Page 10
... resets each side of battery pack. Remove the battery pack from the tool. To turn it OFF, release the switch trigger. To turn the grinder ON, depress and hold lock-off button in order to pull the switch trigger. Therefore, the switch should always be locked when not in operating...
... resets each side of battery pack. Remove the battery pack from the tool. To turn it OFF, release the switch trigger. To turn the grinder ON, depress and hold lock-off button in order to pull the switch trigger. Therefore, the switch should always be locked when not in operating...

Trilingual Manual
Page 11
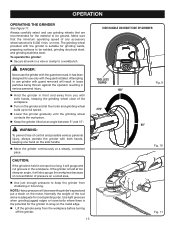
... pack from the spindle. Do not overtighten. 11 DANGER: Never attach a type 1 straight or cut-off and being thrown from the grinder. WRENCH CLAMP NUT GRINDING WHEEL DISC FLANGE TOOLLESS GUARD TO LOOSEN TO TIGHTEN INSTALLING GRINDING WHEEL See Figure 5. Tap lightly around the wheel using...sound. WARNING: Thoroughly inspect a new grinding wheel before engaging spindle lock. Loosen and remove the clamp nut from the grinder. It is only designed for any other purpose is shipped with the disc flange and clamp nut attached to crack when tightening the clamp...
... pack from the spindle. Do not overtighten. 11 DANGER: Never attach a type 1 straight or cut-off and being thrown from the grinder. WRENCH CLAMP NUT GRINDING WHEEL DISC FLANGE TOOLLESS GUARD TO LOOSEN TO TIGHTEN INSTALLING GRINDING WHEEL See Figure 5. Tap lightly around the wheel using...sound. WARNING: Thoroughly inspect a new grinding wheel before engaging spindle lock. Loosen and remove the clamp nut from the grinder. It is only designed for any other purpose is shipped with the disc flange and clamp nut attached to crack when tightening the clamp...
Trilingual Manual
Page 12
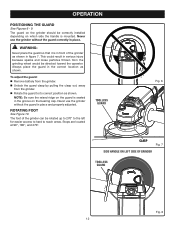
... 7. Stops are located at 90°, 180°, and 270°. WARNING: Never place the guard so that it is mounted. The guard on the grinder should be rotated up to 270° to the left for easier access to hard to its correct position as shown. Always place the guard... in the correct location as shown in front of the grinder can be correctly installed depending on the bearing cap. ROTATING FOOT See Figure 10. OPERATION POSITIONING THE GUARD See Figures 6 - 9. Never use the...
... 7. Stops are located at 90°, 180°, and 270°. WARNING: Never place the guard so that it is mounted. The guard on the grinder should be rotated up to 270° to the left for easier access to hard to its correct position as shown. Always place the guard... in the correct location as shown in front of the grinder can be correctly installed depending on the bearing cap. ROTATING FOOT See Figure 10. OPERATION POSITIONING THE GUARD See Figures 6 - 9. Never use the...
Trilingual Manual
Page 13
... keeping the grinding wheel clear of control and possible serious personal injury, always operate the grinder with both hands, keeping one spot too long, it will decrease the grinder's speed and put a strain on the grinder and let the motor and grinding wheel build up to a workbench. Use light pressure ...or loose bolts where there is held in one hand on the metal edge. Lift the grinder away from the workpiece before turning off the grinder. 13 SIDE HANDLE ON RIGHT SIDE OF GRINDER TOOLLESS GUARD 180° 270° Fig. 9 90° Fig. 10 Fig. 11 The grinding...
... keeping the grinding wheel clear of control and possible serious personal injury, always operate the grinder with both hands, keeping one spot too long, it will decrease the grinder's speed and put a strain on the grinder and let the motor and grinding wheel build up to a workbench. Use light pressure ...or loose bolts where there is held in one hand on the metal edge. Lift the grinder away from the workpiece before turning off the grinder. 13 SIDE HANDLE ON RIGHT SIDE OF GRINDER TOOLLESS GUARD 180° 270° Fig. 9 90° Fig. 10 Fig. 11 The grinding...

Trilingual Manual
Page 15
To replace the guard: Remove the battery pack from the grinder. Depress spindle lock and rotate clamp nut until spindle locks. Loosen and remove clamp nut from spindle using the wrench provided. &#...61550; Remove grinding wheel and disc flange. Unlock the guard clasp by pulling the clasp out, away from the grinder. Open clasp fully and twist guard to release it from the locking groove in the tool housing. Remove guard. ...
To replace the guard: Remove the battery pack from the grinder. Depress spindle lock and rotate clamp nut until spindle locks. Loosen and remove clamp nut from spindle using the wrench provided. &#...61550; Remove grinding wheel and disc flange. Unlock the guard clasp by pulling the clasp out, away from the grinder. Open clasp fully and twist guard to release it from the locking groove in the tool housing. Remove guard. ...
Trilingual Manual
Page 16
...to these chemicals: work in a well ventilated area, and work . Please record the model number and serial number in ., 18 VOLT ANGLE GRINDER P420 WARNING: Some dust created by power sanding, sawing, grinding, drilling, and other reproductive harm. AND SERIAL NO. OPERATOR'S MANUAL 4-1/2 in... TO ORDER REPAIR PARTS When ordering repair parts, always give the following information: • MODEL NUMBER P420 • SERIAL NUMBER Ryobi® is a registered trademark of Ryobi Limited used under license. 983000-984 (WW) 6-24-11 (REV:06) ONE WORLD TECHNOLOGIES, INC. 1428 Pearman Dairy Road,...
...to these chemicals: work in a well ventilated area, and work . Please record the model number and serial number in ., 18 VOLT ANGLE GRINDER P420 WARNING: Some dust created by power sanding, sawing, grinding, drilling, and other reproductive harm. AND SERIAL NO. OPERATOR'S MANUAL 4-1/2 in... TO ORDER REPAIR PARTS When ordering repair parts, always give the following information: • MODEL NUMBER P420 • SERIAL NUMBER Ryobi® is a registered trademark of Ryobi Limited used under license. 983000-984 (WW) 6-24-11 (REV:06) ONE WORLD TECHNOLOGIES, INC. 1428 Pearman Dairy Road,...


