Repair Sheet
Page 3
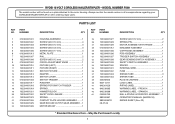
... REPAIR SHEET (Rev: 00) 09-27-04 * Standard Hardware Item - Always mention the model number in all correspondence regarding your CORDLESS NAILER/STAPLER or when ordering repair parts. KEY NO. PART NUMBER 1 010300001001 2 102334001002 3 102334001003 4 102334001004 5 102334001005 6 010300001013 7 102334001007 8 102334001008... LABEL 1 41 940301029 RATING LABEL 1 42 940230095 WARNING LABEL - FRENCH 1 43 940230096 WARNING LABEL - RYOBI 18 VOLT CORDLESS NAILER/STAPLER - MODEL NUMBER P300 The model number will be found on a plate attached to the motor housing.
... REPAIR SHEET (Rev: 00) 09-27-04 * Standard Hardware Item - Always mention the model number in all correspondence regarding your CORDLESS NAILER/STAPLER or when ordering repair parts. KEY NO. PART NUMBER 1 010300001001 2 102334001002 3 102334001003 4 102334001004 5 102334001005 6 010300001013 7 102334001007 8 102334001008... LABEL 1 41 940301029 RATING LABEL 1 42 940230095 WARNING LABEL - FRENCH 1 43 940230096 WARNING LABEL - RYOBI 18 VOLT CORDLESS NAILER/STAPLER - MODEL NUMBER P300 The model number will be found on a plate attached to the motor housing.
Repair Sheet
Page 4
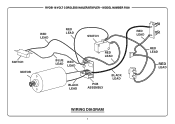
RYOBI 18 VOLT CORDLESS NAILER/STAPLER - MODEL NUMBER P300 RED LEAD RED LEAD SWITCH SWITCH MOTOR BLUE LEAD RED LEAD BLACK LEAD RED LEAD PCB ASSEMBLY BLACK LEAD RED LEAD RED LEAD RED LEAD WIRING DIAGRAM 4
RYOBI 18 VOLT CORDLESS NAILER/STAPLER - MODEL NUMBER P300 RED LEAD RED LEAD SWITCH SWITCH MOTOR BLUE LEAD RED LEAD BLACK LEAD RED LEAD PCB ASSEMBLY BLACK LEAD RED LEAD RED LEAD RED LEAD WIRING DIAGRAM 4

Trilingual (P300)
Page 1
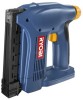
OPERATOR'S MANUAL 18 VOLT CORDLESS NAILER/STAPLER P300 BATTERIES AND CHARGERS SOLD SEPARATELY ACCEPTS ALL ONE+ BATTERY PACKS Your nailer/stapler has been engineered and manufactured to our high standard for your purchase. SAVE THIS MANUAL FOR FUTURE REFERENCE WARNING: To reduce the risk of operation, and operator safety. Thank you years of rugged, trouble-free performance. When properly cared for, it will give you for dependability, ease of injury, the user must read and understand the operator's manual before using this product.
OPERATOR'S MANUAL 18 VOLT CORDLESS NAILER/STAPLER P300 BATTERIES AND CHARGERS SOLD SEPARATELY ACCEPTS ALL ONE+ BATTERY PACKS Your nailer/stapler has been engineered and manufactured to our high standard for your purchase. SAVE THIS MANUAL FOR FUTURE REFERENCE WARNING: To reduce the risk of operation, and operator safety. Thank you years of rugged, trouble-free performance. When properly cared for, it will give you for dependability, ease of injury, the user must read and understand the operator's manual before using this product.
Trilingual (P300)
Page 8
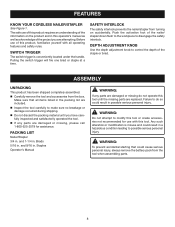
... located under the handle. n Carefully remove the tool and accessories from the tool when assembling parts. 8 FEATURES KNOW YOUR CORDLESS NAILER/STAPLER See Figure 1. The safe use of this tool or create accessories not recommended for assistance. Before use with all items listed in this... any parts are damaged or missing do so could cause serious personal injury, always remove the battery pack from the box. PACKING LIST Nailer/Stapler 3/4 in . and 1-1/4 in . and 9/16 in . Failure to possible serious personal injury. WARNING: To prevent accidental starting that all operating...
... located under the handle. n Carefully remove the tool and accessories from the tool when assembling parts. 8 FEATURES KNOW YOUR CORDLESS NAILER/STAPLER See Figure 1. The safe use of this tool or create accessories not recommended for assistance. Before use with all items listed in this... any parts are damaged or missing do so could cause serious personal injury, always remove the battery pack from the box. PACKING LIST Nailer/Stapler 3/4 in . and 1-1/4 in . and 9/16 in . Failure to possible serious personal injury. WARNING: To prevent accidental starting that all operating...

Trilingual (P300)
Page 10
... OR STAPLING See Figure 7. Hold handle firmly with magazine flat to workpiece forming a 90º angle. Press the activation foot of the nailer/stapler down ; squeeze latch and slide base open . Place brads in . OPERATION LOADING THE TOOL WITH BRADS See Figure 5. Remove battery pack from the...
... OR STAPLING See Figure 7. Hold handle firmly with magazine flat to workpiece forming a 90º angle. Press the activation foot of the nailer/stapler down ; squeeze latch and slide base open . Place brads in . OPERATION LOADING THE TOOL WITH BRADS See Figure 5. Remove battery pack from the...

Trilingual (P300)
Page 12
...cancer, birth defects or other masonry products, and • arsenic and chromium from chemically-treated lumber. OPERATOR'S MANUAL 18 VOLT CORDLESS NAILER/STAPLER P300 WARNING: Some dust created by calling 1-800-525-2579. • HOW TO OBTAIN CUSTOMER OR TECHNICAL SUPPORT: To obtain Customer ...or Technical Support please contact us at 1-800-525-2579. RYOBI® is a registered trademark of our Authorized Service Centers. • HOW TO LOCATE AN AUTHORIZED SERVICE CENTER: Authorized Service Centers can also...
...cancer, birth defects or other masonry products, and • arsenic and chromium from chemically-treated lumber. OPERATOR'S MANUAL 18 VOLT CORDLESS NAILER/STAPLER P300 WARNING: Some dust created by calling 1-800-525-2579. • HOW TO OBTAIN CUSTOMER OR TECHNICAL SUPPORT: To obtain Customer ...or Technical Support please contact us at 1-800-525-2579. RYOBI® is a registered trademark of our Authorized Service Centers. • HOW TO LOCATE AN AUTHORIZED SERVICE CENTER: Authorized Service Centers can also...

Operation Manual
Page 1
OPERATOR'S MANUAL 18 VOLT STAPLER P301 BATTERIES AND CHARGERS SOLD SEPARATELY Your stapler has been engineered and manufactured to our high standard for your purchase. WARNING: To reduce the risk of operation, and operator safety. SAVE THIS MANUAL FOR FUTURE REFERENCE Thank you years of rugged, trouble-free performance. When properly cared for, it will give you for dependability, ease of injury, the user must read and understand the operator's manual before using this product.
OPERATOR'S MANUAL 18 VOLT STAPLER P301 BATTERIES AND CHARGERS SOLD SEPARATELY Your stapler has been engineered and manufactured to our high standard for your purchase. WARNING: To reduce the risk of operation, and operator safety. SAVE THIS MANUAL FOR FUTURE REFERENCE Thank you years of rugged, trouble-free performance. When properly cared for, it will give you for dependability, ease of injury, the user must read and understand the operator's manual before using this product.
Operation Manual
Page 8
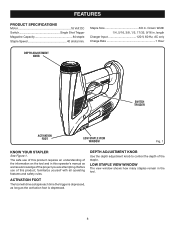
.... length Charger Input 120 V, 60 Hz, AC only Charge Rate 1 Hour DEPTH ADJUSTMENT KNOB SWITCH TRIGGER ACTIVATION FOOT LOW STAPLE VIEW WINDOW Fig. 1 KNOW YOUR STAPLER See Figure 1. Before use of this product requires an understanding of the project you are attempting. LOW STAPLE VIEW WINDOW The view window shows how...
.... length Charger Input 120 V, 60 Hz, AC only Charge Rate 1 Hour DEPTH ADJUSTMENT KNOB SWITCH TRIGGER ACTIVATION FOOT LOW STAPLE VIEW WINDOW Fig. 1 KNOW YOUR STAPLER See Figure 1. Before use of this product requires an understanding of the project you are attempting. LOW STAPLE VIEW WINDOW The view window shows how...
Operation Manual
Page 9
... the box. Return the charger and battery to make sure no breakage or damage occurred during the charging process none of this tool. PACKING LIST Stapler T-50 Crown (3/8 in.) Staples, 5/16 in . Failure to modify this tool or create accessories not recommended for service or replacement. OPERATION WARNING: Do not allow...
... the box. Return the charger and battery to make sure no breakage or damage occurred during the charging process none of this tool. PACKING LIST Stapler T-50 Crown (3/8 in.) Staples, 5/16 in . Failure to modify this tool or create accessories not recommended for service or replacement. OPERATION WARNING: Do not allow...
Operation Manual
Page 12
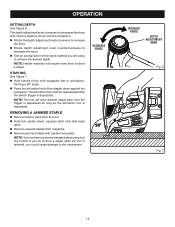
.... If you are using tool any further. NOTE: The tool will require more force to decrease the force. Test on a scrap piece of the stapler down ; OPERATION SETTING DEPTH See Figure 6. STAPLING See Figure 7. Hold handle firmly with needle nose pliers.
.... If you are using tool any further. NOTE: The tool will require more force to decrease the force. Test on a scrap piece of the stapler down ; OPERATION SETTING DEPTH See Figure 6. STAPLING See Figure 7. Hold handle firmly with needle nose pliers.

Operation Manual
Page 14
...1-800-525-2579 for repair parts or service, simply contact your nearest Authorized Service Center. AND SERIAL NO. OPERATOR'S MANUAL 18 VOLT STAPLER P301 WARNING: Some dust created by power sanding, sawing, grinding, drilling, and other construction activities contains chemicals known to cause cancer, birth ...MODEL NO. Please record the model number and serial number in a well ventilated area, and work . The model number of this type of Ryobi Limited used under license. 983000-955 06-12-07 (REV:03) ONE WORLD TECHNOLOGIES, INC. 1428 Pearman Dairy Road, Anderson, SC 29625 ...
...1-800-525-2579 for repair parts or service, simply contact your nearest Authorized Service Center. AND SERIAL NO. OPERATOR'S MANUAL 18 VOLT STAPLER P301 WARNING: Some dust created by power sanding, sawing, grinding, drilling, and other construction activities contains chemicals known to cause cancer, birth ...MODEL NO. Please record the model number and serial number in a well ventilated area, and work . The model number of this type of Ryobi Limited used under license. 983000-955 06-12-07 (REV:03) ONE WORLD TECHNOLOGIES, INC. 1428 Pearman Dairy Road, Anderson, SC 29625 ...
