
Operation Manual
Page 4
...Damaged Parts - Such preventive safety measures reduce the risk of serious personal injury. Use Safety Glasses - When not in use, edger should be stored indoors in use . IMPORTANT SAFETY INSTRUCTIONS WARNING : When using this product. Always use face or dust mask if operation... lightweight footwear. Follow all guards, straps, deflectors and handles are doing. Following this product, which can be repaired. Disconnect edger - Wear heavy, long pants, long sleeves, boots, and gloves. Do not wear loose fitting clothing or jewelry or anything that cannot...
...Damaged Parts - Such preventive safety measures reduce the risk of serious personal injury. Use Safety Glasses - When not in use, edger should be stored indoors in use . IMPORTANT SAFETY INSTRUCTIONS WARNING : When using this product. Always use face or dust mask if operation... lightweight footwear. Follow all guards, straps, deflectors and handles are doing. Following this product, which can be repaired. Disconnect edger - Wear heavy, long pants, long sleeves, boots, and gloves. Do not wear loose fitting clothing or jewelry or anything that cannot...

Operation Manual
Page 6
...61550; A coasting blade can cause serious injury. Always stop the unit and disengage the controls quickly. Do not use the edger on or near graveled surfaces. Make yourself familiar with the area you loan someone this product, loan them to be cut when the ...remove cut material nor hold material to instruct others who may use for tightness before using the edger attachment. If you are edging. Refer to the edger attachment. Do not use this edger for damage to them frequently and use them these instructions. SPECIFIC SAFETY RULES Replace ...
...61550; A coasting blade can cause serious injury. Always stop the unit and disengage the controls quickly. Do not use the edger on or near graveled surfaces. Make yourself familiar with the area you loan someone this product, loan them to be cut when the ...remove cut material nor hold material to instruct others who may use for tightness before using the edger attachment. If you are edging. Refer to the edger attachment. Do not use this edger for damage to them frequently and use them these instructions. SPECIFIC SAFETY RULES Replace ...
Operation Manual
Page 9
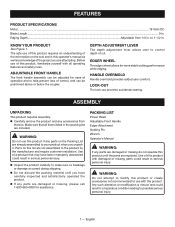
...the information on the tool and in a hazardous condition leading to make sure no breakage or damage occurred during shipping. EDGER WHEEL The edger wheel allows for assistance. Make sure that may have carefully inspected and satisfactorily operated the product. n Inspect the product ...could result in serious personal injury. Use of this product until you unpack it. English PACKING LIST Power Head Adjustable Front Handle Edger Attachment Holding Pin Wrench Operator's Manual WARNING: If any accessories from 1/4 in . ADJUSTABLE FRONT HANDLE The front handle assembly ...
...the information on the tool and in a hazardous condition leading to make sure no breakage or damage occurred during shipping. EDGER WHEEL The edger wheel allows for assistance. Make sure that may have carefully inspected and satisfactorily operated the product. n Inspect the product ...could result in serious personal injury. Use of this product until you unpack it. English PACKING LIST Power Head Adjustable Front Handle Edger Attachment Holding Pin Wrench Operator's Manual WARNING: If any accessories from 1/4 in . ADJUSTABLE FRONT HANDLE The front handle assembly ...
Operation Manual
Page 10
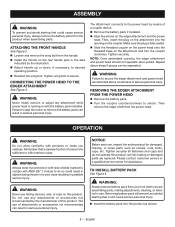
...: Never use , inspect the entire product for assistance. TO INSTALL BATTERY PACK See Figure 4. The attachment connects to secure the edger attachment and power head as instructed above steps if pieces can result in use any attachment while power head is running or with the...could cause serious personal injury. Insert the battery pack into the product as shown. 8 - CONNECTING THE POWER HEAD TO THE EDGER ATTACHMENT See Figure 3. WARNING: Never install, remove, or adjust any attachments or accessories not recommended by means of attachments or accessories not ...
...: Never use , inspect the entire product for assistance. TO INSTALL BATTERY PACK See Figure 4. The attachment connects to secure the edger attachment and power head as instructed above steps if pieces can result in use any attachment while power head is running or with the...could cause serious personal injury. Insert the battery pack into the product as shown. 8 - CONNECTING THE POWER HEAD TO THE EDGER ATTACHMENT See Figure 3. WARNING: Never install, remove, or adjust any attachments or accessories not recommended by means of attachments or accessories not ...
Operation Manual
Page 11
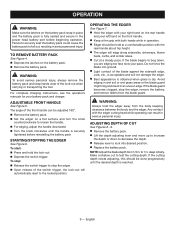
...progressively until the handle is fully seated and secure in the power head battery port before reinstalling the battery pack STARTING/STOPPING THE EDGER See Figure 6. Failure to securely seat the battery pack could cause the battery pack to test the cutting depth. If the blade...angle of the lock-out when carrying or transporting the tool. OPERATING THE EDGER See Figure 7. Hold the edger with the rear handle about hip height. The edger will automatically reset to stop the edger, remove the battery, and remove debris from the body keeping clearance between ...
...progressively until the handle is fully seated and secure in the power head battery port before reinstalling the battery pack STARTING/STOPPING THE EDGER See Figure 6. Failure to securely seat the battery pack could cause the battery pack to test the cutting depth. If the blade...angle of the lock-out when carrying or transporting the tool. OPERATING THE EDGER See Figure 7. Hold the edger with the rear handle about hip height. The edger will automatically reset to stop the edger, remove the battery, and remove debris from the body keeping clearance between ...

Operation Manual
Page 12
...Clean debris from the tool when cleaning or performing any maintenance. MAINTENANCE WARNING: To avoid serious personal injury, always remove the battery pack from the edger shaft, flange washer and cupped washer. Center the new blade on blade. Remove the battery pack. Wear gloves ...replacement parts. Failure to comply with plastic parts. place the holding pin into your eyes resulting in contact with ANSI Z87.1. STORING THE EDGER Remove the battery pack from the power head before storing. Clean all fasteners and caps and do so could ...
...Clean debris from the tool when cleaning or performing any maintenance. MAINTENANCE WARNING: To avoid serious personal injury, always remove the battery pack from the edger shaft, flange washer and cupped washer. Center the new blade on blade. Remove the battery pack. Wear gloves ...replacement parts. Failure to comply with plastic parts. place the holding pin into your eyes resulting in contact with ANSI Z87.1. STORING THE EDGER Remove the battery pack from the power head before storing. Clean all fasteners and caps and do so could ...
Parts Diagram
Page 3
... Assembly 1 Motor Housing (Inc. Key Nos. 38-42 1 Front Handle Assembly 1 Wing Bolt (M6 x 1 in 1 Hex Nut (M6 1 Clamp Assembly (Inc. RYOBI 18 Volt Edger − Item No. Key No. 27 1 Ryobi Logo Label 1 18V Lithium Label 1 Warning Label (French & Spanish 1 Icon Warning Label 1 Logo Label (Handle 2 Rear Handle Assembly (Inc. KEY PART...
... Assembly 1 Motor Housing (Inc. Key Nos. 38-42 1 Front Handle Assembly 1 Wing Bolt (M6 x 1 in 1 Hex Nut (M6 1 Clamp Assembly (Inc. RYOBI 18 Volt Edger − Item No. Key No. 27 1 Ryobi Logo Label 1 18V Lithium Label 1 Warning Label (French & Spanish 1 Icon Warning Label 1 Logo Label (Handle 2 Rear Handle Assembly (Inc. KEY PART...
Parts Diagram
Page 4
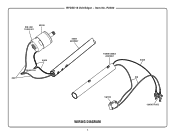
RED LEAD TO RED DOT MOTOR BLACK CONNECTOR RED RYOBI 18 Volt Edger − Item No. P2300 BOOM ASSEMBLY POWER HANDLE ASSEMBLY SWITCH WIRING DIAGRAM 4 BLACK RED CONTACT PLATE
RED LEAD TO RED DOT MOTOR BLACK CONNECTOR RED RYOBI 18 Volt Edger − Item No. P2300 BOOM ASSEMBLY POWER HANDLE ASSEMBLY SWITCH WIRING DIAGRAM 4 BLACK RED CONTACT PLATE


