
English Manual
Page 4
... to a stable platform. Following this rule will reduce the risk of shock, fire, or serious injury. Make sure your extension cord is in the Ryobi jig saw is Class II with a "live " and shock the operator. Use clamps or another practical way to secure and support the workpiece to carry the...
... to a stable platform. Following this rule will reduce the risk of shock, fire, or serious injury. Make sure your extension cord is in the Ryobi jig saw is Class II with a "live " and shock the operator. Use clamps or another practical way to secure and support the workpiece to carry the...

English Manual
Page 9
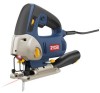
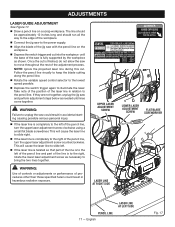
... parts are damaged or missing do not operate this product requires an understanding of varying thickness and density. PACKING LIST Jig Saw Multi-Purpose Saw Blade Anti-Splintering Insert Vacuum Attachment Tool Bag Operator's Manual WARNING: If any accessories from the box. Failure to possible...satisfactorily operated the product. n Do not discard the packing material until assembly is especially helpful when cutting plywood. FEATURES KNOW YOUR JIG SAW See Figure 1. Used in conjunction with all items listed in 15˚ increments. WARNING: Do not connect to power supply ...
... parts are damaged or missing do not operate this product requires an understanding of varying thickness and density. PACKING LIST Jig Saw Multi-Purpose Saw Blade Anti-Splintering Insert Vacuum Attachment Tool Bag Operator's Manual WARNING: If any accessories from the box. Failure to possible...satisfactorily operated the product. n Do not discard the packing material until assembly is especially helpful when cutting plywood. FEATURES KNOW YOUR JIG SAW See Figure 1. Used in conjunction with all items listed in 15˚ increments. WARNING: Do not connect to power supply ...
English Manual
Page 10
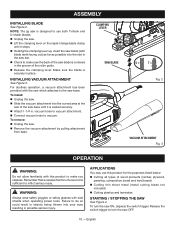
...board and hard board) Cutting thin sheet metal (metal cutting blade not included) Cutting plastics and laminates STARTING / STOPPING THE SAW See Figure 4. Failure to do so could result in objects being thrown into your eyes resulting in place. To remove: Unplug the...trigger to make sure the back of the roller guide. Release the clamping lever. NOTE: The jig saw is seated securely. Attach 1-1/4 in the groove of the saw . Lift the clamping lever on the rapid-change blade clamp until it is designed to use this...
...board and hard board) Cutting thin sheet metal (metal cutting blade not included) Cutting plastics and laminates STARTING / STOPPING THE SAW See Figure 4. Failure to do so could result in objects being thrown into your eyes resulting in place. To remove: Unplug the...trigger to make sure the back of the roller guide. Release the clamping lever. NOTE: The jig saw is seated securely. Attach 1-1/4 in the groove of the saw . Lift the clamping lever on the rapid-change blade clamp until it is designed to use this...
English Manual
Page 12
...and at low speeds under constant usage may overheat the motor and break saw blades. 12 - Running at full speed. WARNING: Do not insert saw base on the workpiece and align cutting edge of the blade with the jig saw at a given speed, depress the switch trigger, push in contact .... Applying too much forward pressure to the Adjustments section. Avoid running the saw and continue to heed this occurs, cool your saw by running it forward on the work surface. TO DECREASE ORBITAL SETTING The jig saw is required, for the cutting operation. The laser guide will ...
...and at low speeds under constant usage may overheat the motor and break saw blades. 12 - Running at full speed. WARNING: Do not insert saw base on the workpiece and align cutting edge of the blade with the jig saw at a given speed, depress the switch trigger, push in contact .... Applying too much forward pressure to the Adjustments section. Avoid running the saw and continue to heed this occurs, cool your saw by running it forward on the work surface. TO DECREASE ORBITAL SETTING The jig saw is required, for the cutting operation. The laser guide will ...
English Manual
Page 14
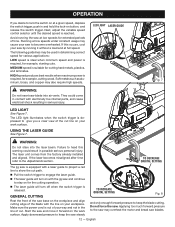
...; Mark the line of cut clearly on the workpiece. Set the orbit adjustment to "0". Set the cutting angle at 0°. Tilt the saw forward so that it rests on the front edge of cut . NOTE: Use only a 7-teeth-per-inch blade for this type of the base and... not come in broken blades or damage to complete the opening. 14 - Scroll cuts can be made with the jig saw forward to the material being cut . Using high speed, start the saw and slowly lower the blade into the workpiece until the blade cuts through the wood. Continue lowering the...
...; Mark the line of cut clearly on the workpiece. Set the orbit adjustment to "0". Set the cutting angle at 0°. Tilt the saw forward so that it rests on the front edge of cut . NOTE: Use only a 7-teeth-per-inch blade for this type of the base and... not come in broken blades or damage to complete the opening. 14 - Scroll cuts can be made with the jig saw forward to the material being cut . Using high speed, start the saw and slowly lower the blade into the workpiece until the blade cuts through the wood. Continue lowering the...

English Manual
Page 15
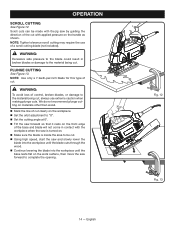
... excessively, use a coarser-tooth blade or lower speed. By doing this, the material will be cut on top of cut smoothly. NOTE: The jig saw has to be cut . To cut thin sheet materials, "sandwich" the material between hardboard or plywood and clamp the layers to cut metals and ...cutting metals to prevent potential fire hazard. OPERATION METAL CUTTING See Figure 14. When cutting conduit, pipe, or angle iron, clamp work firmly and saw using a metal blade (not included). Set the orbital adjustment knob to the vise. If the blade chatters or vibrates excessively, use of metal chips...
... excessively, use a coarser-tooth blade or lower speed. By doing this, the material will be cut on top of cut smoothly. NOTE: The jig saw has to be cut . To cut thin sheet materials, "sandwich" the material between hardboard or plywood and clamp the layers to cut metals and ...cutting metals to prevent potential fire hazard. OPERATION METAL CUTTING See Figure 14. When cutting conduit, pipe, or angle iron, clamp work firmly and saw using a metal blade (not included). Set the orbital adjustment knob to the vise. If the blade chatters or vibrates excessively, use of metal chips...
English Manual
Page 17
... line 17 - The line should be approximately 12 inches long and should run all the way to the edge of the workpiece. Connect the jig saw is to bring the two lines together. NOTE: Ignore the projected laser line during this cut is finished, do not allow the... saw to move throughout the rest of the jig saw could result in accidental starting causing possible serious personal injury. If the laser line is completely to the left of the...
... line 17 - The line should be approximately 12 inches long and should run all the way to the edge of the workpiece. Connect the jig saw is to bring the two lines together. NOTE: Ignore the projected laser line during this cut is finished, do not allow the... saw to move throughout the rest of the jig saw could result in accidental starting causing possible serious personal injury. If the laser line is completely to the left of the...
Repair Sheet
Page 2
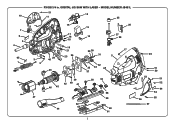
ORBITAL JIG SAW WITH LASER - RYOBI 3/4 in. MODEL NUMBER JS451L 51 10 11 12 25 89 7 6 5 4 65 3 1 2 15 17 16 18 20 22 24 48 19 21 23 36 46 26 13 27 14 28 29 30 17 31 5 32 35 33 48 37 46 45 39 42 40 41 38 34 43 58 47 59 62 63 44 60 61 2 49 53 56 57 16 50 51 52 64 54 55
ORBITAL JIG SAW WITH LASER - RYOBI 3/4 in. MODEL NUMBER JS451L 51 10 11 12 25 89 7 6 5 4 65 3 1 2 15 17 16 18 20 22 24 48 19 21 23 36 46 26 13 27 14 28 29 30 17 31 5 32 35 33 48 37 46 45 39 42 40 41 38 34 43 58 47 59 62 63 44 60 61 2 49 53 56 57 16 50 51 52 64 54 55
Repair Sheet
Page 3
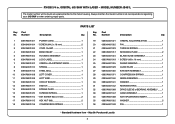
Number Description Key Qty. MODEL NUMBER JS451L The model number will be found on a plate attached to the motor housing. PARTS LIST Key Part No. May Be Purchased Locally 3 No. 1 039076001001 POWER ... DRIVE SLEEVE w/BEARING ASSEMBLY........ 1 039064001047 GEAR ASSEMBLY 1 039076001038 ANTI-SPLINTERING INSERT 1 039076001022 WASHER 2 039064001049 PIN 1 * Standard Hardware Item - Always mention the model number in . ORBITAL JIG SAW WITH LASER - RYOBI 3/4 in all correspondence regarding your JIG SAW or when ordering repair parts.
Number Description Key Qty. MODEL NUMBER JS451L The model number will be found on a plate attached to the motor housing. PARTS LIST Key Part No. May Be Purchased Locally 3 No. 1 039076001001 POWER ... DRIVE SLEEVE w/BEARING ASSEMBLY........ 1 039064001047 GEAR ASSEMBLY 1 039076001038 ANTI-SPLINTERING INSERT 1 039076001022 WASHER 2 039064001049 PIN 1 * Standard Hardware Item - Always mention the model number in . ORBITAL JIG SAW WITH LASER - RYOBI 3/4 in all correspondence regarding your JIG SAW or when ordering repair parts.
Repair Sheet
Page 4
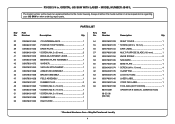
RYOBI 3/4 in all correspondence regarding your JIG SAW or when ordering repair parts. Number Description Key Qty. PARTS LIST Key Part No. ORBITAL JIG SAW WITH LASER - May Be Purchased Locally 4 Always mention the model number in . No. 37 039064001050 COUNTERBALANCE 1 54 38 039064001051 POSITIVE STOP SCREW 1 ... 039076001046 CORD TAG LABEL 1 039076001059 TOOL BAG (NOT SHOWN 1 987000391 OPERATOR'S MANUAL (039076001048) 08-22-08 (REV:00) * Standard Hardware Item - MODEL NUMBER JS451L The model number will be found on a plate attached to the motor housing.
RYOBI 3/4 in all correspondence regarding your JIG SAW or when ordering repair parts. Number Description Key Qty. PARTS LIST Key Part No. ORBITAL JIG SAW WITH LASER - May Be Purchased Locally 4 Always mention the model number in . No. 37 039064001050 COUNTERBALANCE 1 54 38 039064001051 POSITIVE STOP SCREW 1 ... 039076001046 CORD TAG LABEL 1 039076001059 TOOL BAG (NOT SHOWN 1 987000391 OPERATOR'S MANUAL (039076001048) 08-22-08 (REV:00) * Standard Hardware Item - MODEL NUMBER JS451L The model number will be found on a plate attached to the motor housing.
Repair Sheet
Page 5
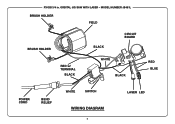
RYOBI 3/4 in. MODEL NUMBER JS451L BRUSH HOLDER FIELD BRUSH HOLDER RED w/ TERMINAL BLACK BLACK WHITE CIRCUIT BOARD BLACK RED BLUE POWER CORD BEND RELIEF WHITE SWITCH WIRING DIAGRAM 5 LASER LED ORBITAL JIG SAW WITH LASER -
RYOBI 3/4 in. MODEL NUMBER JS451L BRUSH HOLDER FIELD BRUSH HOLDER RED w/ TERMINAL BLACK BLACK WHITE CIRCUIT BOARD BLACK RED BLUE POWER CORD BEND RELIEF WHITE SWITCH WIRING DIAGRAM 5 LASER LED ORBITAL JIG SAW WITH LASER -


