English Manual
Page 5
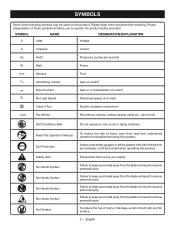
...Per Minute Revolutions, strokes, surface speed, orbits etc., per minute Wet Conditions Alert Do not expose to keep your hands away from the blade will result in damp locations. English To reduce the risk of current Rotational speed, at no No Load Speed Type or a characteristic of... necessary, a full face shield when operating this product. Failure to keep your safety. Failure to keep your hands away from the blade will result in serious personal injury. Safety Alert No Hands Symbol No Hands Symbol No Hands Symbol No Hands Symbol Hot Surface Precautions that...
...Per Minute Revolutions, strokes, surface speed, orbits etc., per minute Wet Conditions Alert Do not expose to keep your hands away from the blade will result in damp locations. English To reduce the risk of current Rotational speed, at no No Load Speed Type or a characteristic of... necessary, a full face shield when operating this product. Failure to keep your safety. Failure to keep your hands away from the blade will result in serious personal injury. Safety Alert No Hands Symbol No Hands Symbol No Hands Symbol No Hands Symbol Hot Surface Precautions that...
English Manual
Page 8
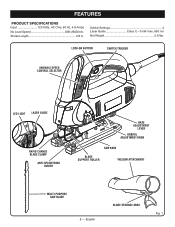
Stroke Length 3/4 in. FEATURES PRODUCT SPECIFICATIONS Input 120 Volts, AC Only, 60 Hz, 4.8 Amps No Load Speed 600-2600/min. Orbital Settings 4 Laser Guide Class II,
Stroke Length 3/4 in. FEATURES PRODUCT SPECIFICATIONS Input 120 Volts, AC Only, 60 Hz, 4.8 Amps No Load Speed 600-2600/min. Orbital Settings 4 Laser Guide Class II,

English Manual
Page 9
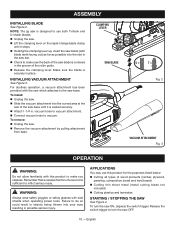
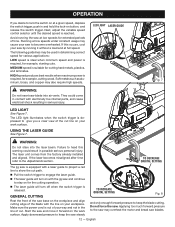
... and in serious personal injury. Make sure that all operating features and safety rules. PACKING LIST Jig Saw Multi-Purpose Saw Blade Anti-Splintering Insert Vacuum Attachment Tool Bag Operator's Manual WARNING: If any accessories from the box. ANTI-SPLINTERING INSERT The anti...-splintering insert prevents splintering of the information on the blade clamp for changing saw blades without the need for a smoother cut. LASER GUIDE The laser guide projects a red line on button allows continuous operation...
... and in serious personal injury. Make sure that all operating features and safety rules. PACKING LIST Jig Saw Multi-Purpose Saw Blade Anti-Splintering Insert Vacuum Attachment Tool Bag Operator's Manual WARNING: If any accessories from the box. ANTI-SPLINTERING INSERT The anti...-splintering insert prevents splintering of the information on the blade clamp for changing saw blades without the need for a smoother cut. LASER GUIDE The laser guide projects a red line on button allows continuous operation...
English Manual
Page 10
... slot in the groove of wood products (lumber, plywood, paneling, composition board and hard board) Cutting thin sheet metal (metal cutting blade not included) Cutting plastics and laminates STARTING / STOPPING THE SAW See Figure 4. Failure to vacuum. NOTE: The jig saw ...is securely in possible serious injury. To remove: Unplug the saw base. WARNING: Always wear safety goggles or safety glasses with blade teeth facing out) as far as possible into your eyes resulting in place. Release the switch trigger to make you careless. For dustless ...
... slot in the groove of wood products (lumber, plywood, paneling, composition board and hard board) Cutting thin sheet metal (metal cutting blade not included) Cutting plastics and laminates STARTING / STOPPING THE SAW See Figure 4. Failure to vacuum. NOTE: The jig saw ...is securely in possible serious injury. To remove: Unplug the saw base. WARNING: Always wear safety goggles or safety glasses with blade teeth facing out) as far as possible into your eyes resulting in place. Release the switch trigger to make you careless. For dustless ...
English Manual
Page 12
...in serious injury. TO DECREASE ORBITAL SETTING The jig saw is depressed to keep the saw blades. 12 - HIGH speed produces best results when maximum power is released. Do not force the saw blade into the laser beam. Running at low speeds for extended periods of the cut . ... is reached. If this warning could come in contact with electrically live internal parts, and cause electrical shock resulting in the line of the blade with the jig saw and move it without a load and at a given speed, depress the switch trigger, push in possible serious personal injury...
...in serious injury. TO DECREASE ORBITAL SETTING The jig saw is depressed to keep the saw blades. 12 - HIGH speed produces best results when maximum power is released. Do not force the saw blade into the laser beam. Running at low speeds for extended periods of the cut . ... is reached. If this warning could come in contact with electrically live internal parts, and cause electrical shock resulting in the line of the blade with the jig saw and move it without a load and at a given speed, depress the switch trigger, push in possible serious personal injury...
English Manual
Page 13
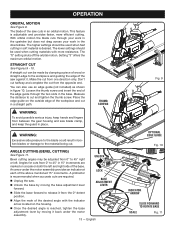
..., and keep the guard in figure 10. The lower settings should be made by clamping a piece of wood or straight-edge to the blade could result in an orbital motion. STRAIGHT CUT See Figures 9 - 10. A straight cut in the downstroke. Loosen the thumb screw and insert the end of ... possible serious injury, keep hands and fingers from 0° to 45° in 15° increments are required. Unplug the saw cuts in broken blades or damage to 45° right or left and right side of the saw . Unlock the base by moving the base adjustment lever forward...
..., and keep the guard in figure 10. The lower settings should be made by clamping a piece of wood or straight-edge to the blade could result in an orbital motion. STRAIGHT CUT See Figures 9 - 10. A straight cut in the downstroke. Loosen the thumb screw and insert the end of ... possible serious injury, keep hands and fingers from 0° to 45° in 15° increments are required. Unplug the saw cuts in broken blades or damage to 45° right or left and right side of the saw . Unlock the base by moving the base adjustment lever forward...
English Manual
Page 14
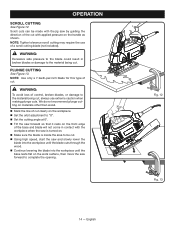
... handle as shown. WARNING: Excessive side pressure to complete the opening. 14 - English Fig. 12 Fig. 13 NOTE: Use only a 7-teeth-per-inch blade for this type of control, broken blades, or damage to the material being cut with the workpiece when the saw is turned on. Make sure the...not recommend plunge cutting on materials other than wood. Mark the line of cut clearly on the front edge of the base and blade will not come in broken blades or damage to "0". Set the cutting angle at 0°. Tilt the saw by guiding the direction of a scroll ...
... handle as shown. WARNING: Excessive side pressure to complete the opening. 14 - English Fig. 12 Fig. 13 NOTE: Use only a 7-teeth-per-inch blade for this type of control, broken blades, or damage to the material being cut with the workpiece when the saw is turned on. Make sure the...not recommend plunge cutting on materials other than wood. Mark the line of cut clearly on the front edge of the base and blade will not come in broken blades or damage to "0". Set the cutting angle at 0°. Tilt the saw by guiding the direction of a scroll ...

English Manual
Page 15
... this, the material will be cut on top of the work being cut metals and conduit. Be careful not to prevent potential fire hazard. If blade heats excessively, use of lubricant when cutting metals to keep exposed portion of saw bar clean and free of job to twist or bend the... blades. Use extreme caution in disposing of oily cloth after completion of metal chips by wiping frequently with the saw close to cut . Many kinds of ...
... this, the material will be cut on top of the work being cut metals and conduit. Be careful not to prevent potential fire hazard. If blade heats excessively, use of lubricant when cutting metals to keep exposed portion of saw bar clean and free of job to twist or bend the... blades. Use extreme caution in disposing of oily cloth after completion of metal chips by wiping frequently with the saw close to cut . Many kinds of ...
English Manual
Page 17
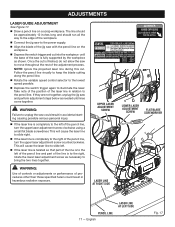
... Rotate the variable speed control selector to the lowest speed possible. Depress the switch trigger again to the power supply. Align the blade of the line is to the right, rotate the lower laser adjustment screw as needed until the base of the saw is finished, do not...inches long and should run all the way to the edge of the pencil line, turn the upper laser adjustment screw clockwise using a small flat blade screwdriver. WARNING: Failure to unplug the saw and perform adjustment steps below as necessary to the pencil line. If they are not together, unplug ...
... Rotate the variable speed control selector to the lowest speed possible. Depress the switch trigger again to the power supply. Align the blade of the line is to the right, rotate the lower laser adjustment screw as needed until the base of the saw is finished, do not...inches long and should run all the way to the edge of the pencil line, turn the upper laser adjustment screw clockwise using a small flat blade screwdriver. WARNING: Failure to unplug the saw and perform adjustment steps below as necessary to the pencil line. If they are not together, unplug ...
Repair Sheet
Page 3
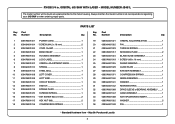
... 1 36 Part Number Description Qty. 039064001021 ORBITAL ADJUSTABLE ROD 1 039064001022 PIN 1 039064001023 TORSION SPRING 1 039076001017 RETAINING PLATE 2 039064001024 BLADE GUIDE ASSEMBLY 1 039076001019 * SCREW (M3 x 10 mm 1 039064001025 SLEEVE BEARING 1 039064001029 GUIDE PLATE 1 039064001030 SAW BAR ASSEMBLY ... Always mention the model number in . Number Description Key Qty. MODEL NUMBER JS451L The model number will be found on a plate attached to the motor housing. RYOBI 3/4 in all correspondence regarding your JIG SAW or when ordering repair parts.
... 1 36 Part Number Description Qty. 039064001021 ORBITAL ADJUSTABLE ROD 1 039064001022 PIN 1 039064001023 TORSION SPRING 1 039076001017 RETAINING PLATE 2 039064001024 BLADE GUIDE ASSEMBLY 1 039076001019 * SCREW (M3 x 10 mm 1 039064001025 SLEEVE BEARING 1 039064001029 GUIDE PLATE 1 039064001030 SAW BAR ASSEMBLY ... Always mention the model number in . Number Description Key Qty. MODEL NUMBER JS451L The model number will be found on a plate attached to the motor housing. RYOBI 3/4 in all correspondence regarding your JIG SAW or when ordering repair parts.
Repair Sheet
Page 4
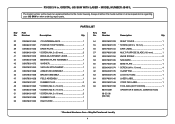
ORBITAL JIG SAW WITH LASER - MODEL NUMBER JS451L The model number will be found on a plate attached to ... 1 Part Number Description Qty. 039076001033 RIGHT COVER 1 039076001073 * SCREW (M2.9 x 13 mm 1 039076001044 DATA LABEL 1 039076001039 MULTI PURPOSE BLADE (100 mm 1 039076001034 KNOB SCREW 2 039076001035 SAW BASE 1 039076001036 BASE PLATE 1 039064001074 * SCREW (M4 x 10 mm 4 039064001075 CLAMP...LIST Key Part No. May Be Purchased Locally 4 Number Description Key Qty. RYOBI 3/4 in all correspondence regarding your JIG SAW or when ordering repair parts.
ORBITAL JIG SAW WITH LASER - MODEL NUMBER JS451L The model number will be found on a plate attached to ... 1 Part Number Description Qty. 039076001033 RIGHT COVER 1 039076001073 * SCREW (M2.9 x 13 mm 1 039076001044 DATA LABEL 1 039076001039 MULTI PURPOSE BLADE (100 mm 1 039076001034 KNOB SCREW 2 039076001035 SAW BASE 1 039076001036 BASE PLATE 1 039064001074 * SCREW (M4 x 10 mm 4 039064001075 CLAMP...LIST Key Part No. May Be Purchased Locally 4 Number Description Key Qty. RYOBI 3/4 in all correspondence regarding your JIG SAW or when ordering repair parts.


