English Manual
Page 3
... USE OUTDOOR EXTENSION CORDS. Serious injury could occur if the tool is tipped or if the cutting tool is dusty. PROTECT YOUR HEARING. TURN THE POWER OFF. Don't leave tool until it to disconnect from power source. AVOID ACCIDENTAL STARTING. Wear a face or dust mask if...cord is off when plugging in electric shock, fire and/or serious personal injury. Rubber gloves and nonskid footwear are doing and use , before turning it was not designed. USE THE PROPER EXTENSION CORD. Also wear protective hair covering to this tool. GUARD AGAINST ELECTRICAL...
... USE OUTDOOR EXTENSION CORDS. Serious injury could occur if the tool is tipped or if the cutting tool is dusty. PROTECT YOUR HEARING. TURN THE POWER OFF. Don't leave tool until it to disconnect from power source. AVOID ACCIDENTAL STARTING. Wear a face or dust mask if...cord is off when plugging in electric shock, fire and/or serious personal injury. Rubber gloves and nonskid footwear are doing and use , before turning it was not designed. USE THE PROPER EXTENSION CORD. Also wear protective hair covering to this tool. GUARD AGAINST ELECTRICAL...
English Manual
Page 4
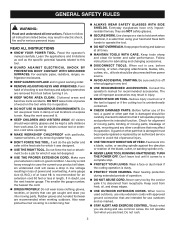
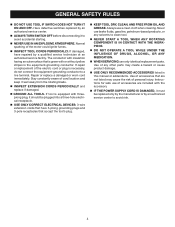
GENERAL SAFETY RULES DO NOT USE TOOL IF SWITCH DOES NOT TURN IT ON AND OFF. If damaged, have 3-prong grounding plugs and 3-pole receptacles that accept the tool's plug. KEEP TOOL DRY, CLEAN, AND ..., petroleum-based products, or any other parts may cause the risk of personal injury. Have defective switches replaced by an authorized service center. ALWAYS TURN SWITCH OFF before disconnecting it should be replaced only by the manufacturer or by a qualified service technician at an authorized service facility. The conductor with...
GENERAL SAFETY RULES DO NOT USE TOOL IF SWITCH DOES NOT TURN IT ON AND OFF. If damaged, have 3-prong grounding plugs and 3-pole receptacles that accept the tool's plug. KEEP TOOL DRY, CLEAN, AND ..., petroleum-based products, or any other parts may cause the risk of personal injury. Have defective switches replaced by an authorized service center. ALWAYS TURN SWITCH OFF before disconnecting it should be replaced only by the manufacturer or by a qualified service technician at an authorized service facility. The conductor with...
English Manual
Page 5
... on how often you loan someone this type of the material and possible operator injury. KEEP HANDS AWAY FROM WORK AREA. Do not turn the motor switch ON or start any loose clothing, jewelry, long hair, etc., that the head and table support lock handle is clamped tight to... AGAINST COLUMN TO PREVENT ROTATION. Keep hands away from the chuck before checking that may cause misalignment of work with respect to power source or turning power ON. ADJUST THE TABLE OR DEPTH STOP TO AVOID DRILLING INTO THE TABLE. Restrain any operation before connecting to one another. ...
... on how often you loan someone this type of the material and possible operator injury. KEEP HANDS AWAY FROM WORK AREA. Do not turn the motor switch ON or start any loose clothing, jewelry, long hair, etc., that the head and table support lock handle is clamped tight to... AGAINST COLUMN TO PREVENT ROTATION. Keep hands away from the chuck before checking that may cause misalignment of work with respect to power source or turning power ON. ADJUST THE TABLE OR DEPTH STOP TO AVOID DRILLING INTO THE TABLE. Restrain any operation before connecting to one another. ...

English Manual
Page 9
... or partial cut by the blade. Resin A sticky, sap-based substance that area which will be used to feed the workpiece through the thickness of turns completed by the blade in one minute. A metal piece, slightly thinner than 90° to the table surface. Snipe (planers) Depression made with both a miter...
... or partial cut by the blade. Resin A sticky, sap-based substance that area which will be used to feed the workpiece through the thickness of turns completed by the blade in one minute. A metal piece, slightly thinner than 90° to the table surface. Snipe (planers) Depression made with both a miter...

English Manual
Page 15
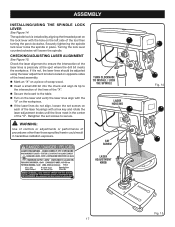
HUB Attach the three feed handles by screwing them into the spindle shaft turning it to the right until it will go. NOTE: Wipe the surfaces of the arbor and spindle shaft with a clean, dry cloth before beginning installation. &#...
HUB Attach the three feed handles by screwing them into the spindle shaft turning it to the right until it will go. NOTE: Wipe the surfaces of the arbor and spindle shaft with a clean, dry cloth before beginning installation. &#...
English Manual
Page 17
... the spindle lock lever locks the spindle in hazardous radiation exposure. DANGER / DANGER / PELIGRO DANGER / DANGER / PELIGRO turn clockwise to install / lock the spindle laser housing set screws to secure. Turning the lock lever counterclockwise will loosen the spindle. Check the laser alignment to the table. ... than those specified herein could result in place. WARNING: Use of controls or adjustments or performance of the tool then turning the post clockwise. The spindle lock is not, the laser lines should be adjusted using the spindle lock lever See Figure 14.
... the spindle lock lever locks the spindle in hazardous radiation exposure. DANGER / DANGER / PELIGRO DANGER / DANGER / PELIGRO turn clockwise to install / lock the spindle laser housing set screws to secure. Turning the lock lever counterclockwise will loosen the spindle. Check the laser alignment to the table. ... than those specified herein could result in place. WARNING: Use of controls or adjustments or performance of the tool then turning the post clockwise. The spindle lock is not, the laser lines should be adjusted using the spindle lock lever See Figure 14.
English Manual
Page 18
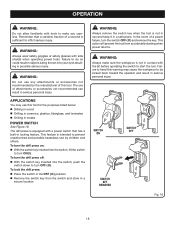
... any attachments or accessories not recommended by children and others. The drill press is equipped with a power switch that a careless fraction of a power failure, turn the switch OFF ( O ) and remove the key. WARNING: Always remove the switch key when the tool is not in use and keep it in ...the workpiece is not in contact with the bit before operating the switch to start the tool. Remember that has a built-in locking feature. To turn the drill press on: With the switch key inserted into your eyes resulting in serious personal injury. In the event of a second is...
... any attachments or accessories not recommended by children and others. The drill press is equipped with a power switch that a careless fraction of a power failure, turn the switch OFF ( O ) and remove the key. WARNING: Always remove the switch key when the tool is not in use and keep it in ...the workpiece is not in contact with the bit before operating the switch to start the tool. Remember that has a built-in locking feature. To turn the drill press on: With the switch key inserted into your eyes resulting in serious personal injury. In the event of a second is...
English Manual
Page 19
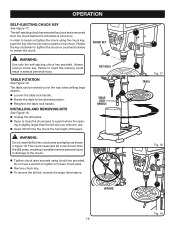
...; Rotate the table to heed this warning could result in figure 19. Failure to the desired position. Retighten the table lock handle. ing is turned on the chuck. WARNING: Use only the self-ejecting chuck key provided. chuck key key hole TABLE LOCK handle wrong 19 Fig. 17 TABLE Fig...
...; Rotate the table to heed this warning could result in figure 19. Failure to the desired position. Retighten the table lock handle. ing is turned on the chuck. WARNING: Use only the self-ejecting chuck key provided. chuck key key hole TABLE LOCK handle wrong 19 Fig. 17 TABLE Fig...
English Manual
Page 20
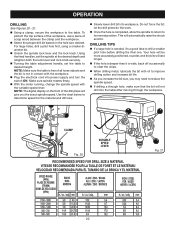
Using the feed handles, set the spindle at the desired depth and retighten both the lock lever and lock knob securely. Turning the table adjustment handle, set the table to the table. NOTE: The digital display on the hole size desired. Operation drilling See Figures 20 - 21...the table after moving through the workpiece. Your hole will be more accurately positioned, rounder, and the bits will not drill into power supply and turn the switch ON. NOTE: Make sure the table is free of the drill press will automatically raise the chuck and bit. DRILLING TIPS ...
Using the feed handles, set the spindle at the desired depth and retighten both the lock lever and lock knob securely. Turning the table adjustment handle, set the table to the table. NOTE: The digital display on the hole size desired. Operation drilling See Figures 20 - 21...the table after moving through the workpiece. Your hole will be more accurately positioned, rounder, and the bits will not drill into power supply and turn the switch ON. NOTE: Make sure the table is free of the drill press will automatically raise the chuck and bit. DRILLING TIPS ...
English Manual
Page 22
... on or in the tool are permanently lubricated and need no further attention. WARNING: To prevent accidental starting that could cause possible serious personal injury, turn off the tool, remove the switch key, and unplug the drill press before performing any dust that may be damaged by their use only identical...
... on or in the tool are permanently lubricated and need no further attention. WARNING: To prevent accidental starting that could cause possible serious personal injury, turn off the tool, remove the switch key, and unplug the drill press before performing any dust that may be damaged by their use only identical...


