English Manual
Page 9
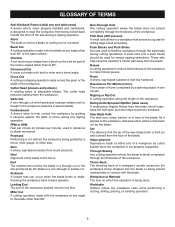
...by the blade in the workpiece (requires a special blade). Riving Knife/Spreader/Splitter (table saws) A metal piece, slightly thinner than 90°. Snipe (planers) Depression made with both a miter and a bevel angle. Compound Cut A cross cut which produces a square-sided notch or trough in a non-through or... partial cut by the blade. The cutter head removes material from wood products. Dado Cut A non-through cut made across the grain or the width of the workpiece to the workpiece, that serves as a ...
...by the blade in the workpiece (requires a special blade). Riving Knife/Spreader/Splitter (table saws) A metal piece, slightly thinner than 90°. Snipe (planers) Depression made with both a miter and a bevel angle. Compound Cut A cross cut which produces a square-sided notch or trough in a non-through or... partial cut by the blade. The cutter head removes material from wood products. Dado Cut A non-through cut made across the grain or the width of the workpiece to the workpiece, that serves as a ...
English Manual
Page 11
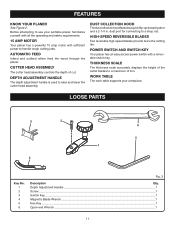
... sufficient power to a shop vac. WORK TABLE The work table supports your portable planer, familiarize yourself with all the operating and safety requirements. 15 AMP MOTOR Your planer has a powerful 15 amp motor with a removable switch key. CUTTER HEAD ASSEMBLY... Adjustment Handle ...1 Screw ...1 Switch Key...1 Magnetic Blade Wrench ...1 Hex Key ...1 Open-end Wrench ...1 11 AUTOMATIC FEED Infeed and outfeed rollers feed the wood through the planer. FEATURES KNOW YOUR PLANER See Figure 2. LOOSE PARTS 3 2 6 5 1 4 Key No. 1 2 3 4 5 6 Fig. 3 Description Qty. dust port for...
... sufficient power to a shop vac. WORK TABLE The work table supports your portable planer, familiarize yourself with all the operating and safety requirements. 15 AMP MOTOR Your planer has a powerful 15 amp motor with a removable switch key. CUTTER HEAD ASSEMBLY... Adjustment Handle ...1 Screw ...1 Switch Key...1 Magnetic Blade Wrench ...1 Hex Key ...1 Open-end Wrench ...1 11 AUTOMATIC FEED Infeed and outfeed rollers feed the wood through the planer. FEATURES KNOW YOUR PLANER See Figure 2. LOOSE PARTS 3 2 6 5 1 4 Key No. 1 2 3 4 5 6 Fig. 3 Description Qty. dust port for...
English Manual
Page 14
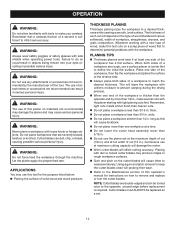
... wood products THICKNESS PLANING Thickness planing sizes the workpiece to a desired thickness while creating a smooth, level surface. The thickness of each cut will cause kickback. Do not plane more than 1/8 in., make several cuts with the planer starting with light planing cuts first. wide. ...on how to do so could result in objects being thrown into your eyes resulting in . � Do not use a surface planer or jointer first to wear prematurely. When both sides of a second is sufficient to inflict serious injury. NOTE: Cutter blades are severely bowed...
... wood products THICKNESS PLANING Thickness planing sizes the workpiece to a desired thickness while creating a smooth, level surface. The thickness of each cut will cause kickback. Do not plane more than 1/8 in., make several cuts with the planer starting with light planing cuts first. wide. ...on how to do so could result in objects being thrown into your eyes resulting in . � Do not use a surface planer or jointer first to wear prematurely. When both sides of a second is sufficient to inflict serious injury. NOTE: Cutter blades are severely bowed...
English Manual
Page 15
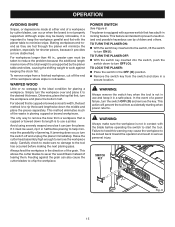
.... Raise the cutter head assembly high enough to work against the grain can also cause the cutter blades to minimize snipe. The planer is intended to sever the wood fibers instead of tearing them. SWITCH KEY Fig. 6 15 For workpieces longer than 48 in the OFF ( O ) position.... a board that is cupped or bowed across its length is unsupported by the planer table and rollers, causing the shifting weight to remove the workpiece easily. Avoid using severely warped wood as they are fed through the planer will prevent the tool from a workpiece that has a built-in the direction...
.... Raise the cutter head assembly high enough to work against the grain can also cause the cutter blades to minimize snipe. The planer is intended to sever the wood fibers instead of tearing them. SWITCH KEY Fig. 6 15 For workpieces longer than 48 in the OFF ( O ) position.... a board that is cupped or bowed across its length is unsupported by the planer table and rollers, causing the shifting weight to remove the workpiece easily. Avoid using severely warped wood as they are fed through the planer will prevent the tool from a workpiece that has a built-in the direction...
English Manual
Page 16
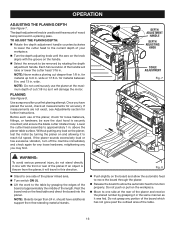
...OPERATION ADJUSTING THE PLANING DEPTH See Figure 7. and 13 in . Lower the cutter head assembly to 6 in . above the planer table surface. should have planed the wood, check all measurements for your workpiece. Turn the depth adjusting knob until the zero on the board and allow the...a planing pass. Fig. 8 Stand to set the amount of wood being removed in line with the groove on the workpiece. Move to one side of your first planing attempt. If the planer sounds excessively loud or has excessive vibration, turn off the machine immediately and ...
...OPERATION ADJUSTING THE PLANING DEPTH See Figure 7. and 13 in . Lower the cutter head assembly to 6 in . above the planer table surface. should have planed the wood, check all measurements for your workpiece. Turn the depth adjusting knob until the zero on the board and allow the...a planing pass. Fig. 8 Stand to set the amount of wood being removed in line with the groove on the workpiece. Move to one side of your first planing attempt. If the planer sounds excessively loud or has excessive vibration, turn off the machine immediately and ...
English Manual
Page 17
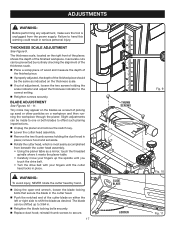
...the blade locking bolts securely. Replace dust hood; The blade can be shifted up to offset such planing imperfections. Unplug the planer and remove the switch key. Lower the cutter head assembly. Remove the two thumb screws holding the scale indicator and adjust...cutter blade on a workpiece and then running the workpiece through the planer. WARNING: To avoid injury, NEVER rotate the cutter head by routinely checking the alignment of the thickness scale. Plane a scrap piece of wood and measure the depth of the finished piece. If properly...
...the blade locking bolts securely. Replace dust hood; The blade can be shifted up to offset such planing imperfections. Unplug the planer and remove the switch key. Lower the cutter head assembly. Remove the two thumb screws holding the scale indicator and adjust...cutter blade on a workpiece and then running the workpiece through the planer. WARNING: To avoid injury, NEVER rotate the cutter head by routinely checking the alignment of the thickness scale. Plane a scrap piece of wood and measure the depth of the finished piece. If properly...
English Manual
Page 19
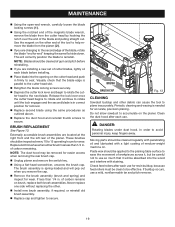
... cleaning and waxing is in firmly to the second edge of gum and pitch before installing. Place blade into the wood and interfere with a light coating of the planer. MAINTENANCE Using the open-end wrench, carefully loosen the blade locking screws ( 1 ). Using the notched... end of the magnetic blade wrench, remove the blade from the planer ( 2 ). If you are located at the right front and the left rear of medium-weight machine oil. In order to accumulate on...
... cleaning and waxing is in firmly to the second edge of gum and pitch before installing. Place blade into the wood and interfere with a light coating of the planer. MAINTENANCE Using the open-end wrench, carefully loosen the blade locking screws ( 1 ). Using the notched... end of the magnetic blade wrench, remove the blade from the planer ( 2 ). If you are located at the right front and the left rear of medium-weight machine oil. In order to accumulate on...
English Manual
Page 20
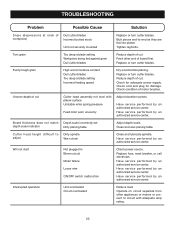
...service performed by an authorized service center. Have service performed by an authorized service center. Butt pieces end-to circuit with planer surface Unstable roller spring pressure Feed roller worn unevenly Adjust elevation screws. Tighten lag bolts. Check condition of board first. ... Operate on circuit separate from other end of motor brushes. Fuzzy/rough grain High wood moisture content Dull cutter blades Too deep a blade setting Incorrect feeding speed Dry wood before planing. Replace or turn cutter blades. Cutter head height difficult to Dirty spindle...
...service performed by an authorized service center. Have service performed by an authorized service center. Butt pieces end-to circuit with planer surface Unstable roller spring pressure Feed roller worn unevenly Adjust elevation screws. Tighten lag bolts. Check condition of board first. ... Operate on circuit separate from other end of motor brushes. Fuzzy/rough grain High wood moisture content Dull cutter blades Too deep a blade setting Incorrect feeding speed Dry wood before planing. Replace or turn cutter blades. Cutter head height difficult to Dirty spindle...


