English Manual
Page 3
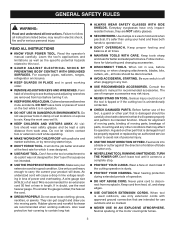
... and adjusting wrenches are intended for a purpose not intended. USE THE PROPER EXTENSION CORD. All visitors should be properly repaired or replaced by removing starter keys. DON'T FORCE TOOL. Use only a cord heavy enough to disconnect from receptacle. Check for lubricating and changing...if the cutting operation is off when plugging in any other part that are removed from tool before servicing, or when changing attachments, blades, bits, cutters, etc., all instructions listed below, may result in doubt, use of checking to contain long hair. ...
... and adjusting wrenches are intended for a purpose not intended. USE THE PROPER EXTENSION CORD. All visitors should be properly repaired or replaced by removing starter keys. DON'T FORCE TOOL. Use only a cord heavy enough to disconnect from receptacle. Check for lubricating and changing...if the cutting operation is off when plugging in any other part that are removed from tool before servicing, or when changing attachments, blades, bits, cutters, etc., all instructions listed below, may result in doubt, use of checking to contain long hair. ...
English Manual
Page 4
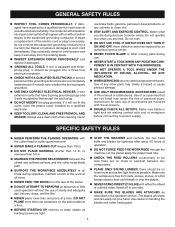
... knots and as few tight knots as described in handling the blades and cutter head guard. 4 Never use of operation. DO NOT FORCE FEED THE WORKPIECE through the machine. Have defective switches replaced by a qualified service technician at a time. maintain control of... personal injury. or narrower than one side. MAKE SURE THE BLADES ARE ATTACHED as possible. If damaged, have 3-prong grounding plugs and...
... knots and as few tight knots as described in handling the blades and cutter head guard. 4 Never use of operation. DO NOT FORCE FEED THE WORKPIECE through the machine. Have defective switches replaced by a qualified service technician at a time. maintain control of... personal injury. or narrower than one side. MAKE SURE THE BLADES ARE ATTACHED as possible. If damaged, have 3-prong grounding plugs and...
English Manual
Page 14
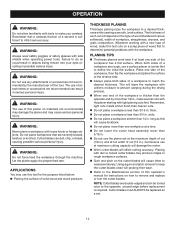
...cuts with the planer starting with the workpiece. NOTE: Cutter blades are double-edged and can be replaced as this tool for instructions on the cutter blades will cause kickback. Do not plane more than 3/4 in . Cutter blades must ALWAYS be turned once to make thin test cuts on...may damage the planer and may produce ridges or rough workpiece surfaces. Gum and pitch on how to remove and replace or turn the cutter blades. This will prolong their wear. Refer to the Maintenance section of solid wood and wood products THICKNESS PLANING Thickness planing...
...cuts with the planer starting with the workpiece. NOTE: Cutter blades are double-edged and can be replaced as this tool for instructions on the cutter blades will cause kickback. Do not plane more than 3/4 in . Cutter blades must ALWAYS be turned once to make thin test cuts on...may damage the planer and may produce ridges or rough workpiece surfaces. Gum and pitch on how to remove and replace or turn the cutter blades. This will prolong their wear. Refer to the Maintenance section of solid wood and wood products THICKNESS PLANING Thickness planing...
English Manual
Page 17
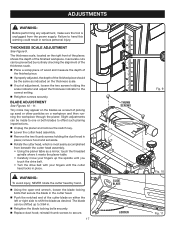
...planer, shows the depth of adjustment, loosen the two screws holding the dust hood in . Retighten the blade locking bolts securely. Replace dust hood; BLADE ADJUSTMENT See Figures 10 - 11. WARNING: To avoid injury, NEVER rotate the cutter head by routinely checking the alignment...The thickness scale, located on a workpiece and then running the workpiece through the planer. Slight adjustments can be made to one or both blades to offset such planing imperfections. Unplug the planer and remove the switch key. Lower the cutter head assembly. &#...
...planer, shows the depth of adjustment, loosen the two screws holding the dust hood in . Retighten the blade locking bolts securely. Replace dust hood; BLADE ADJUSTMENT See Figures 10 - 11. WARNING: To avoid injury, NEVER rotate the cutter head by routinely checking the alignment...The thickness scale, located on a workpiece and then running the workpiece through the planer. Slight adjustments can be made to one or both blades to offset such planing imperfections. Unplug the planer and remove the switch key. Lower the cutter head assembly. &#...
English Manual
Page 18
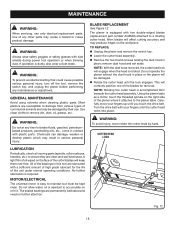
BLADE REPLACEMENT See Figure 12. This will correctly position one of the blades for the life 2. No further lubrication is dusty, also wear... the threaded spindle on the workpiece. Turn the drive belt with two double-edged blades (replacement part number AC8630) attached to a rotating cutter head. WARNING: To avoid injury, never rotate the... to damage from beneath the cutter head assembly. GENERAL MAINTENANCE Avoid using solvents when cleaning plastic parts. TO REPLACE: Unplug the planer and remove the switch key. Lower the cutter head assembly. ...
BLADE REPLACEMENT See Figure 12. This will correctly position one of the blades for the life 2. No further lubrication is dusty, also wear... the threaded spindle on the workpiece. Turn the drive belt with two double-edged blades (replacement part number AC8630) attached to a rotating cutter head. WARNING: To avoid injury, never rotate the... to damage from beneath the cutter head assembly. GENERAL MAINTENANCE Avoid using solvents when cleaning plastic parts. TO REPLACE: Unplug the planer and remove the switch key. Lower the cutter head assembly. ...
English Manual
Page 19
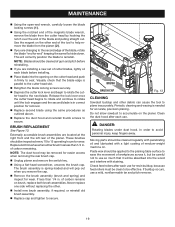
...assembly is parallel to the cutter head slot. Retighten the blade locking screws securely. Depress the cutter lock lever and begin to rotate the cutter head to the next blade. Never replace one side without replacing the other. Install new brush assembly, if required, ...or reinstall old brush assembly. Replace cap and tighten to plane inaccurately. Paste wax should be absorbed into...
...assembly is parallel to the cutter head slot. Retighten the blade locking screws securely. Depress the cutter lock lever and begin to rotate the cutter head to the next blade. Never replace one side without replacing the other. Install new brush assembly, if required, ...or reinstall old brush assembly. Replace cap and tighten to plane inaccurately. Paste wax should be absorbed into...
English Manual
Page 20
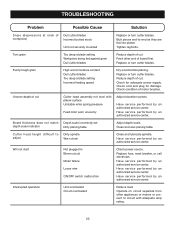
...speed Dry wood before planing. Have service performed by an authorized service center. Tighten lag bolts. Replace or turn cutter blades. Replace or turn cutter blades. Replace fuse, reset breaker, or call electrician. Have service performed by an authorized service center. Board ... Check power source. Reduce depth of board first. Check condition of Dull cutter blades workpiece) Incorrect butted stock Unit not securely mounted Replace or turn cutter blades. Have service performed by an authorized service center. Cutter head height difficult to ...
...speed Dry wood before planing. Have service performed by an authorized service center. Tighten lag bolts. Replace or turn cutter blades. Replace or turn cutter blades. Replace fuse, reset breaker, or call electrician. Have service performed by an authorized service center. Board ... Check power source. Reduce depth of board first. Check condition of Dull cutter blades workpiece) Incorrect butted stock Unit not securely mounted Replace or turn cutter blades. Have service performed by an authorized service center. Cutter head height difficult to ...


