English Manual
Page 8
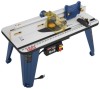
... this product, familiarize yourself with all operating features and safety rules. Molded into the fence assembly is height adjustable. INSERT PLATE The insert plate can be used with a variety of routers. x 3/4 in . It also has pre-drilled countersunk holes that...FEDEIDRECTION FEATURES PRODUCT SPECIFICATIONS Table Dimensions 16 in . VACUUM PORT FENCE ASSEMBLY INSERT PLATE ARTICULATING ROUTER CUTTER / BIT GUARD STARTING PIN 3 2 1 0 1 Inch FEATHER BOARD inch 3 2 1 0 1 Inch RESE T PUSH THROAT PLATES SWITCH ASSEMBLY RESET BUTTON MITER GAUGE Fig. 2 KNOW YOUR ROUTER TABLE See...
... this product, familiarize yourself with all operating features and safety rules. Molded into the fence assembly is height adjustable. INSERT PLATE The insert plate can be used with a variety of routers. x 3/4 in . It also has pre-drilled countersunk holes that...FEDEIDRECTION FEATURES PRODUCT SPECIFICATIONS Table Dimensions 16 in . VACUUM PORT FENCE ASSEMBLY INSERT PLATE ARTICULATING ROUTER CUTTER / BIT GUARD STARTING PIN 3 2 1 0 1 Inch FEATHER BOARD inch 3 2 1 0 1 Inch RESE T PUSH THROAT PLATES SWITCH ASSEMBLY RESET BUTTON MITER GAUGE Fig. 2 KNOW YOUR ROUTER TABLE See...
English Manual
Page 9
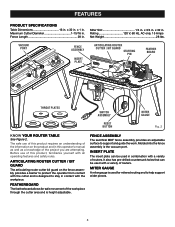
...event of a power failure, turn on the router table and plug the router table into a 120 volt grounded outlet. With the switch key inserted into either a 1-1/4 in a safe, secure location. WARNING: ALWAYS make sure the switch is not in use the starting when power returns. SWITCH ON... SWITCH OFF SWITCH KEY SWITCH IN LOCKED POSITION Fig. 3 9 Only use by children and others. THROAT PLATES Five throat plates are unable to start the tool. vacuum attachment. TO TURN YOUR ROUTER TABLE ON: Plug the router into the switch, lift the...
...event of a power failure, turn on the router table and plug the router table into a 120 volt grounded outlet. With the switch key inserted into either a 1-1/4 in a safe, secure location. WARNING: ALWAYS make sure the switch is not in use the starting when power returns. SWITCH ON... SWITCH OFF SWITCH KEY SWITCH IN LOCKED POSITION Fig. 3 9 Only use by children and others. THROAT PLATES Five throat plates are unable to start the tool. vacuum attachment. TO TURN YOUR ROUTER TABLE ON: Plug the router into the switch, lift the...

English Manual
Page 10
... not discard the packing material until you have carefully inspected and satisfactorily operated the product. If any parts are replaced. Router Insert Plate Screws (5/16-18 x 3/4 in serious personal injury. Miter Gauge 18. Fence Assembly 19. Table Leg Phillips Head Screw (16) ...the router table. Table Leg (4) 2. Table Top 5. Switch Box Nut (3) 6. Carriage Bolt Washer (2) 9. Router Insert Plate Screws (10-24 x 5/8 in .) (3) 16. Router Insert Plate Screws (10-32 x 5/8 in .) (3) 15. Fence Lock Knobs (2) 20. Featherboard Bolts (2) 22. Featherboard Lock Knobs (2) 24...
... not discard the packing material until you have carefully inspected and satisfactorily operated the product. If any parts are replaced. Router Insert Plate Screws (5/16-18 x 3/4 in serious personal injury. Miter Gauge 18. Fence Assembly 19. Table Leg Phillips Head Screw (16) ...the router table. Table Leg (4) 2. Table Top 5. Switch Box Nut (3) 6. Carriage Bolt Washer (2) 9. Router Insert Plate Screws (10-24 x 5/8 in .) (3) 16. Router Insert Plate Screws (10-32 x 5/8 in .) (3) 15. Fence Lock Knobs (2) 20. Featherboard Bolts (2) 22. Featherboard Lock Knobs (2) 24...
English Manual
Page 11
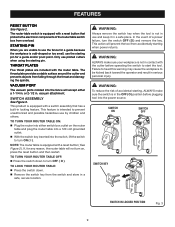
... Place the router table upside down on a flat surface. Position the under table guards, the legs, the router/insert plate assembly, the fence assembly, featherboard, throat plate, starting pin, and installing the miter gauge to attach the table legs. Place router table upside down . Line up...ASSEMBLING THE ROUTER TABLE Assembling the router table involves attaching the switch box, the under table guards in front of and behind the insert plate. The switch box will come in a bag with a wrench or socket. Use the table leg screws in the bag to the router...
... Place the router table upside down on a flat surface. Position the under table guards, the legs, the router/insert plate assembly, the fence assembly, featherboard, throat plate, starting pin, and installing the miter gauge to attach the table legs. Place router table upside down . Line up...ASSEMBLING THE ROUTER TABLE Assembling the router table involves attaching the switch box, the under table guards in front of and behind the insert plate. The switch box will come in a bag with a wrench or socket. Use the table leg screws in the bag to the router...
English Manual
Page 12
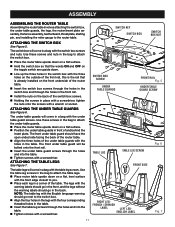
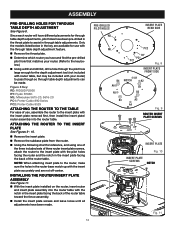
...Ryobi R163K ML: Milwaukee 5615-20, 5616-20 PC1: Porter-Cable 890 Series PC2: Porter-Cable 8529 ATTACHING THE ROUTER TO THE TABLE For ease of the router table. NOTE: When attaching insert plate to the router, make sure the holes in the router base match up with the insert plate...B1 B2 B3 A3 A4 Fig. 9 ROUTER INSERT PLATE SCREWS 3 2 1 0 1 Inch INSERT PLATE Fig. 10 INSERT PLATE SCREWS NOTCH DIFREEECDTION 3 2 1 0 1 Fig. ATTACHING THE ROUTER TO THE INSERT PLATE See Figures 9 - 10. Remove the insert plate. Remove the subbase plate from the router. Using the ...
...Ryobi R163K ML: Milwaukee 5615-20, 5616-20 PC1: Porter-Cable 890 Series PC2: Porter-Cable 8529 ATTACHING THE ROUTER TO THE TABLE For ease of the router table. NOTE: When attaching insert plate to the router, make sure the holes in the router base match up with the insert plate...B1 B2 B3 A3 A4 Fig. 9 ROUTER INSERT PLATE SCREWS 3 2 1 0 1 Inch INSERT PLATE Fig. 10 INSERT PLATE SCREWS NOTCH DIFREEECDTION 3 2 1 0 1 Fig. ATTACHING THE ROUTER TO THE INSERT PLATE See Figures 9 - 10. Remove the insert plate. Remove the subbase plate from the router. Using the ...

English Manual
Page 13
...A1, A3, A5 3 Milwaukee 5616-20 Fixed 10-24 x 5/8 in . A1, A3, A5 3 Porter Cable 7529 Plunge 10-24 x 5/8 in . A1, A3, A5 3 Ryobi R160 Fixed 5/16-18 x 3/4 in . A2, A4, A6 3 Craftsman 17510 Fixed 10-32 x 5/8 in . A2, A4, A6 3 Craftsman 17515 Plunge 5/16-18 x 3/4...x 3/4 in . A1, A3, A5 3 Porter Cable 893PK Fixed 10-24 x 5/8 in . B1, B3 2 Ryobi RE175 Plunge 5/16-18 x 3/4 in . ASSEMBLY BRAND MODEL BASE TYPE FASTENER SIZE INSERT PLATE HOLES USED NUMBER OF HOLES Bosch 1617 Fixed 10-24 x 5/8 in . A1, A3, A5 3 Bosch 1617 EVS Fixed...
...A1, A3, A5 3 Milwaukee 5616-20 Fixed 10-24 x 5/8 in . A1, A3, A5 3 Porter Cable 7529 Plunge 10-24 x 5/8 in . A1, A3, A5 3 Ryobi R160 Fixed 5/16-18 x 3/4 in . A2, A4, A6 3 Craftsman 17510 Fixed 10-32 x 5/8 in . A2, A4, A6 3 Craftsman 17515 Plunge 5/16-18 x 3/4...x 3/4 in . A1, A3, A5 3 Porter Cable 893PK Fixed 10-24 x 5/8 in . B1, B3 2 Ryobi RE175 Plunge 5/16-18 x 3/4 in . ASSEMBLY BRAND MODEL BASE TYPE FASTENER SIZE INSERT PLATE HOLES USED NUMBER OF HOLES Bosch 1617 Fixed 10-24 x 5/8 in . A1, A3, A5 3 Bosch 1617 EVS Fixed...
English Manual
Page 14
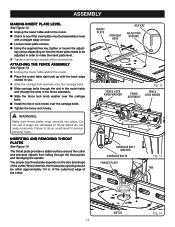
... in the fence assembly. Slide the fence lock knob washer over the carriage bolts. Tighten the fence lock knobs. INSERT PLATE STRAIGHT EDGE Loosen insert plate screws. 3 Using the supplied hex key, tighten or loosen the adjust- 2 1 0 ing screws depending on the size...; Place the router table right side up with the back edge closest to do not snap in order to make the insert plate level. Tighten insert plate screws with a straight edge or level. FENCE LOCK KNOB WASHER Install the fence lock knobs over the carriage bolts...
... in the fence assembly. Slide the fence lock knob washer over the carriage bolts. Tighten the fence lock knobs. INSERT PLATE STRAIGHT EDGE Loosen insert plate screws. 3 Using the supplied hex key, tighten or loosen the adjust- 2 1 0 ing screws depending on the size...; Place the router table right side up with the back edge closest to do not snap in order to make the insert plate level. Tighten insert plate screws with a straight edge or level. FENCE LOCK KNOB WASHER Install the fence lock knobs over the carriage bolts...

English Manual
Page 15
...See Figure 16. Additionally, only use the fence when you are using the starting pin into the hole to the right of the Inch insert plate. Inch Unplug the router table and/or the router. Place the starting pin. Place the starting pin, but ...DIFREEECDTION Inch 1 SLOT 15 Fig. 17 ASSEMBLY Unplug the router table and/or the router. Select the throat plate you wish to use. Press throat plate into insert plate slot until it as a pivot point when cutting small, odd-shaped pieces. ATTACHING THE FEATHERBOARD See Figure 15. Unplug the...
...See Figure 16. Additionally, only use the fence when you are using the starting pin into the hole to the right of the Inch insert plate. Inch Unplug the router table and/or the router. Place the starting pin. Place the starting pin, but ...DIFREEECDTION Inch 1 SLOT 15 Fig. 17 ASSEMBLY Unplug the router table and/or the router. Select the throat plate you wish to use. Press throat plate into insert plate slot until it as a pivot point when cutting small, odd-shaped pieces. ATTACHING THE FEATHERBOARD See Figure 15. Unplug the...
English Manual
Page 18
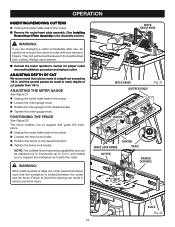
... 22. NOTE: The outfeed fence has joining capabilities and can result in serious personal injury. OPERATION INSERTING/REMOVING CUTTERS Unplug the router table and/or the router. Remove the router/insert plate assembly. (See Installing Router/Insert Plate Assembly in the Assembly section.) WARNING: 3 2 1 0 1 Inch If you are changing a cutter immediately after use...
... 22. NOTE: The outfeed fence has joining capabilities and can result in serious personal injury. OPERATION INSERTING/REMOVING CUTTERS Unplug the router table and/or the router. Remove the router/insert plate assembly. (See Installing Router/Insert Plate Assembly in the Assembly section.) WARNING: 3 2 1 0 1 Inch If you are changing a cutter immediately after use...
Repair Sheet
Page 3
...RIGHT FRONT TABLE LEG (INC. KEY NOS. 39-40 1 SWITCH KEY 1 DATA LABEL 1 * SWITCH BOX SCREW (1/4-20 x 5/8 in 4 INSERT PLATE (INC. KEY NOS. 31 AND 43 1 WARNING LABEL (ENGLISH 1 HEX KEY (1/8 in 1 * SCREW (5/16-18 x 3/4 in 3...REV:00) DESCRIPTION QTY UNDER TABLE GUARD 2 WOOD SCREW 10 REAR TABLE LEG (INC. MODEL NUMBER A25RT02 PARTS LIST DESCRIPTION QTY * CARRIAGE BOLT (1/4-20 x 1 3/4 in 6 LEFT SLIDING FENCE FACE 1...9002780014 25 9002780009 9002780010 9002780011 9002780012 9002780013 26 9002780054 27 9002780072 RYOBI ROUTER TABLE - KEY NOS. 31-32 1 LEG SCREW 16 CARRIAGE BOLT WASHER...
...RIGHT FRONT TABLE LEG (INC. KEY NOS. 39-40 1 SWITCH KEY 1 DATA LABEL 1 * SWITCH BOX SCREW (1/4-20 x 5/8 in 4 INSERT PLATE (INC. KEY NOS. 31 AND 43 1 WARNING LABEL (ENGLISH 1 HEX KEY (1/8 in 1 * SCREW (5/16-18 x 3/4 in 3...REV:00) DESCRIPTION QTY UNDER TABLE GUARD 2 WOOD SCREW 10 REAR TABLE LEG (INC. MODEL NUMBER A25RT02 PARTS LIST DESCRIPTION QTY * CARRIAGE BOLT (1/4-20 x 1 3/4 in 6 LEFT SLIDING FENCE FACE 1...9002780014 25 9002780009 9002780010 9002780011 9002780012 9002780013 26 9002780054 27 9002780072 RYOBI ROUTER TABLE - KEY NOS. 31-32 1 LEG SCREW 16 CARRIAGE BOLT WASHER...


