

User Guide
Page 4
... Selecting a video to watch on your TV 20 Playing a video 21 Chapter 5 Adjusting Settings on Your Player 23 Changing your network settings 23 Changing your display setting 25 Setting the volume for sound effects 27 Changing your screensaver settings 29 Viewing and updating your player info 31 Performing a factory reset 34 Chapter 6 Additional Information 37 Manually entering your network's name (SSID 37 Using the Reset button 39 Understanding player performance 40 Notices 41 Macrovision Statement 41 FCC Statement 41 Roku Digital Video Player...
... Selecting a video to watch on your TV 20 Playing a video 21 Chapter 5 Adjusting Settings on Your Player 23 Changing your network settings 23 Changing your display setting 25 Setting the volume for sound effects 27 Changing your screensaver settings 29 Viewing and updating your player info 31 Performing a factory reset 34 Chapter 6 Additional Information 37 Manually entering your network's name (SSID 37 Using the Reset button 39 Understanding player performance 40 Notices 41 Macrovision Statement 41 FCC Statement 41 Roku Digital Video Player...

User Guide
Page 6
Player inputs Status light IR receiver Optical audio Component video Power • • 2 • • • • Chapter 1 S-Video Reset button Composite Audio video HDMI Ethernet Overview Before you set up your player, get familiar with the inputs on the player and the buttons on the remote control.
Player inputs Status light IR receiver Optical audio Component video Power • • 2 • • • • Chapter 1 S-Video Reset button Composite Audio video HDMI Ethernet Overview Before you set up your player, get familiar with the inputs on the player and the buttons on the remote control.

User Guide
Page 9
... an HDMI cable. (S-Video cables are several ways to connect your player to your TV, your network, and a power source. Your player includes a combination cable that sell audio/video equipment.) The type of connection you set up between your player and your TV, combined with the speed of your Internet connection, determine the quality of your audio/video experience when you have available. The method you choose depends on the inputs supported...
... an HDMI cable. (S-Video cables are several ways to connect your player to your TV, your network, and a power source. Your player includes a combination cable that sell audio/video equipment.) The type of connection you set up between your player and your TV, combined with the speed of your Internet connection, determine the quality of your audio/video experience when you have available. The method you choose depends on the inputs supported...

User Guide
Page 10
... chart ranks the audio and video resolution for each setup option, assuming that is not compromised by your Internet connection: Video * Composite Audio Stereo *** ** S-Video Optical **** *** Component HDMI **** HDMI **** NOTE: Even if you must: • Connect your player to your home network" for details. • Select the HDTV option in Display Type Settings. See the next section "Video connections" for details. • Connect your player to a broadband network with sufficient bandwidth to receive HD streams (4.0 Mbps...
... chart ranks the audio and video resolution for each setup option, assuming that is not compromised by your Internet connection: Video * Composite Audio Stereo *** ** S-Video Optical **** *** Component HDMI **** HDMI **** NOTE: Even if you must: • Connect your player to your home network" for details. • Select the HDTV option in Display Type Settings. See the next section "Video connections" for details. • Connect your player to a broadband network with sufficient bandwidth to receive HD streams (4.0 Mbps...

User Guide
Page 11
... A/V cable into the S-Video jack on your viewing enjoyment. Connecting a composite video cable 1 Insert the yellow connector on the standard A/V cable into the yellow composite video jack on your player. 2 Insert the yellow connector on the other end of the S-Video cable into the yellow composite video jack on your TV or A/V receiver. • • Connecting Your Player • • 7 • • Video connections NOTE: Connecting your TV directly to the audio/video output of your Set-Top Box...
... A/V cable into the S-Video jack on your viewing enjoyment. Connecting a composite video cable 1 Insert the yellow connector on the standard A/V cable into the yellow composite video jack on your player. 2 Insert the yellow connector on the other end of the S-Video cable into the yellow composite video jack on your TV or A/V receiver. • • Connecting Your Player • • 7 • • Video connections NOTE: Connecting your TV directly to the audio/video output of your Set-Top Box...

User Guide
Page 12
... HDMI cable into the corresponding component video jacks on your TV or A/V receiver. Connecting an HDMI cable 1 Insert one end of the green, blue, and red video cable into the jacks with the matching colors on your player. 2 Insert the other end of the green, blue, and red cable into the HDMI jack on your TV or A/V receiver. NOTE: If you use an HDMI cable, you don't need separate audio and video cables, unless you're routing the sound...
... HDMI cable into the corresponding component video jacks on your TV or A/V receiver. Connecting an HDMI cable 1 Insert one end of the green, blue, and red video cable into the jacks with the matching colors on your player. 2 Insert the other end of the green, blue, and red cable into the HDMI jack on your TV or A/V receiver. NOTE: If you use an HDMI cable, you don't need separate audio and video cables, unless you're routing the sound...
User Guide
Page 13
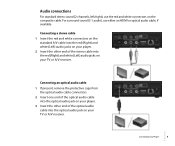
Audio connections For standard stereo sound (2-channels, left/right), use either an HDMI or optical audio cable, if available. Connecting an optical audio cable 1 If present, remove the protective caps from the optical audio cable connectors. 2 Insert one end of the optical audio cable into the optical audio jack on your TV or A/V receiver. • • Connecting Your Player • • 9 • • Connecting a stereo cable 1 Insert the red and white connectors on the standard A/V cable into the red (Right) and white (Left) audio jacks on your player. 2 Insert the...
Audio connections For standard stereo sound (2-channels, left/right), use either an HDMI or optical audio cable, if available. Connecting an optical audio cable 1 If present, remove the protective caps from the optical audio cable connectors. 2 Insert one end of the optical audio cable into the optical audio jack on your TV or A/V receiver. • • Connecting Your Player • • 9 • • Connecting a stereo cable 1 Insert the red and white connectors on the standard A/V cable into the red (Right) and white (Left) audio jacks on your player. 2 Insert the...

User Guide
Page 14
NOTE: If you use an HDMI cable, you don't need separate audio and video cables. • • 10 • • • • Chapter 2 Connecting an HDMI cable 1 Insert one end of the HDMI cable into the HDMI jack on your player. 2 Insert the other end of the HDMI cable into the HDMI jack on your TV or A/V receiver.
NOTE: If you use an HDMI cable, you don't need separate audio and video cables. • • 10 • • • • Chapter 2 Connecting an HDMI cable 1 Insert one end of the HDMI cable into the HDMI jack on your player. 2 Insert the other end of the HDMI cable into the HDMI jack on your TV or A/V receiver.

User Guide
Page 15
... equipment or electronic supplies.) 2 Connect the other end of 1.5Mbps is 4.0Mbps or faster. If you 're using a wired connection, follow these steps to connect your player to your home network using a wireless connection, skip ahead to the next section, "Connecting your player to a power source". 1 Connect one end of a CAT5 ethernet cable to your network. A minimum connection speed of the ethernet cable to your home network. If you 're using either a wireless or wired connection.
... equipment or electronic supplies.) 2 Connect the other end of 1.5Mbps is 4.0Mbps or faster. If you 're using a wired connection, follow these steps to connect your player to your home network using a wireless connection, skip ahead to the next section, "Connecting your player to a power source". 1 Connect one end of a CAT5 ethernet cable to your network. A minimum connection speed of the ethernet cable to your home network. If you 're using either a wireless or wired connection.

User Guide
Page 16
Connecting your player to a power source Like most home entertainment products, your player requires electricity to run. 1 Connect the AC adapter to the back of your player. 2 Insert the power plug into a power outlet. • • 12 • • • • Chapter 2
Connecting your player to a power source Like most home entertainment products, your player requires electricity to run. 1 Connect the AC adapter to the back of your player. 2 Insert the power plug into a power outlet. • • 12 • • • • Chapter 2

User Guide
Page 17
... player is no power button to set up your TV that displays the player. Chapter 3 Setting Up Your Player After you connect your player, as described in the previous chapter, you're ready to access your player and complete Guided Setup to turn on and off. There is properly connected, you plug your player, and press select . • • • • 13 • • You simply access your player...
... player is no power button to set up your TV that displays the player. Chapter 3 Setting Up Your Player After you connect your player, as described in the previous chapter, you're ready to access your player and complete Guided Setup to turn on and off. There is properly connected, you plug your player, and press select . • • • • 13 • • You simply access your player...
User Guide
Page 19
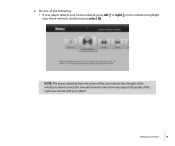
NOTE: The waves radiating from the center of the icon indicate the strength of the following: • If your player detects your home network, press left or right on the remote to highlight your player. • • Setting Up Your Player • • 15 • • 2 Do one of the wireless network connection. A weak network connection may impact the quality of the video you receive with your home network, and then press select .
NOTE: The waves radiating from the center of the icon indicate the strength of the following: • If your player detects your home network, press left or right on the remote to highlight your player. • • Setting Up Your Player • • 15 • • 2 Do one of the wireless network connection. A weak network connection may impact the quality of the video you receive with your home network, and then press select .

User Guide
Page 20
...; If your player doesn't detect your network and your network broadcasts its name (it has a hidden SSID), press left or right on the remote to highlight not shown, and then press select . Make sure your player is within range of your wireless router, highlight scan again, and then press select . • If your network's name (SSID)" for additional instructions. • •...
...; If your player doesn't detect your network and your network broadcasts its name (it has a hidden SSID), press left or right on the remote to highlight not shown, and then press select . Make sure your player is within range of your wireless router, highlight scan again, and then press select . • If your network's name (SSID)" for additional instructions. • •...

User Guide
Page 24
For information on selecting videos for a specific channel, go to www.roku.com/support. 1 Turn on your TV, and if necessary, select the input on your TV that displays the player. 2 On the player remote, press home . • • 20 • • • • Chapter 4 3 Press left or right to highlight the channel you can browse and watch , and then press select . 4 Press left or right to...
For information on selecting videos for a specific channel, go to www.roku.com/support. 1 Turn on your TV, and if necessary, select the input on your TV that displays the player. 2 On the player remote, press home . • • 20 • • • • Chapter 4 3 Press left or right to highlight the channel you can browse and watch , and then press select . 4 Press left or right to...

User Guide
Page 27
You can also view information about your player and reset your player to access your network, display, sound, and screensaver settings. Chapter 5 Adjusting Settings on Your Player Settings enable you need to update your network settings. 1 Press home to go to the Home screen. 2 Highlight settings , and then press select to display the Settings screen. • • • • 23 • • Changing your network settings If you install a new network router or change to a different Internet Service Provider (ISP), you to the original factory settings.
You can also view information about your player and reset your player to access your network, display, sound, and screensaver settings. Chapter 5 Adjusting Settings on Your Player Settings enable you need to update your network settings. 1 Press home to go to the Home screen. 2 Highlight settings , and then press select to display the Settings screen. • • • • 23 • • Changing your network settings If you install a new network router or change to a different Internet Service Provider (ISP), you to the original factory settings.

User Guide
Page 29
Changing your display setting If you purchase a new TV or connect your player to a different TV you already have, you can change your display type selection. 1 Press home to go to the Home screen. 2 Highlight settings , and then press select to display the Settings screen. • • Adjusting Settings on Your Player • • 25 • •
Changing your display setting If you purchase a new TV or connect your player to a different TV you already have, you can change your display type selection. 1 Press home to go to the Home screen. 2 Highlight settings , and then press select to display the Settings screen. • • Adjusting Settings on Your Player • • 25 • •

User Guide
Page 44
... dependent on a combination of several factors: • Your audio/video connections. In many homes, the Internet connection is shared with other devices such as a file transfer, online gaming, or other instances of streaming video), your player is required. Similarly, HDMI and component video are superior to your best available option when connecting the audio and video cables to stereo audio. Your Internet Service Provider (ISP) determines your TV may be compromised...
... dependent on a combination of several factors: • Your audio/video connections. In many homes, the Internet connection is shared with other devices such as a file transfer, online gaming, or other instances of streaming video), your player is required. Similarly, HDMI and component video are superior to your best available option when connecting the audio and video cables to stereo audio. Your Internet Service Provider (ISP) determines your TV may be compromised...
User Guide
Page 45
... • Connect the equipment to an outlet other than the receiver's • Consult a dealer or an experienced radio/TV technician for assistance Pursuant to provide reasonable protection against harmful interference in a particular installation. FCC Statement This device complies with the specifications for home and other intellectual property rights. This product has been tested and complies with Part 15 of...
... • Connect the equipment to an outlet other than the receiver's • Consult a dealer or an experienced radio/TV technician for assistance Pursuant to provide reasonable protection against harmful interference in a particular installation. FCC Statement This device complies with the specifications for home and other intellectual property rights. This product has been tested and complies with Part 15 of...

User Guide
Page 48
... 30-day period, credit will either repair the unit or replace the unit with proof of purchase and all labor charges, parts, and materials, or you may be prepared to provide additional information upon request. Important: When emailing for a Roku Product, you must ship your request: (a) model number, (b) serial number, (c) problem description, (d) software version (located in an invoice to...
... 30-day period, credit will either repair the unit or replace the unit with proof of purchase and all labor charges, parts, and materials, or you may be prepared to provide additional information upon request. Important: When emailing for a Roku Product, you must ship your request: (a) model number, (b) serial number, (c) problem description, (d) software version (located in an invoice to...

User Guide
Page 49
...), ARISING OUT OF, OR IN CONNECTION WITH THE ROKU PRODUCT OR YOUR USE THEREOF. This Agreement shall be construed as fuses and batteries). Scope of and Limitation on Warranty The warranty on the Roku Product is limited to any part of, your Roku Product. This warranty does not cover customer training or education, installation, set forth above . This warranty...
...), ARISING OUT OF, OR IN CONNECTION WITH THE ROKU PRODUCT OR YOUR USE THEREOF. This Agreement shall be construed as fuses and batteries). Scope of and Limitation on Warranty The warranty on the Roku Product is limited to any part of, your Roku Product. This warranty does not cover customer training or education, installation, set forth above . This warranty...


