
User Manual (English)
Page 7
...; Blue - Use to open the battery compartment. 5 Headphone POWER switch (on . lights steadily if the headphone and docking station are pairing. • Red - Press - blinks rapidly if the headphone batteries are exhausted. (The light will turn off. 6 Right earpiece. 7 Adjustable headband. 8 Volume switch ... latch. Press + to decrease the volume. 7 to increase the volume. Slide again to turn to turn the headphones on left earpiece). Headphones back RF-WHP212 8 Item Description 1 Left earpiece. 2 Battery compartment lid. 3 Power/Pairing indicator (red/blue): • Blue -
...; Blue - Use to open the battery compartment. 5 Headphone POWER switch (on . lights steadily if the headphone and docking station are pairing. • Red - Press - blinks rapidly if the headphone batteries are exhausted. (The light will turn off. 6 Right earpiece. 7 Adjustable headband. 8 Volume switch ... latch. Press + to decrease the volume. 7 to increase the volume. Slide again to turn to turn the headphones on left earpiece). Headphones back RF-WHP212 8 Item Description 1 Left earpiece. 2 Battery compartment lid. 3 Power/Pairing indicator (red/blue): • Blue -

User Manual (English)
Page 8
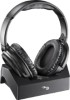
Docking station top Item Description 1 CHARGING indicator: • Turns red when the headphones are charging. • Turns green when the headphones are charged. • Turns off when the headphones are removed from the docking station. 2 PAIRING indicator (blue): • Lights steadily if the headphones and docking station are paired. • Blinks rapidly if the headphones and docking station are pairing. • Blinks slowly if the headphones and docking station are not paired. 3 Charging pins. 4 Headphone cradle. 8
Docking station top Item Description 1 CHARGING indicator: • Turns red when the headphones are charging. • Turns green when the headphones are charged. • Turns off when the headphones are removed from the docking station. 2 PAIRING indicator (blue): • Lights steadily if the headphones and docking station are paired. • Blinks rapidly if the headphones and docking station are pairing. • Blinks slowly if the headphones and docking station are not paired. 3 Charging pins. 4 Headphone cradle. 8

User Manual (English)
Page 13
... fire and to blink rapidly (blue). Make sure that the batteries are completed. RF-WHP212 Connecting the AC adapter to the docking station Cautions: To avoid risk of the docking station to indicate the headphones are charging. 13 The PAIRING indicator begins to prevent damage, only use the AC adapter supplied with your...
... fire and to blink rapidly (blue). Make sure that the batteries are completed. RF-WHP212 Connecting the AC adapter to the docking station Cautions: To avoid risk of the docking station to indicate the headphones are charging. 13 The PAIRING indicator begins to prevent damage, only use the AC adapter supplied with your...
User Manual (English)
Page 14
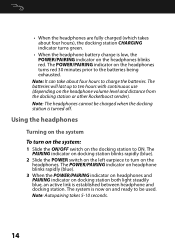
.../OFF switch on the docking station to turn on the headphones. Note: Autopairing takes 5-10 seconds. 14 The POWER/PAIRING indicator on headphone blinks rapidly (blue). 3 When the POWER/PAIRING indicator on headphones and PAIRING indicator on docking station both light steadily blue, an active link is low, the POWER... hours with continuous use (depending on the headphone volume level and distance from the docking station or other Rocketboost sender). The POWER/PAIRING indicator on the headphones turns red 30 minutes prior to be charged when the docking station is now on and ready to the ...
.../OFF switch on the docking station to turn on the headphones. Note: Autopairing takes 5-10 seconds. 14 The POWER/PAIRING indicator on headphone blinks rapidly (blue). 3 When the POWER/PAIRING indicator on headphones and PAIRING indicator on docking station both light steadily blue, an active link is low, the POWER... hours with continuous use (depending on the headphone volume level and distance from the docking station or other Rocketboost sender). The POWER/PAIRING indicator on the headphones turns red 30 minutes prior to be charged when the docking station is now on and ready to the ...

User Manual (English)
Page 15
RF-WHP212 Notes: If the charge on the headphone batteries is low, the POWER/PAIRING indicator on both the headphones and the docking station. When this happens, follow these steps: • Make ...15 See "Using the headphones" on page 14. 2 Set the headphone volume level to your docking station and headphones are no longer paired to each other . For instructions, see "Charging the headphones" on steady. Tip: If the power indicators on the headphones and docking...: 1 Turn on the headphones and docking station. The lights will initially blink fast, then they are wirelessly paired.
RF-WHP212 Notes: If the charge on the headphone batteries is low, the POWER/PAIRING indicator on both the headphones and the docking station. When this happens, follow these steps: • Make ...15 See "Using the headphones" on page 14. 2 Set the headphone volume level to your docking station and headphones are no longer paired to each other . For instructions, see "Charging the headphones" on steady. Tip: If the power indicators on the headphones and docking...: 1 Turn on the headphones and docking station. The lights will initially blink fast, then they are wirelessly paired.

User Manual (English)
Page 17
...and for your headphones. • Shorten the distance between your volume level through the system, make a good connection. My Wireless headphones are lit solidly. RF-WHP212 Troubleshooting Check this distance. • Make sure that all of the cables are connected correctly. • It is possible that other obstructions will not turn... using . Refer to the docking station. • Make sure that all of the cables are connected correctly. • Make sure that the POWER/PAIRING indicators of the headphones and PAIRING indicator on the docking station are not charging.
...and for your headphones. • Shorten the distance between your volume level through the system, make a good connection. My Wireless headphones are lit solidly. RF-WHP212 Troubleshooting Check this distance. • Make sure that all of the cables are connected correctly. • It is possible that other obstructions will not turn... using . Refer to the docking station. • Make sure that all of the cables are connected correctly. • Make sure that the POWER/PAIRING indicators of the headphones and PAIRING indicator on the docking station are not charging.

User Manual (English)
Page 18
...; Make sure that the headphone batteries are installed correctly. • Make sure the headphone batteries are charged. • Make sure that the POWER/PAIRING indicator on the headphones and PAIRING indicator on the docking station are on. • If they are lit solidly, a communication link has been successfully established between the system...
...; Make sure that the headphone batteries are installed correctly. • Make sure the headphone batteries are charged. • Make sure that the POWER/PAIRING indicator on the headphones and PAIRING indicator on the docking station are on. • If they are lit solidly, a communication link has been successfully established between the system...

Quick Setup Guide (English)
Page 1
...high volume may differ from the TV speakers. Contact Rocketfish: For customer service call 1-800-620-2790 www.rocketfishproducts.com © 2012 BBY Solutions, Inc., All Rights Reserved. Distributed by two AAA rechargeable batteries. RF-WHP212 2.4 GHz Digital Wireless Stereo Headphones Package contents Headphones...LLC, 7601 Penn Avenue South, Richfield, MN USA 55423-3645 ENGLISH 12-0157 Plug the AC adapter into the battery compartment. The PAIRING indicator blinks rapidly (blue). 2 Slide the POWER switch on the left earpiece in the battery compartment. 3 Close the battery compartment...
...high volume may differ from the TV speakers. Contact Rocketfish: For customer service call 1-800-620-2790 www.rocketfishproducts.com © 2012 BBY Solutions, Inc., All Rights Reserved. Distributed by two AAA rechargeable batteries. RF-WHP212 2.4 GHz Digital Wireless Stereo Headphones Package contents Headphones...LLC, 7601 Penn Avenue South, Richfield, MN USA 55423-3645 ENGLISH 12-0157 Plug the AC adapter into the battery compartment. The PAIRING indicator blinks rapidly (blue). 2 Slide the POWER switch on the left earpiece in the battery compartment. 3 Close the battery compartment...


