Rocketfish RF-G1501 Support and Manuals
Get Help and Manuals for this Rocketfish item
View All Support Options Below
Free Rocketfish RF-G1501 manuals!
Problems with Rocketfish RF-G1501?
Ask a Question
Free Rocketfish RF-G1501 manuals!
Problems with Rocketfish RF-G1501?
Ask a Question
Popular Rocketfish RF-G1501 Manual Pages
User Guide - Page 1
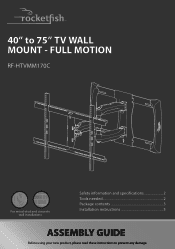
40" to prevent any damage. FULL MOTION
RF-HTVMM170C
For wood-stud and concrete wall installations
Safety information and specifications 2 Tools needed 2 Package contents 3 Installation instructions 5
ASSEMBLY GUIDE
Before using your new product, please read these instructions to 75" TV WALL MOUNT -
User Guide - Page 2

... mount combined. This product contains small items that could be capable of supporting five times the weight of the
installation, contact Customer Service or call : 1-800-620-2790 (U.S. Call 1-800-620-2790 (U.S. SAVE THESE INSTRUCTIONS
Overall dimensions (H × W × D):
CAUTION: Do not use . Rocketfish is not
responsible for any purpose not Wall-mount weight: 19...
User Guide - Page 3
and Canada)
3 RF-HTVMM170C
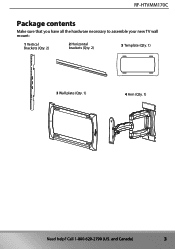
Package contents
Make sure that you have all the hardware necessary to assemble your new TV wall mount:
1 Vertical Brackets (Qty. 2)
2 Horizontal brackets (Qty. 2)
5 Template (Qty. 1)
3 Wall plate (Qty. 1)
4 Arm (Qty. 1)
Need help? Call 1-800-620-2790 (U.S.
User Guide - Page 4
...
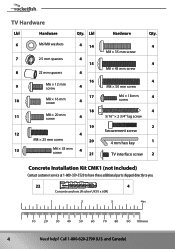
M4 × 18 mm
4
screw
4 5/16" × 2 3/4" lag screw
2 Securement screw
4 mm hex key
1
TV interface screw 2
Concrete Installation Kit CMK1 (not included)
Contact customer service at 1-800-359-5520 to have these additional parts shipped directly to you.
22
4
Concrete anchors (Fischer UX10 x 60R)
1
2
3
4in
10
20
30 40
50
60
70...
User Guide - Page 5
... mount.
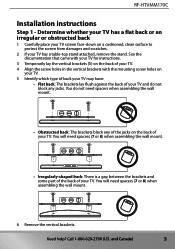
• Irregularly-shaped back: There is a gap between the brackets and some part of the back of your TV. You will need spacers when assembling the wall mount.
...TV has a table-top stand attached, remove the stand. RF-HTVMM170C
Installation instructions
Step 1 - See the documentation that came with your TV for instructions.
3 Temporarily lay the vertical brackets (1) on the back...
User Guide - Page 6
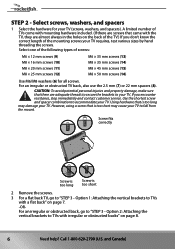
... 3 - Option 1: Attaching the vertical brackets to TVs with a flat back" on the back of the TV.) If you encounter resistance, stop immediately and contact customer service. Option 2: Attaching the vertical brackets to TVs with irregular or obstructed backs" on page 8.
6
Need help? Select one of the following types of the mounting...
User Guide - Page 7
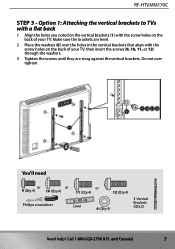
... brackets to TVs with a flat back
1 Align the holes you noted on the vertical brackets (1) with the screw holes on the back of your TV. RF-HTVMM170C
STEP 3 -
User Guide - Page 9
...)
9 Tighten the screws until they are centered.
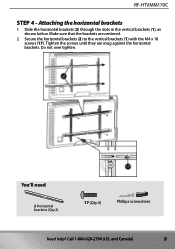
2 Secure the horizontal brackets (2) to the vertical brackets (1) with the M4 x 18 screws (17). Call 1-800-620-2790 (U.S. RF-HTVMM170C
STEP 4 - Make sure that the brackets are snug against the horizontal brackets. Attaching the horizontal brackets
1 Slide the horizontal brackets (2) through the slots in...
User Guide - Page 11
... 2 x 4 in (5.5 mm)
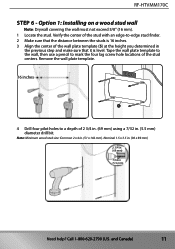
Need help? Nominal 1.5 x 3.5 in. (38 x 89 mm) 2 3/4 in (69 mm) 7/32 in . (51 x 102 mm). Option 1: Installing on a wood stud wall
Note: Drywall covering the wall must not exceed 5/8" (16 mm). 1 Locate the stud. Verify the center of the stud with an...Remove the wall plate template.
16 inches
4 Drill four pilot holes to a depth of the stud centers. RF-HTVMM170C
STEP 6 -
User Guide - Page 13
...in (10 mm)
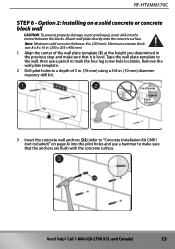
3 Insert the concrete wall anchors (22) (refer to "Concrete Installation Kit CMK1 (not included)" on a solid concrete or concrete block wall
CAUTION: To prevent...(76 mm) using a 3/8 in. (10 mm) diameter masonry drill bit.
3 in (76 mm)
3/8 in (203 mm). RF-HTVMM170C
STEP 6 -
Tape the wall plate template to the wall, then use a hammer to mark the four lag screw hole locations. ...
User Guide - Page 15
...)
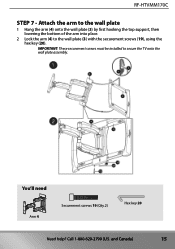
15 IMPORTANT: These securement screws must be installed to the wall plate (3) with the securement screws (19), using the hex key (20). RF-HTVMM170C
STEP 7 - Attach the arm to the wall plate
1 Hang the arm (4) onto the wall plate (3) by first hooking the top support, then lowering the bottom of the arm into...
User Guide - Page 16
...degrees and pressed against the wall.
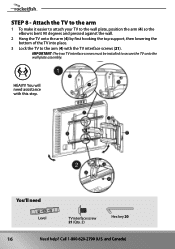
2 Hang the TV onto the arm (4) by first hooking the top support, then lowering the bottom of the TV into place.
3 Lock the TV to secure the TV onto ... wall plate assembly. Call 1-800-620-2790 (U.S. IMPORTANT: The two TV interface screws must be installed to the arm (4) with this step. STEP 8 - You will need
Level
TV interface screw 21 (Qty. 2)...
User Guide - Page 17
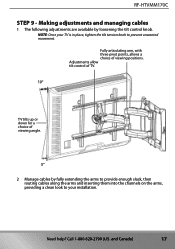
...or down for a choice of viewing positions. Call 1-800-620-2790 (U.S.
NOTE: Once your installation. and Canada)
17
Need help? Fully articulating arm, with three pivot points, allows a choice... of viewing angle.
5°
2 Manage cables by loosening the tilt control knob. RF-HTVMM170C
STEP 9 - Making adjustments and managing cables
1 The following adjustments are available by ...
User Guide - Page 18
and Canada)
18
Need help?
For customer service, call: 1-800-620-2790 (U.S. and Canada) Removing the TV from the wall mount
• To remove your TV from the wall plate assembly, disconnect all cables, then reverse the procedures in Step 8. Call 1-800-620-2790 (U.S. IMPORTANT: Your TV is heavy. You may need assistance with this step.
User Guide - Page 19

Registered in China
V2 ENGLISH 16-0577 Distributed by Best Buy Purchasing, LLC 7601 Penn Ave South, Richfield, MN 55423 U.S.A. ©2016 Best Buy. All rights reserved. Made in some countries. Part # 6907-002124 01
www.rocketfishproducts.com (800) 620-2790 (U.S. and Canada) ROCKETFISH is a trademark of Best Buy and its affiliated companies.
Rocketfish RF-G1501 Reviews
We have not received any reviews for Rocketfish yet.