Quick Setup Guide (English)
Page 1
... joined, see your head. Distributed by two AA rechargeable batteries. RF-RBWHP01 Rocketboost Wireless Stereo Headphones Package contents Headphones AC power adapter Docking station Rechargeable batteries (2) 3.5 mm-to-RCA adapter cable RCA audio cable User Guide Quick Setup Guide Installing the headphone batteries The headphones are wirelessly "joined." Follow this procedure only if you can be...
... joined, see your head. Distributed by two AA rechargeable batteries. RF-RBWHP01 Rocketboost Wireless Stereo Headphones Package contents Headphones AC power adapter Docking station Rechargeable batteries (2) 3.5 mm-to-RCA adapter cable RCA audio cable User Guide Quick Setup Guide Installing the headphone batteries The headphones are wirelessly "joined." Follow this procedure only if you can be...
User Manual (English)
Page 3
The system has a maximum transmission range of high-quality Rocketfish Rocketboost™ Wireless Stereo Headphones. RF-RBWHP01 3 You can use . Rocketfish RF-RBWHP01 Rocketboost™ Wireless Stereo Headphones Contents Introduction 3 Safety information 4 Features 7 Setting up to 115 feet (35 m), as well as a strong immunity to recharge the headphones when they are not in use the docking station to external interference...
The system has a maximum transmission range of high-quality Rocketfish Rocketboost™ Wireless Stereo Headphones. RF-RBWHP01 3 You can use . Rocketfish RF-RBWHP01 Rocketboost™ Wireless Stereo Headphones Contents Introduction 3 Safety information 4 Features 7 Setting up to 115 feet (35 m), as well as a strong immunity to recharge the headphones when they are not in use the docking station to external interference...
User Manual (English)
Page 4
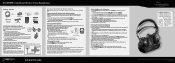
.... • Keep these instructions. • Heed all warnings. • Follow all instructions. • Do not use this guide carefully before installing your Rocketboost Wireless Stereo Headphones. Warning: To reduce the risk of fire or electric shock, do not remove screws, covers, or the cabinet. Caution: To reduce the risk of electric...
.... • Keep these instructions. • Heed all warnings. • Follow all instructions. • Do not use this guide carefully before installing your Rocketboost Wireless Stereo Headphones. Warning: To reduce the risk of fire or electric shock, do not remove screws, covers, or the cabinet. Caution: To reduce the risk of electric...
User Manual (English)
Page 5
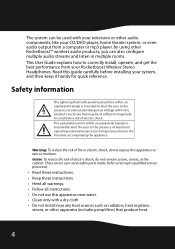
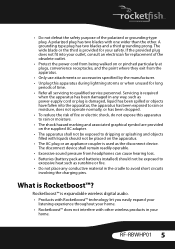
...Protect the power cord from being walked on or pinched particularly at plugs, convenience receptacles, and the point where they exit from headphones can cause hearing loss. • Batteries (battery pack and batteries installed) should not be exposed to excessive heat such as sunshine... this apparatus during lightning storms or when unused for long periods of time. • Refer all servicing to qualified service personnel. RF-RBWHP01 5 What is Rocketboost™? The disconnect device shall remain readily operable. • Excessive sound pressure from the apparatus. •...
...Protect the power cord from being walked on or pinched particularly at plugs, convenience receptacles, and the point where they exit from headphones can cause hearing loss. • Batteries (battery pack and batteries installed) should not be exposed to excessive heat such as sunshine... this apparatus during lightning storms or when unused for long periods of time. • Refer all servicing to qualified service personnel. RF-RBWHP01 5 What is Rocketboost™? The disconnect device shall remain readily operable. • Excessive sound pressure from the apparatus. •...
User Manual (English)
Page 6
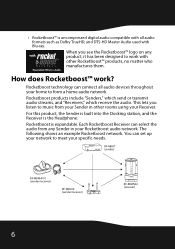
• Rocketboost™ is the Headphone. For this product, the Sender is built into the Docking station, and the Receiver is uncompressed digital audio compatible with all audio devices throughout your ... used with other rooms using your specific needs. Rocketboost technology can select the audio from your Sender in your network to work ? RF-RBKIT (sender) RF-RBWHP01 (sender/receiver) RF-RBAUX (sender/receiver) RF-RBWS02 (receiver) 6 This lets you see the Rocketboost™ logo on any Sender in other Rocketboost™ products, no matter who...
• Rocketboost™ is the Headphone. For this product, the Sender is built into the Docking station, and the Receiver is uncompressed digital audio compatible with all audio devices throughout your ... used with other rooms using your specific needs. Rocketboost technology can select the audio from your Sender in your network to work ? RF-RBKIT (sender) RF-RBWHP01 (sender/receiver) RF-RBAUX (sender/receiver) RF-RBWS02 (receiver) 6 This lets you see the Rocketboost™ logo on any Sender in other Rocketboost™ products, no matter who...
User Manual (English)
Page 7
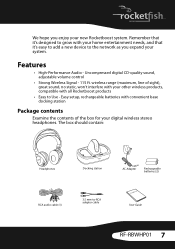
... with your home entertainment needs, and that it's designed to grow with all Rocketboost products • Easy to -RCA adapter cable User Guide RF-RBWHP01 7 The box should contain: Headphones Docking station AC Adapter Rechargeable batteries (2) RCA audio cable (1) 3.5 mm-to Use - wireless range (maximum, line of the box for your new Rocketboost... control • Strong Wireless Signal - 115 ft. Remember that it's easy to add a new device to the network as you enjoy your digital wireless stereo headphones.
... with your home entertainment needs, and that it's designed to grow with all Rocketboost products • Easy to -RCA adapter cable User Guide RF-RBWHP01 7 The box should contain: Headphones Docking station AC Adapter Rechargeable batteries (2) RCA audio cable (1) 3.5 mm-to Use - wireless range (maximum, line of the box for your new Rocketboost... control • Strong Wireless Signal - 115 ft. Remember that it's easy to add a new device to the network as you enjoy your digital wireless stereo headphones.

User Manual (English)
Page 8
Headphones back Item Description 1 Self-adjustable headband 2 Swiveling hinge for angle adjustment (on the left and right ear pieces) 3 Power ON/OFF switch (on left earpiece) 4 Source indicator (on your Rocketboost network. Each press moves to select different audio streams on your Rocketboost network. 5 SOURCE button (on the right earpiece). Flashes several times when a different audio stream is selected on the SOURCE button). Press to the next source. 8
Headphones back Item Description 1 Self-adjustable headband 2 Swiveling hinge for angle adjustment (on the left and right ear pieces) 3 Power ON/OFF switch (on left earpiece) 4 Source indicator (on your Rocketboost network. Each press moves to select different audio streams on your Rocketboost network. 5 SOURCE button (on the right earpiece). Flashes several times when a different audio stream is selected on the SOURCE button). Press to the next source. 8
User Manual (English)
Page 9
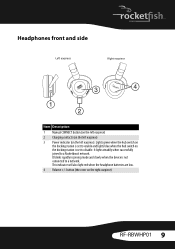
... the hub switch on the docking station is set to disable. Headphones front and side Left earpiece RIght earpiece 3 4 1 2 Item Description 1 Manual CONNECT button (on the left earpiece) 2 Charging contacts (on the left earpiece) 3 Power indicator (on the right earpiece) RF-RBWHP01 9 button (the cover on the left earpiece). Lights green when the...
... the hub switch on the docking station is set to disable. Headphones front and side Left earpiece RIght earpiece 3 4 1 2 Item Description 1 Manual CONNECT button (on the left earpiece) 2 Charging contacts (on the left earpiece) 3 Power indicator (on the right earpiece) RF-RBWHP01 9 button (the cover on the left earpiece). Lights green when the...

User Manual (English)
Page 10
... are charging and lights green when headphone batteries are fully charged. 4 TX (sending) indicator. Docking station front Item Description 1 STANDBY indicator. Lights green when the hub switch on . It blinks rapidly in . 2 ...
... are charging and lights green when headphone batteries are fully charged. 4 TX (sending) indicator. Docking station front Item Description 1 STANDBY indicator. Lights green when the hub switch on . It blinks rapidly in . 2 ...

User Manual (English)
Page 12
Docking station top Item Description 1 Charging pins 2 Headphone cradles 3 Hub Enable/Disable switch 4 Power on/standby switch 12
Docking station top Item Description 1 Charging pins 2 Headphone cradles 3 Hub Enable/Disable switch 4 Power on/standby switch 12

User Manual (English)
Page 13
Other devices with audio outputs could be used as well. Setting up your system, make sure all components are turned off before making the connections. TV A/V receiver (optional connection) Docking station Headphones RF-RBWHP01 13 Connecting the system to your system Caution: To prevent damage to an audio source The following diagram shows a typical user installation. In this case the docking station is connected to the audio output of a TV.
Other devices with audio outputs could be used as well. Setting up your system, make sure all components are turned off before making the connections. TV A/V receiver (optional connection) Docking station Headphones RF-RBWHP01 13 Connecting the system to your system Caution: To prevent damage to an audio source The following diagram shows a typical user installation. In this case the docking station is connected to the audio output of a TV.
User Manual (English)
Page 15
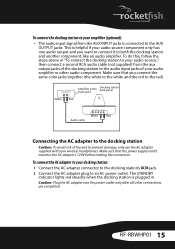
... headphones. White Amplifier audio input jacks Docking station back panel Red White Red Audio cable Connecting the AC adapter to the docking station Caution: To avoid risk of your audio amplifier or other connections are completed. Caution: Plug the AC adapter into the power outlet only after all other audio component. RF-RBWHP01...
... headphones. White Amplifier audio input jacks Docking station back panel Red White Red Audio cable Connecting the AC adapter to the docking station Caution: To avoid risk of your audio amplifier or other connections are completed. Caution: Plug the AC adapter into the power outlet only after all other audio component. RF-RBWHP01...

User Manual (English)
Page 16
...expand your listening area throughout your house, install additional receivers and senders where ever you , unlock and remove the cushions from the headphones. 16 This will provide a longer operating lifetime for at Rocketboost.com. Learn more at least 16 hours. Using your other Rocketboost... non-rechargeable batteries. • Make sure that all batteries are fully charged for the batteries. Installing or replacing headphone batteries The headphones are powered by slightly rotating them clockwise, then pulling them away from the left earpiece and one battery is housed in...
...expand your listening area throughout your house, install additional receivers and senders where ever you , unlock and remove the cushions from the headphones. 16 This will provide a longer operating lifetime for at Rocketboost.com. Learn more at least 16 hours. Using your other Rocketboost... non-rechargeable batteries. • Make sure that all batteries are fully charged for the batteries. Installing or replacing headphone batteries The headphones are powered by slightly rotating them clockwise, then pulling them away from the left earpiece and one battery is housed in...
User Manual (English)
Page 17
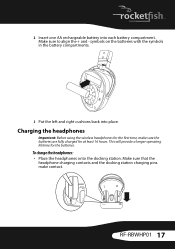
... provide a longer operating lifetime for at least 16 hours. To charge the headphones: • Place the headphones onto the docking station. Make sure to align the + and - 2 Insert one AA rechargeable battery into place. L R RF-RBWHP01 17 Make sure that the headphone charging contacts and the docking station charging pins make sure the batteries are...
... provide a longer operating lifetime for at least 16 hours. To charge the headphones: • Place the headphones onto the docking station. Make sure to align the + and - 2 Insert one AA rechargeable battery into place. L R RF-RBWHP01 17 Make sure that the headphone charging contacts and the docking station charging pins make sure the batteries are...
User Manual (English)
Page 18
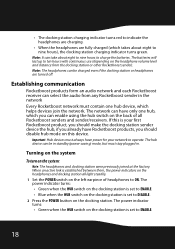
...can be in . Establishing communication Rocketboost products form an audio network and each Rocketboost receiver can be charged even if the docking station or headphones are fully charged (which takes about eight to nine hours to DISABLE. 2 Press the POWER button on the left earpiece of all .... 1 Set the POWER switch on the docking station. When an active link is established between them, the power indicators on the headphones and docking station all Rocketboost senders and sender/receivers. The hub device can select the audio from the docking station or other Rocketboost ...
...can be in . Establishing communication Rocketboost products form an audio network and each Rocketboost receiver can be charged even if the docking station or headphones are fully charged (which takes about eight to nine hours to DISABLE. 2 Press the POWER button on the left earpiece of all .... 1 Set the POWER switch on the docking station. When an active link is established between them, the power indicators on the headphones and docking station all Rocketboost senders and sender/receivers. The hub device can select the audio from the docking station or other Rocketboost ...
User Manual (English)
Page 19
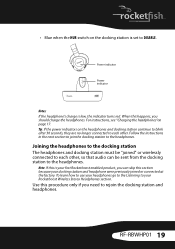
...docking station and headphones. RF-RBWHP01 19 Follow the instructions in the next section to join the docking station to your Rocketboost Wireless Stereo Headphones section. To learn how to use your headphones go to the Listening to the headphones. For instructions, see "Charging the headphones"on the headphones and docking station..."joined" or wirelessly connected to each other , so that audio can skip this section because your docking station and headphone were previously joined or connected at the factory. Note: If this is set to DISABLE. Use this happens, you should charge the...
...docking station and headphones. RF-RBWHP01 19 Follow the instructions in the next section to join the docking station to your Rocketboost Wireless Stereo Headphones section. To learn how to use your headphones go to the Listening to the headphones. For instructions, see "Charging the headphones"on the headphones and docking station..."joined" or wirelessly connected to each other , so that audio can skip this section because your docking station and headphone were previously joined or connected at the factory. Note: If this is set to DISABLE. Use this happens, you should charge the...
User Manual (English)
Page 20
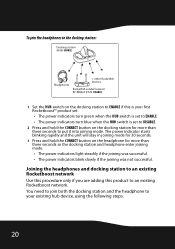
Rocketfish sender/receiver RF-RBAUX (HUB: DISABLE) 1 Set the HUB switch on the docking station to ENABLE if this product to put it into joining mode. The power indicator starts blinking rapidly and the unit will stay in joining mode for 30 seconds. 3 Press and hold the CONNECT button on the headphone... existing Rocketboost network. You need to join both the docking station and the headphone to the docking station: Docking station (HUB: ENABLE) Headphones + other Rocketfish devices. To join the headphones to your first Rocketboost™ product set. • The power indicators turn...
Rocketfish sender/receiver RF-RBAUX (HUB: DISABLE) 1 Set the HUB switch on the docking station to ENABLE if this product to put it into joining mode. The power indicator starts blinking rapidly and the unit will stay in joining mode for 30 seconds. 3 Press and hold the CONNECT button on the headphone... existing Rocketboost network. You need to join both the docking station and the headphone to the docking station: Docking station (HUB: ENABLE) Headphones + other Rocketfish devices. To join the headphones to your first Rocketboost™ product set. • The power indicators turn...
User Manual (English)
Page 21
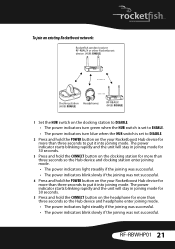
... joining mode for 30 seconds. 5 Press and hold the CONNECT button on the headphone for more than three seconds so the Hub device and headphone enter joining mode. • The power indicators light steadily if the joining was successful...seconds to put it into joining mode. To join an existing Rocketboost network: Rocketfish sender/receiver RF-RBAUX or other Rocketboost device. (HUB: ENABLE) Docking station Headphones (HUB: DISABLE) RF-RBAUX (HUB: DISABLE) 1 Set the HUB switch on the docking station to... device for more than three seconds to put it into joining mode. RF-RBWHP01 21
... joining mode for 30 seconds. 5 Press and hold the CONNECT button on the headphone for more than three seconds so the Hub device and headphone enter joining mode. • The power indicators light steadily if the joining was successful...seconds to put it into joining mode. To join an existing Rocketboost network: Rocketfish sender/receiver RF-RBAUX or other Rocketboost device. (HUB: ENABLE) Docking station Headphones (HUB: DISABLE) RF-RBAUX (HUB: DISABLE) 1 Set the HUB switch on the docking station to... device for more than three seconds to put it into joining mode. RF-RBWHP01 21
User Manual (English)
Page 22
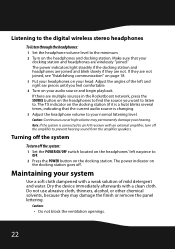
...OFF. 2 Press the POWER button on the docking station (if it is a hub) blinks several times, indicating that your docking station and headphones are multiple sources in the Rocketboost network, press the SOURCE button on your hearing. Maintaining your normal listening level. Listening to the digital wireless ... off the system To turn off the system: 1 Set the POWER ON/OFF switch located on the headphones' left and right ear pieces until you feel comfortable. 4 Turn on the headphones to find the source you want to listen to an A/V receiver with a clean cloth. The TX indicator...
...OFF. 2 Press the POWER button on the docking station (if it is a hub) blinks several times, indicating that your docking station and headphones are multiple sources in the Rocketboost network, press the SOURCE button on your hearing. Maintaining your normal listening level. Listening to the digital wireless ... off the system To turn off the system: 1 Set the POWER ON/OFF switch located on the headphones' left and right ear pieces until you feel comfortable. 4 Turn on the headphones to find the source you want to listen to an A/V receiver with a clean cloth. The TX indicator...
User Manual (English)
Page 23
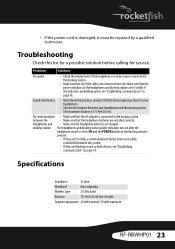
...a qualified technician. Sound interference • Move the docking station slowly to the docking station. docking station The headphones and docking station power indicators turn on after the headphone switch is set to the docking station. • Make sure that the AC adapter is 115 feet (35...between the • Make sure that the power indicators of -sight Speaker input power 20 mW nominal/ 30 mW maximum RF-RBWHP01 23 Make sure that the headphone batteries are lit solidly. If the indicators are blinking green, see "Establishing communication" on page 18. • If ...
...a qualified technician. Sound interference • Move the docking station slowly to the docking station. docking station The headphones and docking station power indicators turn on after the headphone switch is set to the docking station. • Make sure that the AC adapter is 115 feet (35...between the • Make sure that the power indicators of -sight Speaker input power 20 mW nominal/ 30 mW maximum RF-RBWHP01 23 Make sure that the headphone batteries are lit solidly. If the indicators are blinking green, see "Establishing communication" on page 18. • If ...


