Rocketfish RF-HTMF19 Support and Manuals
Get Help and Manuals for this Rocketfish item
View All Support Options Below
Free Rocketfish RF-HTMF19 manuals!
Problems with Rocketfish RF-HTMF19?
Ask a Question
Free Rocketfish RF-HTMF19 manuals!
Problems with Rocketfish RF-HTMF19?
Ask a Question
Popular Rocketfish RF-HTMF19 Manual Pages
User Manual - Page 1

Antes de usar su producto nuevo, lea este instructivo para prevenir cualquier daño. 32" to prevent any damage. FPO)
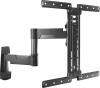
RF-HTMF19
ASSEMBLY GUIDE/GUÍA DE ENSAMBLAJE
Before using your new product, please read these instructions to 55" TV WALL MOUNT MONTAJE DE PARED PARA TELEVISOR DE 32 A 55 PULG.(Spanish -
User Manual - Page 3

... NOT INSTALL INTO DRYWALL ALONE - Your RF-HTMF19 represents the state of the art in . (43.6 cm × 43.6 cm) • Wall-mount weight: 7.3 lbs. (3.31 kg) • VESA patterns: 75 × 75 to be capable of supporting five times the weight of your purchase of the installation, contact Customer Service or call : 1-800-620-2790
3 Rocketfish is...
User Manual - Page 5

Tools needed
You need the following tools to assemble your new TV wall mount:
RF-HTMF19
Tape measure
Pencil
Level
Drill
Phillips screwdriver
Socket wrench with 1/2" (13 mm) socket or adjustable wrench
Tape
Wood Stud Wall
Concrete or Concrete Block Wall
Edge-to-edge 7/32" (5.5 mm)
stud finder
wood drill bit
Awl
Hammer
3/8" (10 mm) masonry drill bit
5
User Manual - Page 8

Hardware
#
C1
Concrete anchors (Fischer UX10 x 60R)
2
8
Lbl. Concrete Installation Kit CMK1 (not included)
Contact customer service at 1-800-620-2790 to have these additional parts shipped directly to you.
User Manual - Page 9

... wall mount.
6 Remove the brackets.
9 See the documentation that came with your TV for instructions.
3 Temporarily lay the horizontal brackets (04) on the back of your TV. 4 Align the ...the brackets and some part of the back of your TV and do not need spacers when assembling the wall mount.
• Obstructed back: The brackets block any jacks. RF-HTMF19
Installation instructions
STEP 1 - You...
User Manual - Page 10

...on the back of the mounting screws your TV.) If you encounter resistance, stop immediately and contact customer service. If you don't know the correct length of your TV requires, test various sizes by hand ... the hardware for all M6 or M8 screws. For an irregular or obstructed TV back, also use the 2.5 mm, 5 mm, or 22 mm spacers (03). STEP 2 - Select the screws that is too short...
User Manual - Page 11

... the horizontal brackets to your TV
CAUTION: To avoid personal injury or property damage, do not use power tools. 1 Align the holes you selected in STEP 1. 4 Tighten the screws until they are snug against the brackets. RF-HTMF19
STEP 3 - Do not over the holes in the brackets that align with the screw holes...
User Manual - Page 13

... arm assembly (08) is used, the top hole in the TV arm assembly will need to account for the location of the VESA when determining the height of the screen from a seated position (normally, 40 to 60 inches from the ground).
For more detailed information on all TVs. RF-HTMF19
STEP 5 - When the...
User Manual - Page 15

... template (07) at the height you determined in . (5.5 mm)
4 Move the cover out away from the arm assembly wall plate.
08
15 RF-HTMF19 2 Align the center of 2 3/4 in. (70 mm) using a 7/32 in. (5.5 mm) diameter drill bit, then remove the mounting template.
(69 mm) (257.3/5/34m2inim.n(7)0 mm)
7/32 in
the previous step...
User Manual - Page 17
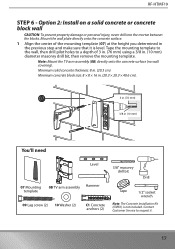
... the concrete surface. 1 Align the center of 3 in. (76 mm) using a 3/8 in the previous step and make sure that it .
17 Tape the... (2)
C1 Concrete anchors (2)
3/8" masonry drill bit
Drill
Tape
1/2" socket wrench
Note: The Concrete Installation Kit (CMK1) is level. RF-HTMF19
STEP 6 - Contact Customer Service to a depth of the mounting template (07) at the height you determined in . (10...
User Manual - Page 19

RF-HTMF19 4 Align the TV arm assembly (08) with the anchors (C1), insert the lag screws (09)
through the washers (10) and into the holes in the wall plate, then tighten the lag screws only until they are firm against the wall plate. CAUTION: Avoid potential injuries or property damage! DO NOT over-tighten the lag screws (09).
19
User Manual - Page 21

..., you want by choosing the
appropriate slot in the vertical TV bracket. Select the height you want
HEAVY!
Select the height you must use the locking screw (11) to secure your TV to the TV arm assembly with the locking screw (11). RF-HTMF19 2 Hang your TV to the TV arm assembly.
21
User Manual - Page 23

Adjust the level
1 Loosen the locking screw (11) with a Phillips screwdriver. STEP 10 -
RF-HTMF19
2 Level your TV.
23
User Manual - Page 25

You may need assistance with a Phillips screwdriver. and Canada) 25 For customer service, call: 1-800-620-2790 (U.S.
2 Remove the locking screw (11) with this step.
RF-HTMF19
08
3 Lift your TV off the arm assembly.
11
HEAVY!
User Manual - Page 27

... any person not authorized by any part of Best Buy and its affiliated companies. *Distributed by Best Buy Purchasing, LLC 7601 Penn Ave South, Richfield, MN 55423 U.S.A. ©2022 Best Buy. REPAIR REPLACEMENT AS PROVIDED UNDER THIS WARRANTY IS YOUR EXCLUSIVE REMEDY FOR BREACH OF WARRANTY. ROCKETFISH PRODUCTS MAKES NO OTHER EXPRESS WARRANTIES WITH...
Rocketfish RF-HTMF19 Reviews
We have not received any reviews for Rocketfish yet.