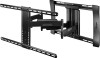
User Guide
Page 2
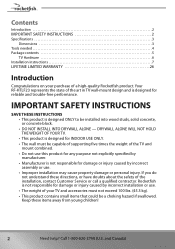
... exceed 100 lbs. (45.3 kg). • This product contains small items that could be installed into wood studs, solid concrete, or concrete block. • DO NOT INSTALL INTO DRYWALL ALONE - Your RF-HTLF23 represents the state of a high-quality Rocketfish product. If you do not understand these items away from young children! 2 Need help? Keep...
... exceed 100 lbs. (45.3 kg). • This product contains small items that could be installed into wood studs, solid concrete, or concrete block. • DO NOT INSTALL INTO DRYWALL ALONE - Your RF-HTLF23 represents the state of a high-quality Rocketfish product. If you do not understand these items away from young children! 2 Need help? Keep...
User Guide
Page 7
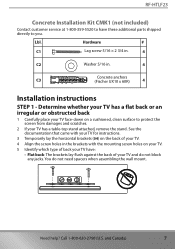
...1 Carefully place your TV face-down on the back of your TV. 4 Align the screw holes in . 4 Concrete anchors C3 (Fischer UX10 x 60R) 4 Installation instructions STEP 1 - Call 1-800-620-2790 (U.S. and Canada) 7 Hardware # C1 Lag screw 5/16 × 2 3/4 in. 4 C2 Washer 5/16 in..., clean surface to protect the screen from damages and scratches. 2 If your TV has a table-top stand attached, remove the stand. RF-HTLF23 Concrete Installation Kit CMK1 (not included) Contact customer service at 1-800-359-5520 to have : • Flat back: The brackets lay flush against ...
...1 Carefully place your TV face-down on the back of your TV. 4 Align the screw holes in . 4 Concrete anchors C3 (Fischer UX10 x 60R) 4 Installation instructions STEP 1 - Call 1-800-620-2790 (U.S. and Canada) 7 Hardware # C1 Lag screw 5/16 × 2 3/4 in. 4 C2 Washer 5/16 in..., clean surface to protect the screen from damages and scratches. 2 If your TV has a table-top stand attached, remove the stand. RF-HTLF23 Concrete Installation Kit CMK1 (not included) Contact customer service at 1-800-359-5520 to have : • Flat back: The brackets lay flush against ...

User Guide
Page 14
Call 1-800-620-2790 (U.S. Minimum wood stud size: nominal 2 × 4 in. (5.1 × 10.2 cm) actual 1 1/2 × 3 1/2 in . (1.6 cm). STEP 6 - and Canada) Option 1: Installing on a wood stud wall Note: Drywall covering the wall must not exceed 5/8" (16 mm). 1 Locate the stud, then verify the center of the stud with ...
Call 1-800-620-2790 (U.S. Minimum wood stud size: nominal 2 × 4 in. (5.1 × 10.2 cm) actual 1 1/2 × 3 1/2 in . (1.6 cm). STEP 6 - and Canada) Option 1: Installing on a wood stud wall Note: Drywall covering the wall must not exceed 5/8" (16 mm). 1 Locate the stud, then verify the center of the stud with ...
User Guide
Page 17
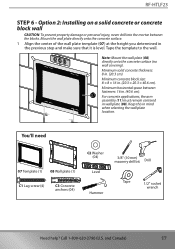
...-620-2790 (U.S. Option 2: Installing on a solid concrete or concrete block wall CAUTION: To prevent property damage or personal injury, never drill into the mortar between fasteners: 16 in. (40.6 cm). 07 For concrete applications, the arm assembly (11) must remain centered in mind when selecting the wall plate location. RF-HTLF23 STEP 6 - Minimum...
...-620-2790 (U.S. Option 2: Installing on a solid concrete or concrete block wall CAUTION: To prevent property damage or personal injury, never drill into the mortar between fasteners: 16 in. (40.6 cm). 07 For concrete applications, the arm assembly (11) must remain centered in mind when selecting the wall plate location. RF-HTLF23 STEP 6 - Minimum...

User Guide
Page 18
Call 1-800-620-2790 (U.S. C3 18 Need help? and Canada) 2 Drill pilot holes to a depth of 3 in. (7.6 cm) using a 3/8 in. (10 mm) diameter masonry drill bit, then remove the template. 3 in. (76 mm) 07 3 Insert the concrete wall anchors (C3) (see Concrete Installation Kit CMK1 (not included) on page 7) into the pilot holes and use a hammer to make sure that the anchors are flush with the concrete surface.
Call 1-800-620-2790 (U.S. C3 18 Need help? and Canada) 2 Drill pilot holes to a depth of 3 in. (7.6 cm) using a 3/8 in. (10 mm) diameter masonry drill bit, then remove the template. 3 in. (76 mm) 07 3 Insert the concrete wall anchors (C3) (see Concrete Installation Kit CMK1 (not included) on page 7) into the pilot holes and use a hammer to make sure that the anchors are flush with the concrete surface.
User Guide
Page 21
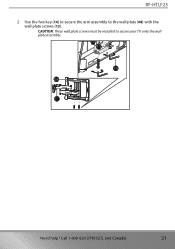
CAUTION: These wall plate screws must be installed to the wall plate (08) with the wall plate screws (13). RF-HTLF23 2 Use the hex key (14) to secure the arm assembly to secure your TV onto the wall plate assembly. 13 14 08 11 Need help? and Canada) 21 Call 1-800-620-2790 (U.S.
CAUTION: These wall plate screws must be installed to the wall plate (08) with the wall plate screws (13). RF-HTLF23 2 Use the hex key (14) to secure the arm assembly to secure your TV onto the wall plate assembly. 13 14 08 11 Need help? and Canada) 21 Call 1-800-620-2790 (U.S.
User Guide
Page 23
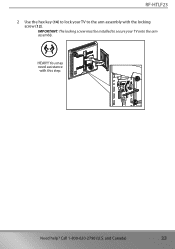
RF-HTLF23 2 Use the hex key (14) to lock your TV to secure your TV onto the arm assembly. 05 HEAVY! and Canada) 23 IMPORTANT: The locking screw must be installed to the arm assembly with this step. 12 14 Need help? Call 1-800-620-2790 (U.S. You may need assistance 11 with the locking screw (12).
RF-HTLF23 2 Use the hex key (14) to lock your TV to secure your TV onto the arm assembly. 05 HEAVY! and Canada) 23 IMPORTANT: The locking screw must be installed to the arm assembly with this step. 12 14 Need help? Call 1-800-620-2790 (U.S. You may need assistance 11 with the locking screw (12).

User Guide
Page 24
STEP 9 - Adjust tilt Note: After your installation. 11 STEP 10 - Tension knob 14 24 Need help? Call 1-800-620-2790 (U.S. and Canada) Managing cables • Fully extend the arm assembly (11) to provide enough slack, then routing cables along the arms and inserting them into the channels on the arms to provide a clean look to keep your TV in place, tighten the tilt tension knob to prevent unwanted movement. • Loosen the tension knob with your fingers or the hex key (14), adjust the tilt angle, then tighten the knob to your TV is in place.
STEP 9 - Adjust tilt Note: After your installation. 11 STEP 10 - Tension knob 14 24 Need help? Call 1-800-620-2790 (U.S. and Canada) Managing cables • Fully extend the arm assembly (11) to provide enough slack, then routing cables along the arms and inserting them into the channels on the arms to provide a clean look to keep your TV in place, tighten the tilt tension knob to prevent unwanted movement. • Loosen the tension knob with your fingers or the hex key (14), adjust the tilt angle, then tighten the knob to your TV is in place.

User Guide
Page 26
...warranty service, in the United States or Canada from a Best Buy online website (www.bestbuy.com or www.bestbuy.ca), please take your Rocketfish Product during the Warranty Period. Where is packaged with this warranty become the property of protection as power surges 26 Need help? or (2) ... at www.bestbuy.com or www.bestbuy.ca and is the warranty valid? This warranty does not cover: • Customer instruction/education • Installation • Set up adjustments • Cosmetic damage • Damage due to be purchased in the United States and Canada call 1-800-620-2790...
...warranty service, in the United States or Canada from a Best Buy online website (www.bestbuy.com or www.bestbuy.ca), please take your Rocketfish Product during the Warranty Period. Where is packaged with this warranty become the property of protection as power surges 26 Need help? or (2) ... at www.bestbuy.com or www.bestbuy.ca and is the warranty valid? This warranty does not cover: • Customer instruction/education • Installation • Set up adjustments • Cosmetic damage • Damage due to be purchased in the United States and Canada call 1-800-620-2790...
Warranty Sheet
Page 1
..., including but not limited to batteries (i.e. Where is printed on the receipt you received with all labor and parts charges. ROCKETFISH PRODUCTS MAKES NO OTHER EXPRESS WARRANTIES WITH RESPECT TO THE PRODUCT, ALL EXPRESS AND IMPLIED WARRANTIES FOR THE PRODUCT, INCLUDING BUT NOT... images applied for 1 year (365 days) from the date of your Rocketfish Product during the Warranty Period. How long does the coverage last? This warranty does not cover: • Customer instruction/education • Installation • Set up adjustments • Cosmetic damage • Damage due to...
..., including but not limited to batteries (i.e. Where is printed on the receipt you received with all labor and parts charges. ROCKETFISH PRODUCTS MAKES NO OTHER EXPRESS WARRANTIES WITH RESPECT TO THE PRODUCT, ALL EXPRESS AND IMPLIED WARRANTIES FOR THE PRODUCT, INCLUDING BUT NOT... images applied for 1 year (365 days) from the date of your Rocketfish Product during the Warranty Period. How long does the coverage last? This warranty does not cover: • Customer instruction/education • Installation • Set up adjustments • Cosmetic damage • Damage due to...