User Manual (English)
Page 3
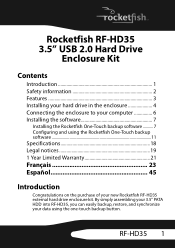
Rocketfish RF-HD35 3.5" USB 2.0 Hard Drive Enclosure Kit Contents Introduction 1 Safety information 2 Features 3 Installing your hard drive in the enclosure 4 Connecting the enclosure to your computer 6 Installing the software 7 Installing the Rocketfish One-Touch backup software .......... 7 Configuring and using the Rocketfish One-Touch backup software 11 Specifications 18 ...of your data using the one-touch backup button. By simply assembling your 3.5" PATA HDD into RF-HD35, you can easily backup, restore, and synchronize your new Rocketfish RF-HD35 external hard drive enclosure kit...
Rocketfish RF-HD35 3.5" USB 2.0 Hard Drive Enclosure Kit Contents Introduction 1 Safety information 2 Features 3 Installing your hard drive in the enclosure 4 Connecting the enclosure to your computer 6 Installing the software 7 Installing the Rocketfish One-Touch backup software .......... 7 Configuring and using the Rocketfish One-Touch backup software 11 Specifications 18 ...of your data using the one-touch backup button. By simply assembling your 3.5" PATA HDD into RF-HD35, you can easily backup, restore, and synchronize your new Rocketfish RF-HD35 external hard drive enclosure kit...
User Manual (English)
Page 5
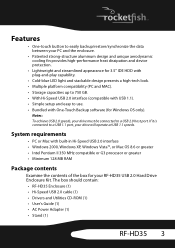
...or greater • Minimum 128 MB RAM Package contents Examine the contents of the box for your drive will operate at USB 1.1 speeds. The box should contain: • RF-HD35 Enclosure (1) • Hi-Speed USB 2.0 cable (1) • Drivers and Utilities CD-ROM (1) • User's Guide (1) • AC Power Adapter ...(1) • Stand (1) RF-HD35 3 Notes: To achieve USB 2.0 speeds, your drive must be connected to use. • Bundled with One-Touch Backup software (for Windows OS only). Features...
...or greater • Minimum 128 MB RAM Package contents Examine the contents of the box for your drive will operate at USB 1.1 speeds. The box should contain: • RF-HD35 Enclosure (1) • Hi-Speed USB 2.0 cable (1) • Drivers and Utilities CD-ROM (1) • User's Guide (1) • AC Power Adapter ...(1) • Stand (1) RF-HD35 3 Notes: To achieve USB 2.0 speeds, your drive must be connected to use. • Bundled with One-Touch Backup software (for Windows OS only). Features...
User Manual (English)
Page 8
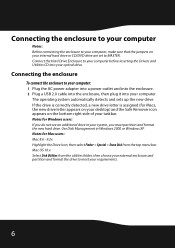
Connecting the enclosure To connect the enclosure to your computer: 1 Plug the AC power adapter into a power outlet and into the enclosure. 2 Plug a USB 2.0 cable into the enclosure, then plug it into your optical drive. Mac OS 10.x Select Disk Utilities from the top menu bar. Connecting the enclosure ...
Connecting the enclosure To connect the enclosure to your computer: 1 Plug the AC power adapter into a power outlet and into the enclosure. 2 Plug a USB 2.0 cable into the enclosure, then plug it into your optical drive. Mac OS 10.x Select Disk Utilities from the top menu bar. Connecting the enclosure ...
User Manual (English)
Page 9
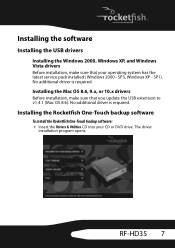
No additional driver is required. Installing the Rocketfish One-Touch backup software To install the Rocketfish One-Touch backup software: 1 Insert the Drivers & Utilities CD into your operating system has the latest service pack installed (Windows 2000...Mac OS 8.6, 9.x, or 10.x drivers Before installation, make sure that you update the USB extension to v1.4.1 (Mac OS 8.6). SP3, Windows XP - No additional driver is required. RF-HD35 7 Installing the software Installing the USB drivers Installing the Windows 2000, Windows XP, and Windows Vista drivers Before installation, make ...
No additional driver is required. Installing the Rocketfish One-Touch backup software To install the Rocketfish One-Touch backup software: 1 Insert the Drivers & Utilities CD into your operating system has the latest service pack installed (Windows 2000...Mac OS 8.6, 9.x, or 10.x drivers Before installation, make sure that you update the USB extension to v1.4.1 (Mac OS 8.6). SP3, Windows XP - No additional driver is required. RF-HD35 7 Installing the software Installing the USB drivers Installing the Windows 2000, Windows XP, and Windows Vista drivers Before installation, make ...
User Manual (English)
Page 11
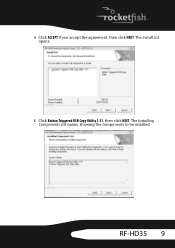
RF-HD35 9 The Install List opens. 5 Click Button Triggered USB Copy Utility 1.51, then click NEXT. 4 Click ACCEPT if you accept the agreement, then click NEXT. The Installing Components List opens, showing the components to be installed.
RF-HD35 9 The Install List opens. 5 Click Button Triggered USB Copy Utility 1.51, then click NEXT. 4 Click ACCEPT if you accept the agreement, then click NEXT. The Installing Components List opens, showing the components to be installed.
User Manual (English)
Page 14
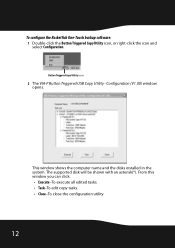
This window shows the computer name and the disks installed in the system. Button Triggered Copy Utility icon 2 The VIA-P Button Triggered USB Copy Utility - The supported disk will be shown with an asterisk(*). To configure the Rocketfish One-Touch backup software: 1 Double-click the Button Triggered Copy Utility icon, or right-click the icon and select Configuration. Configuration (V1.00) window opens. From this window you can click: • Execute-To execute all edited tasks. • Task-To edit copy tasks. • Close-To close the configuration utility. 12
This window shows the computer name and the disks installed in the system. Button Triggered Copy Utility icon 2 The VIA-P Button Triggered USB Copy Utility - The supported disk will be shown with an asterisk(*). To configure the Rocketfish One-Touch backup software: 1 Double-click the Button Triggered Copy Utility icon, or right-click the icon and select Configuration. Configuration (V1.00) window opens. From this window you can click: • Execute-To execute all edited tasks. • Task-To edit copy tasks. • Close-To close the configuration utility. 12
User Manual (English)
Page 20
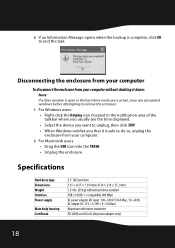
Disconnecting the enclosure from your computer To disconnect the enclosure from your computer without hard drive installed USB 2.0 (USB 1.1 compatible) 480 Mbps AC power adapter (AC input: 100~240 V/ 0.8 A Max., 50~60 Hz DC output: DC 12 V +5/-8% / 0~2 A Max.) Aluminum with mirror treatment FCC (EMI) ...; When Windows notifies you that it is complete, click OK to do so, unplug the enclosure from your computer. 2 For Macintosh users: • Drag the USB icon into the TRASH. • Unplug the enclosure.
Disconnecting the enclosure from your computer To disconnect the enclosure from your computer without hard drive installed USB 2.0 (USB 1.1 compatible) 480 Mbps AC power adapter (AC input: 100~240 V/ 0.8 A Max., 50~60 Hz DC output: DC 12 V +5/-8% / 0~2 A Max.) Aluminum with mirror treatment FCC (EMI) ...; When Windows notifies you that it is complete, click OK to do so, unplug the enclosure from your computer. 2 For Macintosh users: • Drag the USB icon into the TRASH. • Unplug the enclosure.

