
Owners Manual
Page 1
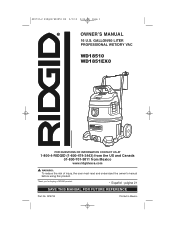
página 21 SAVE THIS MANUAL FOR FUTURE REFERENCE Part No. SP6733-2 Ridgid WD1851 ES 2/3/12 2:04 PM Page 1 OWNER'S MANUAL 16 U.S. WARNING: To reduce the risk of injury, the user must read and understand the owner's manual before using this product. GALLON/60 LITER PROFESSIONAL WET/DRY VAC WD18510 WD1851EX0 FOR QUESTIONS OR INFORMATION CONTACT US AT 1-800-4-RIDGID (1-800-474-3443) from the US and Canada 01-800-701-9811 from Mexico www.ridgidvacs.com ! SP6733 Printed in Mexico Thank you for buying a RIDGID product. • Español -
página 21 SAVE THIS MANUAL FOR FUTURE REFERENCE Part No. SP6733-2 Ridgid WD1851 ES 2/3/12 2:04 PM Page 1 OWNER'S MANUAL 16 U.S. WARNING: To reduce the risk of injury, the user must read and understand the owner's manual before using this product. GALLON/60 LITER PROFESSIONAL WET/DRY VAC WD18510 WD1851EX0 FOR QUESTIONS OR INFORMATION CONTACT US AT 1-800-4-RIDGID (1-800-474-3443) from the US and Canada 01-800-701-9811 from Mexico www.ridgidvacs.com ! SP6733 Printed in Mexico Thank you for buying a RIDGID product. • Español -
Owners Manual
Page 2
... Contents List 4 Filter Replacement and Installation 6 Drum/Caddy Assembly 7 Installing Handle 8 Removing Handle 8 Installing Tool Holder 9 Wet/Dry Vac Assembly 9 Operation 10 Vacuuming Dry Materials 11 Vacuuming Liquids 11 Section Page Emptying the Drum 11 Moving the Wet/Dry Vac 11 Blowing Feature 12 Accessory and Hose Storage 13 Cord Wrap 13 Maintenance 13 Filter 13 Cleaning and Disinfecting the Wet/Dry Vac . . . . 14 Cord Maintenance 14 Storage 14 Casters & Wheels 14 Frame & Handles 14 Repair Parts 16 Warranty 20 IMPORTANT SAFETY INSTRUCTIONS...
... Contents List 4 Filter Replacement and Installation 6 Drum/Caddy Assembly 7 Installing Handle 8 Removing Handle 8 Installing Tool Holder 9 Wet/Dry Vac Assembly 9 Operation 10 Vacuuming Dry Materials 11 Vacuuming Liquids 11 Section Page Emptying the Drum 11 Moving the Wet/Dry Vac 11 Blowing Feature 12 Accessory and Hose Storage 13 Cord Wrap 13 Maintenance 13 Filter 13 Cleaning and Disinfecting the Wet/Dry Vac . . . . 14 Cord Maintenance 14 Storage 14 Casters & Wheels 14 Frame & Handles 14 Repair Parts 16 Warranty 20 IMPORTANT SAFETY INSTRUCTIONS...
Owners Manual
Page 3
... heavy with wet hands. • Use only extension cords that may reduce air flow. • Keep hair, loose clothing, fingers, and all parts of any ventilation openings blocked; or longer. • This Vac is in size. WARNING: To reduce the risk of eye injury, wear safety eyewear. SAVE THIS MANUAL 3 Do not vacuum with damaged cord, plug or other hazardous materials. keep free of dust, lint, hair...
... heavy with wet hands. • Use only extension cords that may reduce air flow. • Keep hair, loose clothing, fingers, and all parts of any ventilation openings blocked; or longer. • This Vac is in size. WARNING: To reduce the risk of eye injury, wear safety eyewear. SAVE THIS MANUAL 3 Do not vacuum with damaged cord, plug or other hazardous materials. keep free of dust, lint, hair...
Owners Manual
Page 4
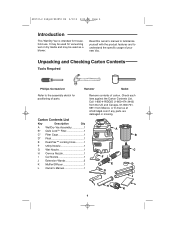
...-2 Ridgid WD1851 ES 2/3/12 2:04 PM Page 4 Introduction This Wet/Dry Vac is intended for vacuuming wet or dry media and may be used as a blower. A B C F E D G J I Car Nozzle 1 J Extension Wands 2 K Muffler/Diffuser 1 L Owner's Manual 1 Remove contents of parts. Carton Contents List Key Description Qty A Wet/Dry Vac Assembly 1 B* Qwik Lock™ Filter 1 C* Filter Cage 1 D* Float 1 E Dual-Flex™ Locking Hose ...........1 F Utility Nozzle 1 G Wet Nozzle 1 H Crevice Nozzle 1 I H 4 L K Check each item against the Carton Contents List...
...-2 Ridgid WD1851 ES 2/3/12 2:04 PM Page 4 Introduction This Wet/Dry Vac is intended for vacuuming wet or dry media and may be used as a blower. A B C F E D G J I Car Nozzle 1 J Extension Wands 2 K Muffler/Diffuser 1 L Owner's Manual 1 Remove contents of parts. Carton Contents List Key Description Qty A Wet/Dry Vac Assembly 1 B* Qwik Lock™ Filter 1 C* Filter Cage 1 D* Float 1 E Dual-Flex™ Locking Hose ...........1 F Utility Nozzle 1 G Wet Nozzle 1 H Crevice Nozzle 1 I H 4 L K Check each item against the Carton Contents List...
Owners Manual
Page 5
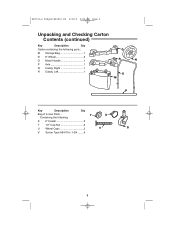
SP6733-2 Ridgid WD1851 ES 2/3/12 2:04 PM Page 5 Unpacking and Checking Carton Contents (continued) Key Description Qty Carton containing the following parts: M Storage Bag 1 N 8" Wheel 2 O Metal Handle 1 P Axle 1 Q Caddy, Right 1 R Caddy, Left 1 Q R N O M P Key Description Qty Bag of Loose Parts Containing the following: T U S 2" Caster 2 T 1/2" Cap Nut 2 U Wheel Caps 2 V S V Screw, Type AB #10 x 1-3/4 ........4 5
SP6733-2 Ridgid WD1851 ES 2/3/12 2:04 PM Page 5 Unpacking and Checking Carton Contents (continued) Key Description Qty Carton containing the following parts: M Storage Bag 1 N 8" Wheel 2 O Metal Handle 1 P Axle 1 Q Caddy, Right 1 R Caddy, Left 1 Q R N O M P Key Description Qty Bag of Loose Parts Containing the following: T U S 2" Caster 2 T 1/2" Cap Nut 2 U Wheel Caps 2 V S V Screw, Type AB #10 x 1-3/4 ........4 5
Owners Manual
Page 6
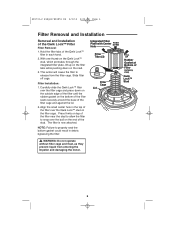
... result in each hand. 2. Slide filter off cage. Integrated Filter Plate with Center Hole PUSH DOWN Filter Tabs (2) Filter Cage Lid PULL UP Rubber Gasket at Bottom of the Qwik Lock™ Filter Filter Removal: 1. SP6733-2 Ridgid WD1851 ES 2/3/12 2:04 PM Page 6 Filter Removal and Installation Removal and Installation of Filter (cutaway view) Qwik Lock™ Stud ! The filter is now attached. WARNING: Do not operate without filter cage and float...
... result in each hand. 2. Slide filter off cage. Integrated Filter Plate with Center Hole PUSH DOWN Filter Tabs (2) Filter Cage Lid PULL UP Rubber Gasket at Bottom of the Qwik Lock™ Filter Filter Removal: 1. SP6733-2 Ridgid WD1851 ES 2/3/12 2:04 PM Page 6 Filter Removal and Installation Removal and Installation of Filter (cutaway view) Qwik Lock™ Stud ! The filter is now attached. WARNING: Do not operate without filter cage and float...
Owners Manual
Page 7
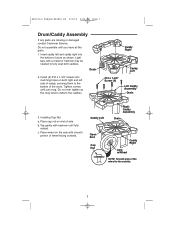
... the outside. 7 c. SP6733-2 Ridgid WD1851 ES 2/3/12 2:04 PM Page 7 Drum/Caddy Assembly If any parts are missing or damaged contact Customer Service. Install (4) #10 x 1-3/4" screws into the bottom of the drum. Caddy Right Caddy Left #10 x 1-3/4" Screw (4) Left Caddy Assembly Drain 3. Caddy Left Right Caddy Assembly Drain Open End Cap Nut Caddy Right Axle w/Wheel NOTE: Smooth side of...
... the outside. 7 c. SP6733-2 Ridgid WD1851 ES 2/3/12 2:04 PM Page 7 Drum/Caddy Assembly If any parts are missing or damaged contact Customer Service. Install (4) #10 x 1-3/4" screws into the bottom of the drum. Caddy Right Caddy Left #10 x 1-3/4" Screw (4) Left Caddy Assembly Drain 3. Caddy Left Right Caddy Assembly Drain Open End Cap Nut Caddy Right Axle w/Wheel NOTE: Smooth side of...
Owners Manual
Page 8
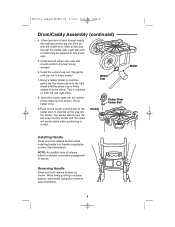
... both left making sure the leg slot lines up with the cradle hole. Wheel Cap Socket Caster Stem Caster Ball Mallet Installing Handle Press and hold release buttons as shown. (Front caster only). 9. Slide open end of handle. While firmly pushing in drum (See illustration). Install the second cap nut. SP6733-2 Ridgid WD1851 ES 2/3/12 2:04 PM Page 8 Drum/Caddy...
... both left making sure the leg slot lines up with the cradle hole. Wheel Cap Socket Caster Stem Caster Ball Mallet Installing Handle Press and hold release buttons as shown. (Front caster only). 9. Slide open end of handle. While firmly pushing in drum (See illustration). Install the second cap nut. SP6733-2 Ridgid WD1851 ES 2/3/12 2:04 PM Page 8 Drum/Caddy...

Owners Manual
Page 9
... (assembled earlier). 2. To remove the hose from the Vac, press the release button in the hose assembly and pull the hose out of the Vac inlet, as shown with extension wand holders facing unit. Tote Straps (4) Handle Wet/Dry Vac Assembly 1. The hose should snap into the inlet of the "DualFlex™ Locking" hose into place. SP6733-2 Ridgid WD1851 ES 2/3/12 2:04 PM Page 9 Drum/Caddy Assembly (continued) Installing Tool Holder Tote Snaps Install tool...
... (assembled earlier). 2. To remove the hose from the Vac, press the release button in the hose assembly and pull the hose out of the Vac inlet, as shown with extension wand holders facing unit. Tote Straps (4) Handle Wet/Dry Vac Assembly 1. The hose should snap into the inlet of the "DualFlex™ Locking" hose into place. SP6733-2 Ridgid WD1851 ES 2/3/12 2:04 PM Page 9 Drum/Caddy Assembly (continued) Installing Tool Holder Tote Snaps Install tool...
Owners Manual
Page 10
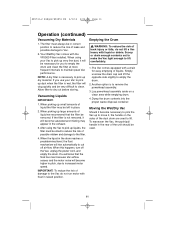
... leave Vac running when float has cut off suction. • Sparks inside the motor can be used on by pushing the switch from position "O" to an independent service center or call customer service. • When using Vac if you plug the power cord into contact with wet hands. • Unplug Vac before servicing. Wet Nozzle - Extension Wands - Provides transfer of attaching extension wands and nozzles. Muffler/Diffuser - Dual-Flex™ Locking Hose - Use to work site...
... leave Vac running when float has cut off suction. • Sparks inside the motor can be used on by pushing the switch from position "O" to an independent service center or call customer service. • When using Vac if you plug the power cord into contact with wet hands. • Unplug Vac before servicing. Wet Nozzle - Extension Wands - Provides transfer of attaching extension wands and nozzles. Muffler/Diffuser - Dual-Flex™ Locking Hose - Use to work site...
Owners Manual
Page 11
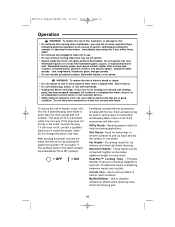
...-2 Ridgid WD1851 ES 2/3/12 2:04 PM Page 11 Operation (continued) Vacuuming Dry Materials 1. If you to empty the drum and clean the filter at more frequent intervals to pick up small amounts of liquid the filter may appear in the rear of damage to remove the powerhead assembly. 3. Lay powerhead assembly aside on the sides of liquids. Moving the Wet/Dry Vac Should it will clog quickly...
...-2 Ridgid WD1851 ES 2/3/12 2:04 PM Page 11 Operation (continued) Vacuuming Dry Materials 1. If you to empty the drum and clean the filter at more frequent intervals to pick up small amounts of liquid the filter may appear in the rear of damage to remove the powerhead assembly. 3. Lay powerhead assembly aside on the sides of liquids. Moving the Wet/Dry Vac Should it will clog quickly...
Owners Manual
Page 12
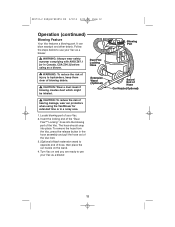
... ear protectors when using as a blower. ! To remove the hose from the Vac, press the release button in a noisy area. 1. Locate blowing port of hose, then place the car nozzle on and you are ready to use your Vac. 2. It can blow sawdust and other debris. CAUTION: To reduce the risk of Hose Car Nozzle (Optional) 12 SP6733-2 Ridgid WD1851 ES 2/3/12 2:04 PM Page 12 Operation...
... ear protectors when using as a blower. ! To remove the hose from the Vac, press the release button in a noisy area. 1. Locate blowing port of hose, then place the car nozzle on and you are ready to use your Vac. 2. It can blow sawdust and other debris. CAUTION: To reduce the risk of Hose Car Nozzle (Optional) 12 SP6733-2 Ridgid WD1851 ES 2/3/12 2:04 PM Page 12 Operation...
Owners Manual
Page 13
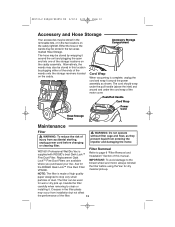
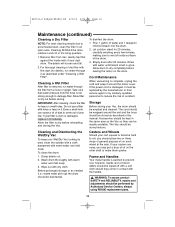
... Dust Filter. WARNING: Do not operate without filter cage and float, as shown. Creases in the two areas marked Hose Storage. Push/Pull Handle Cord Wrap STHOORSAEGE STHOORSAEGE Hose Storage Area Power Cord Maintenance Filter ! NOTE: The filter is made of high quality paper designed to clean or installing it around the power assembly as they prevent liquid from accidental starting, unplug power cord before using the Vac for dry material pick-up . SP6733-2 Ridgid WD1851...
... Dust Filter. WARNING: Do not operate without filter cage and float, as shown. Creases in the two areas marked Hose Storage. Push/Pull Handle Cord Wrap STHOORSAEGE STHOORSAEGE Hose Storage Area Power Cord Maintenance Filter ! NOTE: The filter is made of high quality paper designed to clean or installing it around the power assembly as they prevent liquid from accidental starting, unplug power cord before using the Vac for dry material pick-up . SP6733-2 Ridgid WD1851...
Owners Manual
Page 14
... cleaned. Cleaning SHOULD be stored indoors. Allow filter to damage filter. The cord should be wrapped around the motor cover. Cord Maintenance When vacuuming is removed, run water through the filter from Vac. Cleaning a Wet Filter After filter is complete, unplug the cord and wrap it immediately. If the power cord is not strong enough to dry out before storing. waste water pick up) the drum should be done outdoors and not in an open...
... cleaned. Cleaning SHOULD be stored indoors. Allow filter to damage filter. The cord should be wrapped around the motor cover. Cord Maintenance When vacuuming is removed, run water through the filter from Vac. Cleaning a Wet Filter After filter is complete, unplug the cord and wrap it immediately. If the power cord is not strong enough to dry out before storing. waste water pick up) the drum should be done outdoors and not in an open...
Owners Manual
Page 16
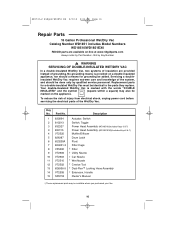
...; Wet Nozzle 12 VT2502 † Crevice Tool 13 826356-5 † Dual-Flex™ Locking Hose Assembly 14 VT2508 † Extension, Handle 15 SP6733 Owner's Manual † These replacement parts may also be marked on a double-insulated appliance, nor should be available where you purchased your Vac. 16 To reduce the risk of injury from electrical shock, unplug power cord before servicing the electrical parts of the Wet/Dry Vac. No...
...; Wet Nozzle 12 VT2502 † Crevice Tool 13 826356-5 † Dual-Flex™ Locking Hose Assembly 14 VT2508 † Extension, Handle 15 SP6733 Owner's Manual † These replacement parts may also be marked on a double-insulated appliance, nor should be available where you purchased your Vac. 16 To reduce the risk of injury from electrical shock, unplug power cord before servicing the electrical parts of the Wet/Dry Vac. No...
Owners Manual
Page 17
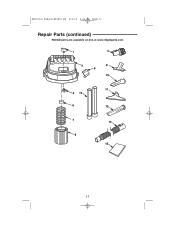
SP6733-2 Ridgid WD1851 ES 2/3/12 2:04 PM Page 17 Repair Parts (continued) RIDGID parts are available on-line at www.ridgidparts.com 1 4 3 9 5 10 2 14 6 7 8 11 12 13 15 17
SP6733-2 Ridgid WD1851 ES 2/3/12 2:04 PM Page 17 Repair Parts (continued) RIDGID parts are available on-line at www.ridgidparts.com 1 4 3 9 5 10 2 14 6 7 8 11 12 13 15 17

Owners Manual
Page 18
... 820563-12 13 509748-1 Description Handle Dust Drum Assembly Drain Cap Wheel Cap Cap Nut 1/2" 8" Wheel Assembly (Includes Keys 4 and 5) Shaft Caddy, Right Caddy, Left Caster Tote Screw Type "AB" #10 x 1-3/4 Bag of Loose Parts (Not Illustrated) (Includes Keys 4, 5, 10, and 12) 18 SP6733-2 Ridgid WD1851 ES 2/3/12 2:04 PM Page 18 Repair Parts (continued) Parts List for Wet/Dry Vac Cart RIDGID parts are available on-line at www...
... 820563-12 13 509748-1 Description Handle Dust Drum Assembly Drain Cap Wheel Cap Cap Nut 1/2" 8" Wheel Assembly (Includes Keys 4 and 5) Shaft Caddy, Right Caddy, Left Caster Tote Screw Type "AB" #10 x 1-3/4 Bag of Loose Parts (Not Illustrated) (Includes Keys 4, 5, 10, and 12) 18 SP6733-2 Ridgid WD1851 ES 2/3/12 2:04 PM Page 18 Repair Parts (continued) Parts List for Wet/Dry Vac Cart RIDGID parts are available on-line at www...
Owners Manual
Page 20
... of the RIDGID® Wet/Dry Vac. • How to obtain service To obtain the benefit of this warranty, deliver via prepaid transportation the complete product to receive a full refund of power head assembly. WD18510 or WD1851EX0 Model and serial number may be returned to the place of Ridge Tool Company. or, if after three attempts to repair or replace during the warranty period the Wet/Dry Vac is still...
... of the RIDGID® Wet/Dry Vac. • How to obtain service To obtain the benefit of this warranty, deliver via prepaid transportation the complete product to receive a full refund of power head assembly. WD18510 or WD1851EX0 Model and serial number may be returned to the place of Ridge Tool Company. or, if after three attempts to repair or replace during the warranty period the Wet/Dry Vac is still...


