

Owners Manual
Page 1
Thank you for buying a RIDGID product. • Español - página 15 SAVE THIS MANUAL FOR FUTURE REFERENCE Part No. SP6765 Printed in Mexico WARNING: To reduce the risk of injury, the user must read and understand the owner's manual before using this product. GALLON/45 LITER WET/DRY VAC WD12701 WD1270EX0 FOR QUESTIONS OR INFORMATION CONTACT US AT 1-800-4-RIDGID (1-800-474-3443) from the US and Canada 01-800-701-9811 from Mexico www.ridgidvacs.com ! SP6765-2 12 GALLON ES 2/3/12 2:00 PM Page 1 OWNER'S MANUAL 12 U.S.
Thank you for buying a RIDGID product. • Español - página 15 SAVE THIS MANUAL FOR FUTURE REFERENCE Part No. SP6765 Printed in Mexico WARNING: To reduce the risk of injury, the user must read and understand the owner's manual before using this product. GALLON/45 LITER WET/DRY VAC WD12701 WD1270EX0 FOR QUESTIONS OR INFORMATION CONTACT US AT 1-800-4-RIDGID (1-800-474-3443) from the US and Canada 01-800-701-9811 from Mexico www.ridgidvacs.com ! SP6765-2 12 GALLON ES 2/3/12 2:00 PM Page 1 OWNER'S MANUAL 12 U.S.
Owners Manual
Page 2
... Carton Contents 4 Caster/Caster Foot Assembly 4 Filter Removal and Installation 5 Wet/Dry Vac Assembly 6 Insert Hose 6 To Store Your Accessories 7 Operation 7 Vacuuming Dry Materials 8 Vacuuming Liquids 8 Section Page Emptying the Drum 9 Moving the Wet/Dry Vac 9 Blowing Feature 9 Maintenance 10 Filter 10 Cleaning and Disinfecting the Wet/Dry Vac 11 Cord Maintenance 11 Storage 11 Casters 11 Repair Parts 12 Warranty 14 IMPORTANT SAFETY INSTRUCTIONS Safety is a combination of using your Wet/Dry Vacuum cleaner ("Vac") works. When using common sense, staying alert, and...
... Carton Contents 4 Caster/Caster Foot Assembly 4 Filter Removal and Installation 5 Wet/Dry Vac Assembly 6 Insert Hose 6 To Store Your Accessories 7 Operation 7 Vacuuming Dry Materials 8 Vacuuming Liquids 8 Section Page Emptying the Drum 9 Moving the Wet/Dry Vac 9 Blowing Feature 9 Maintenance 10 Filter 10 Cleaning and Disinfecting the Wet/Dry Vac 11 Cord Maintenance 11 Storage 11 Casters 11 Repair Parts 12 Warranty 14 IMPORTANT SAFETY INSTRUCTIONS Safety is a combination of using your Wet/Dry Vacuum cleaner ("Vac") works. When using common sense, staying alert, and...
Owners Manual
Page 3
... the connection. Do not run Vac over cord. Do not use with damaged cord, plug or other hazardous materials. WHEN SERVICING USE ONLY IDENTICAL REPLACEMENT PARTS. ! To reduce power loss, use an extension cord with your own safety, read and understand owner's manual. Read the instructions for extended time or in size. Do not use a 14 gauge extension cord if 25 to rain - Use only identical replacement parts. Vacuuming fine debris with conductors...
... the connection. Do not run Vac over cord. Do not use with damaged cord, plug or other hazardous materials. WHEN SERVICING USE ONLY IDENTICAL REPLACEMENT PARTS. ! To reduce power loss, use an extension cord with your own safety, read and understand owner's manual. Read the instructions for extended time or in size. Do not use a 14 gauge extension cord if 25 to rain - Use only identical replacement parts. Vacuuming fine debris with conductors...
Owners Manual
Page 4
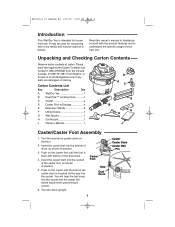
... upright. Read this owner's manual to familiarize yourself with bottom of the caster foot, as shown (4 places). 3. Carton Contents List Key Description Qty A Wet/Dry Vac 1 B Dual-Flex™ Locking Hose ...........1 C Caster 4 D Caster Foot w/Storage 4 E Extension Wands 2 F Utility Nozzle 1 G Wet Nozzle 1 H Car Nozzle 1 J Owner's Manual 1 D A C B F E H G J Caster/Caster Foot Assembly 1. Turn the dust drum upside down on the caster until the foot is correct. 6. It may be used for household use...
... upright. Read this owner's manual to familiarize yourself with bottom of the caster foot, as shown (4 places). 3. Carton Contents List Key Description Qty A Wet/Dry Vac 1 B Dual-Flex™ Locking Hose ...........1 C Caster 4 D Caster Foot w/Storage 4 E Extension Wands 2 F Utility Nozzle 1 G Wet Nozzle 1 H Car Nozzle 1 J Owner's Manual 1 D A C B F E H G J Caster/Caster Foot Assembly 1. Turn the dust drum upside down on the caster until the foot is correct. 6. It may be used for household use...
Owners Manual
Page 5
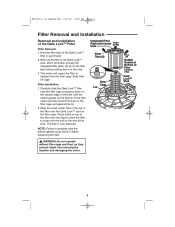
... hand. 2. Slide filter off cage. NOTE: Failure to snap over the Qwik Lock™ stud on the bottom of the filter seats securely around the base of the Qwik Lock™ Filter Filter Removal: 1. WARNING: Do not operate without filter cage and float, as they prevent liquid from the filter cage. The filter is now attached. Hold the filter tabs of Filter (cutaway view...
... hand. 2. Slide filter off cage. NOTE: Failure to snap over the Qwik Lock™ stud on the bottom of the filter seats securely around the base of the Qwik Lock™ Filter Filter Removal: 1. WARNING: Do not operate without filter cage and float, as they prevent liquid from the filter cage. The filter is now attached. Hold the filter tabs of Filter (cutaway view...
Owners Manual
Page 6
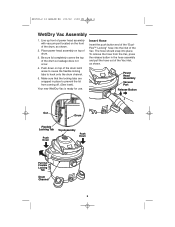
... of the Vac. Place power head assembly on the front of the "DualFlex™ Locking" hose into place. To remove the hose from coming off. (See inset). Insert Hose Insert the push button end of the drum, as shown. SP6765-2 12 GALLON ES 2/3/12 2:00 PM Page 6 Wet/Dry Vac Assembly 1. Your new Wet/Dry Vac is ready for use. Line up front of power head assembly with vacuum port located on top...
... of the Vac. Place power head assembly on the front of the "DualFlex™ Locking" hose into place. To remove the hose from coming off. (See inset). Insert Hose Insert the push button end of the drum, as shown. SP6765-2 12 GALLON ES 2/3/12 2:00 PM Page 6 Wet/Dry Vac Assembly 1. Your new Wet/Dry Vac is ready for use. Line up front of power head assembly with vacuum port located on top...
Owners Manual
Page 7
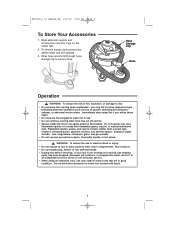
... not handle plug, switch, or Vac with wet hands. • Unplug Vac before servicing. Immediately stop using an extension cord, use . • Do not continue running while unattended - SP6765-2 12 GALLON ES 2/3/12 2:00 PM Page 7 To Store Your Accessories 1. WARNING: To reduce the risk of suction, debris/liquid exiting the exhaust, or abnormal motor noises. Flammable liquids, gases, and vapors include: lighter fluid, solvent-type cleaners, oil...
... not handle plug, switch, or Vac with wet hands. • Unplug Vac before servicing. Immediately stop using an extension cord, use . • Do not continue running while unattended - SP6765-2 12 GALLON ES 2/3/12 2:00 PM Page 7 To Store Your Accessories 1. WARNING: To reduce the risk of suction, debris/liquid exiting the exhaust, or abnormal motor noises. Flammable liquids, gases, and vapors include: lighter fluid, solvent-type cleaners, oil...
Owners Manual
Page 8
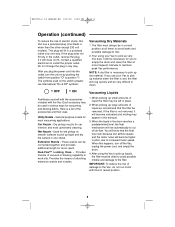
... provides additional length for vacuuming and blowing debris. IMPORTANT: To reduce the risk of damage to increased motor speed. These wands can be removed. The symbols used in any way. NOTE: A dry filter is necessary to maintain peak Vac performance. Wet Nozzle - Extension Wands - When picking up dry material. If it will clog quickly and be left in the exhaust. 3. Do not change the plug in various ways...
... provides additional length for vacuuming and blowing debris. IMPORTANT: To reduce the risk of damage to increased motor speed. These wands can be removed. The symbols used in any way. NOTE: A dry filter is necessary to maintain peak Vac performance. Wet Nozzle - Extension Wands - When picking up dry material. If it will clog quickly and be left in the exhaust. 3. Do not change the plug in various ways...
Owners Manual
Page 9
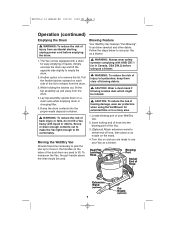
... the top assembly up to move it become necessary to lift. Moving the Wet/Dry Vac Should it , the handles on the wand. 4. WARNING: To reduce the risk of injury to release from the drum. 3. CAUTION: Wear a dust mask if blowing creates dust which might be used to pick the Vac up and away from accidental starting, unplug power cord before using the Vac/Blower for easy...
... the top assembly up to move it become necessary to lift. Moving the Wet/Dry Vac Should it , the handles on the wand. 4. WARNING: To reduce the risk of injury to release from the drum. 3. CAUTION: Wear a dust mask if blowing creates dust which might be used to pick the Vac up and away from accidental starting, unplug power cord before using the Vac/Blower for easy...
Owners Manual
Page 10
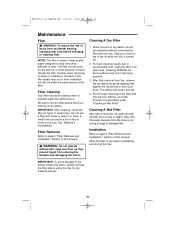
...: Do not operate without removing the filter from accidental starting, unplug power cord before reinstalling and storing the Vac. Take care that water pressure from the hose is removed, run water through the filter from Vac, remove the dry debris by gently tapping filter against the inside wall of injury from the Vac. For best cleaning results due to the blower wheel and motor, always reinstall the filter before storing or picking up...
...: Do not operate without removing the filter from accidental starting, unplug power cord before reinstalling and storing the Vac. Take care that water pressure from the hose is removed, run water through the filter from Vac, remove the dry debris by gently tapping filter against the inside wall of injury from the Vac. For best cleaning results due to the blower wheel and motor, always reinstall the filter before storing or picking up...
Owners Manual
Page 11
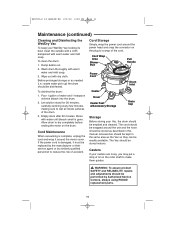
... the plug to make them quieter. ! To disinfect the drum: 1. Cord Maintenance When vacuuming is damaged, it around the power head and snap the connector on the roller shaft to a wrap of water and 1 teaspoon chlorine bleach into the drum. 2. waste water pick up) the drum should be replaced by the manufacturer or their service agent or by Authorized Service Centers, always using RIDGID replacement parts. 11...
... the plug to make them quieter. ! To disinfect the drum: 1. Cord Maintenance When vacuuming is damaged, it around the power head and snap the connector on the roller shaft to a wrap of water and 1 teaspoon chlorine bleach into the drum. 2. waste water pick up) the drum should be replaced by the manufacturer or their service agent or by Authorized Service Centers, always using RIDGID replacement parts. 11...

Owners Manual
Page 12
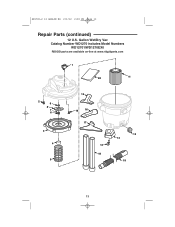
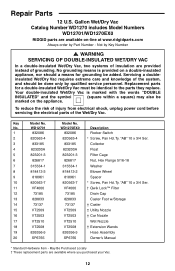
..., and should a means for a double-insulated Wet/Dry Vac must be identical to the parts they replace. Replacement parts for grounding be done only by qualified service personnel. Servicing a double- To reduce the risk of injury from electrical shock, unplug power cord before servicing the electrical parts of the Wet/Dry Vac. Gallon Wet/Dry Vac Catalog Number WD1270 includes Model Numbers WD12701/WD1270EX0 RIDGID parts are available where you purchased your Vac. 12 WD12701 1 832086 2 820563-4 3 833185...
..., and should a means for a double-insulated Wet/Dry Vac must be identical to the parts they replace. Replacement parts for grounding be done only by qualified service personnel. Servicing a double- To reduce the risk of injury from electrical shock, unplug power cord before servicing the electrical parts of the Wet/Dry Vac. Gallon Wet/Dry Vac Catalog Number WD1270 includes Model Numbers WD12701/WD1270EX0 RIDGID parts are available where you purchased your Vac. 12 WD12701 1 832086 2 820563-4 3 833185...
Owners Manual
Page 13
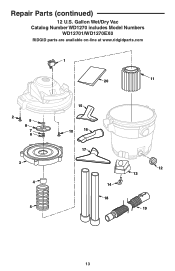
Gallon Wet/Dry Vac Catalog Number WD1270 includes Model Numbers WD12701/WD1270EX0 RIDGID parts are available on-line at www.ridgidparts.com 1 20 11 2 9 8 7 6 3 4 5 15 10 16 17 14 18 12 13 19 13 SP6765-2 12 GALLON ES 2/3/12 2:00 PM Page 13 Repair Parts (continued) 12 U.S.
Gallon Wet/Dry Vac Catalog Number WD1270 includes Model Numbers WD12701/WD1270EX0 RIDGID parts are available on-line at www.ridgidparts.com 1 20 11 2 9 8 7 6 3 4 5 15 10 16 17 14 18 12 13 19 13 SP6765-2 12 GALLON ES 2/3/12 2:00 PM Page 13 Repair Parts (continued) 12 U.S.
Owners Manual
Page 14
... to repair or replace during the warranty period the product is authorized to receive a full refund of your Model Number and Serial Number on behalf of the RIDGE TOOL COMPANY. Warranty coverage ends when the product becomes unusable for future use. WD12701 / WD1270EX0 Serial Number Model and serial numbers may be repaired or replaced, at RIDGE TOOL's option, and returned at no charge; You should be free of the RIDGID® tool. No...
... to repair or replace during the warranty period the product is authorized to receive a full refund of your Model Number and Serial Number on behalf of the RIDGE TOOL COMPANY. Warranty coverage ends when the product becomes unusable for future use. WD12701 / WD1270EX0 Serial Number Model and serial numbers may be repaired or replaced, at RIDGE TOOL's option, and returned at no charge; You should be free of the RIDGID® tool. No...
Parts Guide
Page 2
... servicing the electrical parts of the system, and should a means for a double-insulated Wet/Dry Vac must be identical to the parts they replace. Collector Float Filter Cage Nut, Hex Flange 5/16-18 Washer Blower Wheel Spacer * Screw, Pan Hd. "AB" 10 x 3/4 Ser. † Qwik Lock™ Filter Drain Cap Caster Foot w/Storage † Caster † Utility Nozzle † Car Nozzle Wet Nozzle † Extension Wands Hose Assembly Owner's Manual...
... servicing the electrical parts of the system, and should a means for a double-insulated Wet/Dry Vac must be identical to the parts they replace. Collector Float Filter Cage Nut, Hex Flange 5/16-18 Washer Blower Wheel Spacer * Screw, Pan Hd. "AB" 10 x 3/4 Ser. † Qwik Lock™ Filter Drain Cap Caster Foot w/Storage † Caster † Utility Nozzle † Car Nozzle Wet Nozzle † Extension Wands Hose Assembly Owner's Manual...
Parts Guide
Page 3
Repair Parts (continued) 12 U.S. Gallon Wet/Dry Vac Catalog Number WD1270 includes Model Numbers WD12701/WD1270EX0 RIDGID parts are available on-line at www.ridgidparts.com 1 20 11 2 9 8 7 6 3 4 5 15 10 16 17 14 18 12 13 19 13
Repair Parts (continued) 12 U.S. Gallon Wet/Dry Vac Catalog Number WD1270 includes Model Numbers WD12701/WD1270EX0 RIDGID parts are available on-line at www.ridgidparts.com 1 20 11 2 9 8 7 6 3 4 5 15 10 16 17 14 18 12 13 19 13


