
Owners Manual
Page 2
RP 330 Pressing Tool Table of Contents Recording Form for Machine Serial Number ...1 General Power Tool Safety Information Work Area Safety...2 Electrical Safety ...2 Personal Safety ...3 Power ...Scissor Jaw Set ...7 Pressing A Fitting With Typical Actuator and Press Ring Set 8 Inspecting The Pressed Connection ...9 Maintenance Instructions Cleaning and Lubrication ...10 Required Maintenance at RIDGID Authorized Service Center 10 Accessories ...10 Storage ...10 Service and Repair ...10 Troubleshooting ...11 RP 330 Diagnostic Codes ...12 Lifetime Warranty ...Back Cover ii Ridge Tool Company
RP 330 Pressing Tool Table of Contents Recording Form for Machine Serial Number ...1 General Power Tool Safety Information Work Area Safety...2 Electrical Safety ...2 Personal Safety ...3 Power ...Scissor Jaw Set ...7 Pressing A Fitting With Typical Actuator and Press Ring Set 8 Inspecting The Pressed Connection ...9 Maintenance Instructions Cleaning and Lubrication ...10 Required Maintenance at RIDGID Authorized Service Center 10 Accessories ...10 Storage ...10 Service and Repair ...10 Troubleshooting ...11 RP 330 Diagnostic Codes ...12 Lifetime Warranty ...Back Cover ii Ridge Tool Company
Owners Manual
Page 6
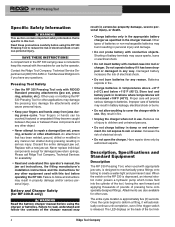
... manner can be crushed, fractured or amputated if they become caught between the jaws or between these precautions carefully before operating the RP 330. Please call Ridge Tool Company, Technical Services for any way. Failure to this operator's manual, the jaw set instructions, the...Read the battery charger manual before using the RP 330 Pressing Tool to cover the charger while in property damage and/or serious personal injury. Your fingers or hands can shatter during press cycle. Replace with this manual with RIDGID Standard pressing attachments (jaw set . Failure to...
... manner can be crushed, fractured or amputated if they become caught between the jaws or between these precautions carefully before operating the RP 330. Please call Ridge Tool Company, Technical Services for any way. Failure to this operator's manual, the jaw set instructions, the...Read the battery charger manual before using the RP 330 Pressing Tool to cover the charger while in property damage and/or serious personal injury. Your fingers or hands can shatter during press cycle. Replace with this manual with RIDGID Standard pressing attachments (jaw set . Failure to...
Owners Manual
Page 7
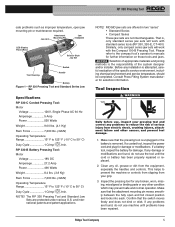
...the fully open jaw mounting pin or maintenance required. If a corded tool, inspect the power cord and plug for damage. The RP 330 Pressing Tool and Standard Jaw Sets are not interchangeable. Please refer to reduce the risk of serious injury from electric shock, crushing injures... 5 Jaw Arm Attachment Mounting Pin Jaw Sideplate LED Display Panel (Rear) Scissor Style Jaw Set Tool Housing Switch Handle Battery Figure 1 - RIDGID jaw sets are offered in two "series" • Standard Series • Compact Series These jaw sets are protected under various U.S. NOTICE Selection...
...the fully open jaw mounting pin or maintenance required. If a corded tool, inspect the power cord and plug for damage. The RP 330 Pressing Tool and Standard Jaw Sets are not interchangeable. Please refer to reduce the risk of serious injury from electric shock, crushing injures... 5 Jaw Arm Attachment Mounting Pin Jaw Sideplate LED Display Panel (Rear) Scissor Style Jaw Set Tool Housing Switch Handle Battery Figure 1 - RIDGID jaw sets are offered in two "series" • Standard Series • Compact Series These jaw sets are protected under various U.S. NOTICE Selection...
Owners Manual
Page 8
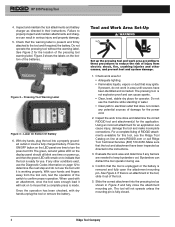
RP 330 Pressing Tool 4. Figure 3 shows the labels on the display panel should all blink one time to be done and determine the correct RIDGID tool and attachment(s) for the application. Label On Bottom Of Battery 6. The green, red and yellow LED on the bottom of the tool. 5. Check work...2. Pressing Tool Warning Label Figure 3 - Tool and Work Area Set-Up WARNING Set up , and then the green LED will lock on line at www.RIDGID.com or call Ridge Tool Technical Services (800) 519-3456. When used with dry hands unplug the tool or remove the battery. If present, do...
RP 330 Pressing Tool 4. Figure 3 shows the labels on the display panel should all blink one time to be done and determine the correct RIDGID tool and attachment(s) for the application. Label On Bottom Of Battery 6. The green, red and yellow LED on the bottom of the tool. 5. Check work...2. Pressing Tool Warning Label Figure 3 - Tool and Work Area Set-Up WARNING Set up , and then the green LED will lock on line at www.RIDGID.com or call Ridge Tool Technical Services (800) 519-3456. When used with dry hands unplug the tool or remove the battery. If present, do...
Owners Manual
Page 10
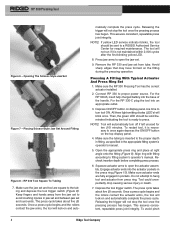
... tool should be sent to open the actuator assembly. Press jaw arms to a RIDGID Authorized Service Center for ten (10) minutes. Remove the RP 330 and jaw set . 9. Make sure the RP 330 Pressing Tool has the correct actuator installed. 2. For the RP 330-C plug the tool into the base of the handle. Make sure the tubing...
... tool should be sent to open the actuator assembly. Press jaw arms to a RIDGID Authorized Service Center for ten (10) minutes. Remove the RP 330 and jaw set . 9. Make sure the RP 330 Pressing Tool has the correct actuator installed. 2. For the RP 330-C plug the tool into the base of the handle. Make sure the tubing...

Owners Manual
Page 11
If yellow LED service indicator blinks, the tool should be sent to a RIDGID Authorized Service Center for required maintenance. Pressure Release Button Inspecting The Pressed Connection 1. Control rings and label are found, then removal of ...'s operator's manual for the following: • Excessive misalignment of these problems are supplied by manually grasping ring halves and opening assembly. NOTICE The RP 330 Pressing Tool will turn off automatically if the battery is not maintained within 2,000 cycles after the first blinking yellow LED. 8. Ridge Tool Company ...
If yellow LED service indicator blinks, the tool should be sent to a RIDGID Authorized Service Center for required maintenance. Pressure Release Button Inspecting The Pressed Connection 1. Control rings and label are found, then removal of ...'s operator's manual for the following: • Excessive misalignment of these problems are supplied by manually grasping ring halves and opening assembly. NOTICE The RP 330 Pressing Tool will turn off automatically if the battery is not maintained within 2,000 cycles after the first blinking yellow LED. 8. Ridge Tool Company ...
Owners Manual
Page 12
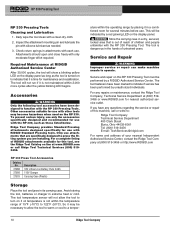
...is not within the temperature range of 15°F (-10°C) to function with RIDGID Standard Pressing tools. Inspect the attachment mounting pin and lubricate the pin with the RP 330 Pressing Tool. The tool is out of reach of untrained users. Accessories WARNING Only .... Service and Repair WARNING Improper service or repair can make machine unsafe to turn on the RP 330. RP 330 Pressing Tool RP 330 Pressing Tools Cleaning and Lubrication 1. Required Maintenance at RIDGID Authorized Service Center After 30,000 cycles, the tool will be indicated by a red glowing LED...
...is not within the temperature range of 15°F (-10°C) to function with RIDGID Standard Pressing tools. Inspect the attachment mounting pin and lubricate the pin with the RP 330 Pressing Tool. The tool is out of reach of untrained users. Accessories WARNING Only .... Service and Repair WARNING Improper service or repair can make machine unsafe to turn on the RP 330. RP 330 Pressing Tool RP 330 Pressing Tools Cleaning and Lubrication 1. Required Maintenance at RIDGID Authorized Service Center After 30,000 cycles, the tool will be indicated by a red glowing LED...

