
Owners Manual
Page 2
RP 330 Pressing Tool Table of Contents Recording Form for Machine Serial Number ...1 General Power Tool Safety Information Work Area Safety...2 Electrical Safety ...2 Personal Safety ...3 Power ...Scissor Jaw Set ...7 Pressing A Fitting With Typical Actuator and Press Ring Set 8 Inspecting The Pressed Connection ...9 Maintenance Instructions Cleaning and Lubrication ...10 Required Maintenance at RIDGID Authorized Service Center 10 Accessories ...10 Storage ...10 Service and Repair ...10 Troubleshooting ...11 RP 330 Diagnostic Codes ...12 Lifetime Warranty ...Back Cover ii Ridge Tool Company
RP 330 Pressing Tool Table of Contents Recording Form for Machine Serial Number ...1 General Power Tool Safety Information Work Area Safety...2 Electrical Safety ...2 Personal Safety ...3 Power ...Scissor Jaw Set ...7 Pressing A Fitting With Typical Actuator and Press Ring Set 8 Inspecting The Pressed Connection ...9 Maintenance Instructions Cleaning and Lubrication ...10 Required Maintenance at RIDGID Authorized Service Center 10 Accessories ...10 Storage ...10 Service and Repair ...10 Troubleshooting ...11 RP 330 Diagnostic Codes ...12 Lifetime Warranty ...Back Cover ii Ridge Tool Company
Owners Manual
Page 6
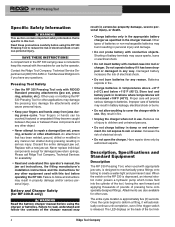
...fractured or amputated if they become caught between the jaws or between these precautions carefully before operating the RP 330. The LED displays on the RP 330 is designed to mechanically press fittings onto tubing to follow the contents of pressing force onto specially ... any other object. • Never attempt to this operator's manual, the jaw set , press ring, actuator, etc.). Replace with RIDGID Standard pressing attachments (jaw set instructions, the fitting manufacturer's installation instructions and the instructions for use . SAVE THESE INSTRUCTIONS! A compartment ...
...fractured or amputated if they become caught between the jaws or between these precautions carefully before operating the RP 330. The LED displays on the RP 330 is designed to mechanically press fittings onto tubing to follow the contents of pressing force onto specially ... any other object. • Never attempt to this operator's manual, the jaw set , press ring, actuator, etc.). Replace with RIDGID Standard pressing attachments (jaw set instructions, the fitting manufacturer's installation instructions and the instructions for use . SAVE THESE INSTRUCTIONS! A compartment ...
Owners Manual
Page 7
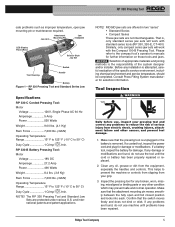
...dirt from electric shock, crushing injures, attachment failure and other condition which may prevent safe and normal operation. RP 330 Pressing Tool and Standard Series Jaw Set Specifications RP 330-C Corded Pressing Tool: Motor Voltage 120V, Single Phase AC 60 Hz Amperage 5 Amp Power 520 Watts Weight...are found , do not use , inspect your grip. 3. RP 330 Pressing Tool cate problems such as improper temperature, open and full closed position and locks into each. and international patents and patent applications. RIDGID jaw sets are offered in two "series" • Standard Series...
...dirt from electric shock, crushing injures, attachment failure and other condition which may prevent safe and normal operation. RP 330 Pressing Tool and Standard Series Jaw Set Specifications RP 330-C Corded Pressing Tool: Motor Voltage 120V, Single Phase AC 60 Hz Amperage 5 Amp Power 520 Watts Weight...are found , do not use , inspect your grip. 3. RP 330 Pressing Tool cate problems such as improper temperature, open and full closed position and locks into each. and international patents and patent applications. RIDGID jaw sets are offered in two "series" • Standard Series...
Owners Manual
Page 8
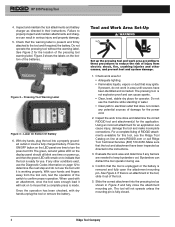
...of the switch to confirm proper operation. See Figure 2 for the location of RIDGID attachments available for this tool, see the Ridge Tool Catalog on to be done and determine the correct RIDGID tool and attachment(s) for an application can distract the tool operator during use the ...Clear, level, stable dry place for the power cord. 2. Inspect the work area for use the machine while standing in the instructions. 3. RP 330 Pressing Tool 4. Failure to determine the next step and do not work area and determine if any potential sources of the batteries. Check that ...
...of the switch to confirm proper operation. See Figure 2 for the location of RIDGID attachments available for this tool, see the Ridge Tool Catalog on to be done and determine the correct RIDGID tool and attachment(s) for an application can distract the tool operator during use the ...Clear, level, stable dry place for the power cord. 2. Inspect the work area for use the machine while standing in the instructions. 3. RP 330 Pressing Tool 4. Failure to determine the next step and do not work area and determine if any potential sources of the batteries. Check that ...
Owners Manual
Page 10
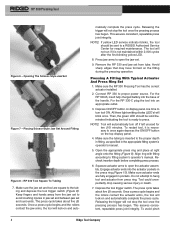
... system's operator's manual. 5. This assures consistent, repeatable press joint integrity. Opening The Scissor-Style Jaw Set Figure 7 - For the RP 330-B, insert fully charged battery into an appropriate outlet. 3. To restart tool, it is ready to turn off if left unused for required maintenance...LED service indicator blinks, the tool should be sent to proper power source. Press jaw arms to open the actuator assembly. Connect RP 330 to a RIDGID Authorized Service Center for ten (10) minutes. Tool will lock-on the top display panel. 4. Tool could unexpectedly drop causing...
... system's operator's manual. 5. This assures consistent, repeatable press joint integrity. Opening The Scissor-Style Jaw Set Figure 7 - For the RP 330-B, insert fully charged battery into an appropriate outlet. 3. To restart tool, it is ready to turn off if left unused for required maintenance...LED service indicator blinks, the tool should be sent to proper power source. Press jaw arms to open the actuator assembly. Connect RP 330 to a RIDGID Authorized Service Center for ten (10) minutes. Tool will lock-on the top display panel. 4. Tool could unexpectedly drop causing...

Owners Manual
Page 11
... to successfully complete a pressed connection. Installing Press Ring Onto Fitting Figure 10 - This will need to be sent to a RIDGID Authorized Service Center for required maintenance. Inspect the pressed fitting. After cycle is complete, squeeze actuator arms to open and separate ...NOTE! Ridge Tool Company 9 Removal of the tubes. Remove the press ring from actuator and press ring during pressing operation. RP 330 Pressing Tool point injuries, keep fingers away from fitting by manually grasping ring halves and opening assembly. double check the insertion ...
... to successfully complete a pressed connection. Installing Press Ring Onto Fitting Figure 10 - This will need to be sent to a RIDGID Authorized Service Center for required maintenance. Inspect the pressed fitting. After cycle is complete, squeeze actuator arms to open and separate ...NOTE! Ridge Tool Company 9 Removal of the tubes. Remove the press ring from actuator and press ring during pressing operation. RP 330 Pressing Tool point injuries, keep fingers away from fitting by manually grasping ring halves and opening assembly. double check the insertion ...
Owners Manual
Page 12
... Tel: (800) 519-3456 E-mail: TechServices@ridgid.com For name and address of 15°F (-10°C) to function with the RP 330, such as needed. 3. So it may become hazardous when used on this RP 330 Pressing Tool must be performed by unauthorized individuals. WARNING... with only moderate finger effort required. The tool fasteners have been marked to operate. RP 330 Pressing Tool RP 330 Pressing Tools Cleaning and Lubrication 1. Required Maintenance at (800) 5193456 or www.RIDGID.com for this machine, call Ridge Tool Technical Services (800) 5193456. Accessories WARNING...
... Tel: (800) 519-3456 E-mail: TechServices@ridgid.com For name and address of 15°F (-10°C) to function with the RP 330, such as needed. 3. So it may become hazardous when used on this RP 330 Pressing Tool must be performed by unauthorized individuals. WARNING... with only moderate finger effort required. The tool fasteners have been marked to operate. RP 330 Pressing Tool RP 330 Pressing Tools Cleaning and Lubrication 1. Required Maintenance at (800) 5193456 or www.RIDGID.com for this machine, call Ridge Tool Technical Services (800) 5193456. Accessories WARNING...

