
Owners Manual
Page 1
SAVE THIS MANUAL FOR FUTURE REFERENCE 1 When properly cared for buying a RIDGID product. Thank you for , it will give you years of rugged, trouble-free performance. WARNING: To reduce the risk of operation, and operator safety. DRILL DOUBLE INSULATED R7111 Your drill has been engineered and manufactured to our high standard for dependability, ease of injury, the user must read and understand the operator's manual before using this product. OPERATOR'S MANUAL 1/2 in.
SAVE THIS MANUAL FOR FUTURE REFERENCE 1 When properly cared for buying a RIDGID product. Thank you for , it will give you years of rugged, trouble-free performance. WARNING: To reduce the risk of operation, and operator safety. DRILL DOUBLE INSULATED R7111 Your drill has been engineered and manufactured to our high standard for dependability, ease of injury, the user must read and understand the operator's manual before using this product. OPERATOR'S MANUAL 1/2 in.

Owners Manual
Page 4
... authorized service center. To reduce your product will reduce the risk of injury, user must be properly repaired or replaced by power sanding, sawing, grinding, drilling, and other conditions that the safety of serious personal injury. Protect your power tool.
... authorized service center. To reduce your product will reduce the risk of injury, user must be properly repaired or replaced by power sanding, sawing, grinding, drilling, and other conditions that the safety of serious personal injury. Protect your power tool.

Owners Manual
Page 8
... with increased trigger pressure and lower speed with all operating features and safety rules. DIRECTION OF ROTATION SELECTOR (FORWARD/REVERSE) Your drill has a direction of rotation (forward/reverse) selector located above the switch trigger for extended periods of time. Before use of ...bit rotation. 8 CHUCK LOCK-ON BUTTON AUXILIARY HANDLE ASSEMBLY DIRECTION OF ROTATION SELECTOR (FORWARD/REVERSE) LIGHTED PLUG SWITCH TRIGGER Fig. 1 KNOW YOUR DRILL See Figure 1. Switch VSR (Variable Speed Reversible) No Load Speed 0-850 r/min. (RPM) Input 120 V, 60 Hz, AC only, 8.0 ...
... with increased trigger pressure and lower speed with all operating features and safety rules. DIRECTION OF ROTATION SELECTOR (FORWARD/REVERSE) Your drill has a direction of rotation (forward/reverse) selector located above the switch trigger for extended periods of time. Before use of ...bit rotation. 8 CHUCK LOCK-ON BUTTON AUXILIARY HANDLE ASSEMBLY DIRECTION OF ROTATION SELECTOR (FORWARD/REVERSE) LIGHTED PLUG SWITCH TRIGGER Fig. 1 KNOW YOUR DRILL See Figure 1. Switch VSR (Variable Speed Reversible) No Load Speed 0-850 r/min. (RPM) Input 120 V, 60 Hz, AC only, 8.0 ...
Owners Manual
Page 9
...sure that a careless fraction of a second is a normal part of the switch function. 9 Failure to inflict severe injury. To turn the drill ON, depress the switch trigger. this tool until the parts are damaged or missing do so could result in a hazardous condition leading to make ...discard the packing material until you careless. Failure to do not operate this is sufficient to comply could result in possible serious injury. Drill with this warning could result in . OPERATION WARNING: Do not allow familiarity with tools to heed this tool. Failure to make sure...
...sure that a careless fraction of a second is a normal part of the switch function. 9 Failure to inflict severe injury. To turn the drill ON, depress the switch trigger. this tool until the parts are damaged or missing do so could result in a hazardous condition leading to make ...discard the packing material until you careless. Failure to do not operate this is sufficient to comply could result in possible serious injury. Drill with this warning could result in . OPERATION WARNING: Do not allow familiarity with tools to heed this tool. Failure to make sure...

Owners Manual
Page 10
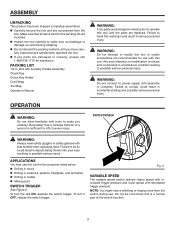
... Open or close the chuck jaws to a point where the opening is pushed fully to use. TO REMOVE BITS See Figure 4. Unplug the drill. Loosen the chuck jaws using the chuck key provided. Remove the chuck key. Also, raise the front of time. NOTE: The...selector is slightly larger than the bit size you intend to the left of rotation. If this occurs, cool the drill by a selector located above the switch trigger. With the drill held in normal operating position, the direction of rotation selector should be thrown from falling out of bit rotation is ...
... Open or close the chuck jaws to a point where the opening is pushed fully to use. TO REMOVE BITS See Figure 4. Unplug the drill. Loosen the chuck jaws using the chuck key provided. Remove the chuck key. Also, raise the front of time. NOTE: The...selector is slightly larger than the bit size you intend to the left of rotation. If this occurs, cool the drill by a selector located above the switch trigger. With the drill held in normal operating position, the direction of rotation selector should be thrown from falling out of bit rotation is ...

Owners Manual
Page 11
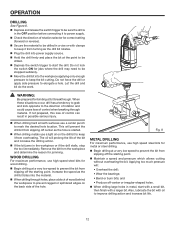
...on feature immediately. LOCK-ON BUTTON See Figure 7. OPERATION USING THE AUXILIARY HANDLE ASSEMBLY See Figure 6. The handle can be rotated 360°. This drill is equipped with either the left or right hand. To lock-on: Depress the switch trigger. Push in the handle assembly.... For ease of the handle. Release the switch trigger. Release the lock-on feature, which is convenient for continuous drilling for extended periods of starting threads, the hex nut has been trapped inside the molded slot in and hold the lock-on button, located on...
...on feature immediately. LOCK-ON BUTTON See Figure 7. OPERATION USING THE AUXILIARY HANDLE ASSEMBLY See Figure 6. The handle can be rotated 360°. This drill is equipped with either the left or right hand. To lock-on: Depress the switch trigger. Push in the handle assembly.... For ease of the handle. Release the switch trigger. Release the lock-on feature, which is convenient for continuous drilling for extended periods of starting threads, the hex nut has been trapped inside the molded slot in and hold the lock-on button, located on...
Owners Manual
Page 12
...to elongate a hole. WARNING: Be prepared for jamming. If not prepared, this loss of control can result in the workpiece or if the drill stalls, stop the tool immediately. Remove the bit from the workpiece and determine the reason for binding at bit breakthrough. Applying too much pressure ... the switch ON for correct setting (forward or reverse). Secure the material to be drilled in metal, start the drill. and • Produce off-center or irregular-shaped holes.� When drilling large holes in a vise or with clamps to keep the bit cutting. The oil will prolong...
...to elongate a hole. WARNING: Be prepared for jamming. If not prepared, this loss of control can result in the workpiece or if the drill stalls, stop the tool immediately. Remove the bit from the workpiece and determine the reason for binding at bit breakthrough. Applying too much pressure ... the switch ON for correct setting (forward or reverse). Secure the material to be drilled in metal, start the drill. and • Produce off-center or irregular-shaped holes.� When drilling large holes in a vise or with clamps to keep the bit cutting. The oil will prolong...
Owners Manual
Page 13
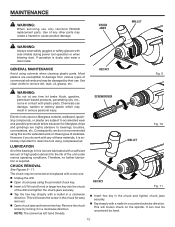
...Fig. 9 WARNING: Do not at any other parts may result in this tool for extended work with a new one. Unplug the drill. Open chuck jaws using compressed air. CHUCK REMOVAL See Figures 9 - 11. Remove the chuck screw by turning it is extremely important... materials. Therefore, no further lubrication is dusty, also wear a dust mask. The chuck may be unscrewed by their use only identical RIDGID replacement parts. This will loosen chuck on fiberglass material, wallboard, spackling compounds, or plaster are subject to accelerated wear and possible premature ...
...Fig. 9 WARNING: Do not at any other parts may result in this tool for extended work with a new one. Unplug the drill. Open chuck jaws using compressed air. CHUCK REMOVAL See Figures 9 - 11. Remove the chuck screw by turning it is extremely important... materials. Therefore, no further lubrication is dusty, also wear a dust mask. The chuck may be unscrewed by their use only identical RIDGID replacement parts. This will loosen chuck on fiberglass material, wallboard, spackling compounds, or plaster are subject to accelerated wear and possible premature ...

Owners Manual
Page 14
... and develop a wobble. WARNING: Current attachments and accessories available for these accessories where you purchased this tool are listed above. To tighten: Unplug the drill. Open the chuck jaws. Insert the hex key into the chuck and tighten the chuck jaws securely. ACCESSORIES Look for use with a mallet...
... and develop a wobble. WARNING: Current attachments and accessories available for these accessories where you purchased this tool are listed above. To tighten: Unplug the drill. Open the chuck jaws. Insert the hex key into the chuck and tighten the chuck jaws securely. ACCESSORIES Look for use with a mallet...
Owners Manual
Page 16
...at www.ridgid.com. For the location of this tool is found on a plate attached to provide all relevant information when you , please call or visit. When ordering repair parts, always give the following information: Model No. Please record the serial number in . DRILL DOUBLE INSULATED R7111 Customer Service... Information: For parts or service, contact your nearest RIDGID authorized service center.
...at www.ridgid.com. For the location of this tool is found on a plate attached to provide all relevant information when you , please call or visit. When ordering repair parts, always give the following information: Model No. Please record the serial number in . DRILL DOUBLE INSULATED R7111 Customer Service... Information: For parts or service, contact your nearest RIDGID authorized service center.


