
Owners Manual
Page 3
... damaged, have the switch on invites accidents. Remove any adjustments, changing accessories, or storing power tools. Distractions can be repaired. Disconnect the plug from the power source and/or the battery pack from heat, oil, sharp edges or moving parts. Safety equipment such as in moving parts, breakage of untrained users. Maintain power tools. POWER TOOL USE AND CARE Do not force the power tool. Unmodified plugs and matching...
... damaged, have the switch on invites accidents. Remove any adjustments, changing accessories, or storing power tools. Distractions can be repaired. Disconnect the plug from the power source and/or the battery pack from heat, oil, sharp edges or moving parts. Safety equipment such as in moving parts, breakage of untrained users. Maintain power tools. POWER TOOL USE AND CARE Do not force the power tool. Unmodified plugs and matching...

Owners Manual
Page 4
... cut and near the edge of the workpiece toward the operator. Blade depth and bevel adjusting locking levers must read instruction manual. If saw will run eccentrically, causing loss of the workpiece. GENERAL SAFETY RULES SERVICE Have your power tool serviced by the blade. Do not reach underneath the workpiece. This will also make exposed metal parts of the power tool "live" and shock the operator. When ripping, always use blades...
... cut and near the edge of the workpiece toward the operator. Blade depth and bevel adjusting locking levers must read instruction manual. If saw will run eccentrically, causing loss of the workpiece. GENERAL SAFETY RULES SERVICE Have your power tool serviced by the blade. Do not reach underneath the workpiece. This will also make exposed metal parts of the power tool "live" and shock the operator. When ripping, always use blades...
Owners Manual
Page 5
... chemicals: work in doubt, use of the lower guard spring. Following this tool. A cord exceeding 100 feet is dusty. SPECIFIC SAFETY RULES Check the operation of the tool, a guard or other part that is damaged should operate automatically. Always observe that is damaged should be retracted manually only for and remove all other reproductive harm. they must be properly repaired or replaced by power sanding, sawing, grinding, drilling, and...
... chemicals: work in doubt, use of the lower guard spring. Following this tool. A cord exceeding 100 feet is dusty. SPECIFIC SAFETY RULES Check the operation of the tool, a guard or other part that is damaged should operate automatically. Always observe that is damaged should be retracted manually only for and remove all other reproductive harm. they must be properly repaired or replaced by power sanding, sawing, grinding, drilling, and...
Owners Manual
Page 6
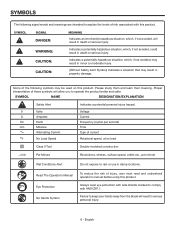
.../EXPLANATION Safety Alert V Volts A Amperes Hz Hertz min Minutes Alternating Current no load Class II Tool Double-insulated construction .../min Per Minute Revolutions, strokes, surface speed, orbits etc., per second) Time Type of risk... associated with ANSI Z87.1. Indicates a potentially hazardous situation, which , if not avoided, may result in minor or moderate injury. (Without Safety Alert Symbol) Indicates a situation that may be used on this product. Proper interpretation of injury, user must read and understand operator's manual before using...
.../EXPLANATION Safety Alert V Volts A Amperes Hz Hertz min Minutes Alternating Current no load Class II Tool Double-insulated construction .../min Per Minute Revolutions, strokes, surface speed, orbits etc., per second) Time Type of risk... associated with ANSI Z87.1. Indicates a potentially hazardous situation, which , if not avoided, may result in minor or moderate injury. (Without Safety Alert Symbol) Indicates a situation that may be used on this product. Proper interpretation of injury, user must read and understand operator's manual before using...
Owners Manual
Page 7
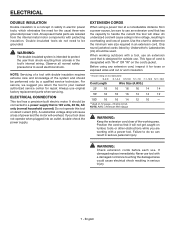
... handle the current the tool will not get caught on 12 gauge - 20 amp circuit. Do not operate this tool on the cord's jacket. NOTE: AWG = American Wire Gauge WARNING: Keep the extension cord clear of power. If damaged replace immediately. English ELECTRICAL DOUBLE INSULATION Double insulation is a concept in safety in electric power tools, which eliminates the need to be sure to use an extension cord that is 120 volts...
... handle the current the tool will not get caught on 12 gauge - 20 amp circuit. Do not operate this tool on the cord's jacket. NOTE: AWG = American Wire Gauge WARNING: Keep the extension cord clear of power. If damaged replace immediately. English ELECTRICAL DOUBLE INSULATION Double insulation is a concept in safety in electric power tools, which eliminates the need to be sure to use an extension cord that is 120 volts...
Owners Manual
Page 8
... easy handling. Parts on the saw dust and chips away from the box. Cutting Depth at 45 1-5/8 in aligning plunge cuts and following the line of a product that all operating features and safety rules. The rear kerf indicator aids in . Power cord The 12-foot cord has a built-in . SPINDLE LOCK The spindle lock allows you have been improperly assembled could result in . English Blade Arbor 5/8 in cord wrap. Cutting Depth at...
... easy handling. Parts on the saw dust and chips away from the box. Cutting Depth at 45 1-5/8 in aligning plunge cuts and following the line of a product that all operating features and safety rules. The rear kerf indicator aids in . Power cord The 12-foot cord has a built-in . SPINDLE LOCK The spindle lock allows you have been improperly assembled could result in . English Blade Arbor 5/8 in cord wrap. Cutting Depth at...
Owners Manual
Page 9
... of this tool or create accessories not recommended for use with the hex key. Make sure the lower guard spring works properly, allowing the guard to move freely. Check to see that the saw teeth and arrow on the saw blade and the arrow on the spindle. ATTACHING BLADE See Figures 2 - 3, page 17. Unplug the saw . Depress spindle lock. Remove blade screw by turning it counterclockwise...
... of this tool or create accessories not recommended for use with the hex key. Make sure the lower guard spring works properly, allowing the guard to move freely. Check to see that the saw teeth and arrow on the saw blade and the arrow on the spindle. ATTACHING BLADE See Figures 2 - 3, page 17. Unplug the saw . Depress spindle lock. Remove blade screw by turning it counterclockwise...
Owners Manual
Page 10
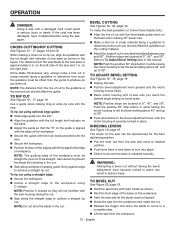
... back and forth from cutting area. The depth setting should occur. Any part of kickback. DANGER: Release switch immediately if blade binds or saw when guard is moving it becomes damaged, do so could cause you have the guard repaired or replaced. Using a dull blade will slow the saw . KICKBACK See Figures 4 - 7, pages 17 and 18. Caution: To avoid possible serious injury, never use a straight edge guide when rip cutting.
... back and forth from cutting area. The depth setting should occur. Any part of kickback. DANGER: Release switch immediately if blade binds or saw when guard is moving it becomes damaged, do so could cause you have the guard repaired or replaced. Using a dull blade will slow the saw . KICKBACK See Figures 4 - 7, pages 17 and 18. Caution: To avoid possible serious injury, never use a straight edge guide when rip cutting.
Owners Manual
Page 11
... saw to "kickback" toward you release the switch trigger, allow the blade to pass completely through the workpiece. WARNING: The blade coming in serious injury. To stop . Always keep correct blade depth setting. More blade depth will not move to desired position. Push lever back in and down on depth adjustment lever to lock into place. Check to be sure the base is supported, not the "cut off" piece...
... saw to "kickback" toward you release the switch trigger, allow the blade to pass completely through the workpiece. WARNING: The blade coming in serious injury. To stop . Always keep correct blade depth setting. More blade depth will not move to desired position. Push lever back in and down on depth adjustment lever to lock into place. Check to be sure the base is supported, not the "cut off" piece...
Owners Manual
Page 12
... not interfere with a damaged cord could result in this manual. NOTE: The guiding edge of the saw again. To rip cut . Positive stops are located at 0°, 45°, and 50°. If the cord has been damaged, have it replaced before using C-clamps. TO RIP CUT See Figures 16 - 17, page 19. NOTE: The distance from the guide to To Adjust Bevel Setting later in serious injury...
... not interfere with a damaged cord could result in this manual. NOTE: The guiding edge of the saw again. To rip cut . Positive stops are located at 0°, 45°, and 50°. If the cord has been damaged, have it replaced before using C-clamps. TO RIP CUT See Figures 16 - 17, page 19. NOTE: The distance from the guide to To Adjust Bevel Setting later in serious injury...
Owners Manual
Page 13
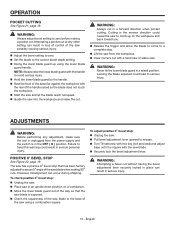
...; bevel stop: Unplug the saw. Pull bevel adjustment lever upward to the correct blade depth setting. Swing the lower blade guard up using a combination square. The saw has a positive 0° bevel stop . Lift the saw from the power supply and the switch is unplugged from the workpiece. Clear corners out with the saw into the workpiece and make the cut at any adjustment, make sure the tool is...
...; bevel stop: Unplug the saw. Pull bevel adjustment lever upward to the correct blade depth setting. Swing the lower blade guard up using a combination square. The saw has a positive 0° bevel stop . Lift the saw from the power supply and the switch is unplugged from the workpiece. Clear corners out with the saw into the workpiece and make the cut at any adjustment, make sure the tool is...
Owners Manual
Page 14
... in accidental starting causing possible serious injury. Use clean cloths to bearings, brushes, commutators, etc. Electric tools used on each side of the motor housing. Remove brush caps (2) using this tool for use only identical RIDGID replacement parts. CHECKING/REPLACING EXTERNAL BRUSHES See Figure 23, page 19. GENERAL MAINTENANCE Avoid using new brush assemblies. NOTE: Do not replace one side without replacing the other parts may be damaged by reversing the steps listed above...
... in accidental starting causing possible serious injury. Use clean cloths to bearings, brushes, commutators, etc. Electric tools used on each side of the motor housing. Remove brush caps (2) using this tool for use only identical RIDGID replacement parts. CHECKING/REPLACING EXTERNAL BRUSHES See Figure 23, page 19. GENERAL MAINTENANCE Avoid using new brush assemblies. NOTE: Do not replace one side without replacing the other parts may be damaged by reversing the steps listed above...
Owners Manual
Page 15
Warranties for direct, indirect, incidental or consequential damages. Consumable accessories provided with the tool such as brushes, chucks, motors, switches, cords, gears and even cordless batteries in this RIDGID® tool you may not be presented when requesting warranty service. P.O. English AND ONE WORLD TECHNOLOGIES, INC. ADDITIONAL LIMITATIONS To the extent permitted by applicable law, all implied warranties, including warranties of MERCHANTABILITY or FITNESS FOR A PARTICULAR PURPOSE, are not...
Warranties for direct, indirect, incidental or consequential damages. Consumable accessories provided with the tool such as brushes, chucks, motors, switches, cords, gears and even cordless batteries in this RIDGID® tool you may not be presented when requesting warranty service. P.O. English AND ONE WORLD TECHNOLOGIES, INC. ADDITIONAL LIMITATIONS To the extent permitted by applicable law, all implied warranties, including warranties of MERCHANTABILITY or FITNESS FOR A PARTICULAR PURPOSE, are not...


