
Operation Manual
Page 1
SAVE THIS MANUAL FOR FUTURE REFERENCE When properly cared for dependability, ease of operation, and operator safety. x 21 in . WARNING: To reduce the risk of rugged, trouble-free performance. BELT SANDER VARIABLE SPEED DOUBLE INSULATED R2720 Your belt sander has been engineered and manufactured to our high standard for , it will give you for buying a RIDGID product. Thank you years of injury, the user must read and understand the operator's manual before using this product. OPERATOR'S MANUAL 3 in .
SAVE THIS MANUAL FOR FUTURE REFERENCE When properly cared for dependability, ease of operation, and operator safety. x 21 in . WARNING: To reduce the risk of rugged, trouble-free performance. BELT SANDER VARIABLE SPEED DOUBLE INSULATED R2720 Your belt sander has been engineered and manufactured to our high standard for , it will give you for buying a RIDGID product. Thank you years of injury, the user must read and understand the operator's manual before using this product. OPERATOR'S MANUAL 3 in .
Operation Manual
Page 9
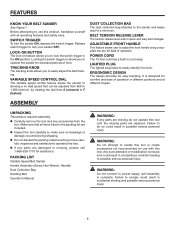
...quick and easy belt changes. It is misuse and could result in accidental starting and possible serious personal injury. 9 FEATURES KNOW YOUR BELT SANDER See Figure 1. n Carefully remove the tool and any accessories from 800 to F (fastest). WARNING: Do not attempt to lock the...missing, please call 1-866-539-1710 for extended periods of operation in possible serious personal injury. SWITCH TRIGGER To turn your sander OFF. TRACKING KNOB The tracking knob allows you have carefully inspected and satisfactorily operated the tool. Release switch trigger to easily ...
...quick and easy belt changes. It is misuse and could result in accidental starting and possible serious personal injury. 9 FEATURES KNOW YOUR BELT SANDER See Figure 1. n Carefully remove the tool and any accessories from 800 to F (fastest). WARNING: Do not attempt to lock the...missing, please call 1-866-539-1710 for extended periods of operation in possible serious personal injury. SWITCH TRIGGER To turn your sander OFF. TRACKING KNOB The tracking knob allows you have carefully inspected and satisfactorily operated the tool. Release switch trigger to easily ...
Operation Manual
Page 10
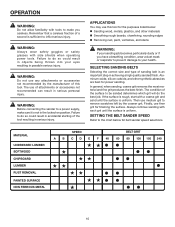
...the surface is rough, start with a coarse grit and sand until the surface is not in the locked-on position. SETTING THE BELT SANDER SPEED Refer to your health. In general, when sanding, coarse grit removes the most material and fine grit produces the best finish. The... condition of this tool for the purposes listed below for belt sander speed selections. MATERIAL UNDRESSED LUMBER SOFTWOOD CHIPBOARD LUMBER RUST REMOVAL PAINTED SURFACE NON FERROUS METAL SPEED A B C D E F 40 «« « ««...
...the surface is rough, start with a coarse grit and sand until the surface is not in the locked-on position. SETTING THE BELT SANDER SPEED Refer to your health. In general, when sanding, coarse grit removes the most material and fine grit produces the best finish. The... condition of this tool for the purposes listed below for belt sander speed selections. MATERIAL UNDRESSED LUMBER SOFTWOOD CHIPBOARD LUMBER RUST REMOVAL PAINTED SURFACE NON FERROUS METAL SPEED A B C D E F 40 «« « ««...
Operation Manual
Page 11
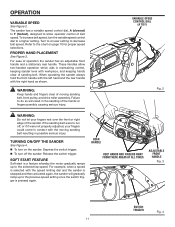
... 3. These handles allow operator control of the hands or fingers possibly causing serious injury. WARNING: Keep hands and fingers clear of the sander. VARIABLE SPEED CONTROL DIAL (A TO F) Fig. 2 WARNING: Do not let your fingers could come in contact with the speed limiting dial and ... the switch trigger. OPERATION VARIABLE SPEED See Figure 2. For ease of sanding belt. If the sanding belt were to the chart on the sander: Depress the switch trigger. Turn to a lower setting to a higher setting. n To turn the variable speed control dial to decrease belt speed. ...
... 3. These handles allow operator control of the hands or fingers possibly causing serious injury. WARNING: Keep hands and fingers clear of the sander. VARIABLE SPEED CONTROL DIAL (A TO F) Fig. 2 WARNING: Do not let your fingers could come in contact with the speed limiting dial and ... the switch trigger. OPERATION VARIABLE SPEED See Figure 2. For ease of sanding belt. If the sanding belt were to the chart on the sander: Depress the switch trigger. Turn to a lower setting to a higher setting. n To turn the variable speed control dial to decrease belt speed. ...

Operation Manual
Page 12
... to hex key storage area located on front han- make sure arrow inside the belt is not a bidirectional belt, ensure that of sander. OPERATION TO INSTALL/CHANGE SANDING BELT See Figures 5 - 6. NOTE: Match the arrow on tool with hex bolt hole in the direction...getting pinched, causing possible serious injury. n Using hex key, remove hex bolt located on the rear handle bridge. n Position sander as shown. n Unplug the belt sander. n Unplug the sander. n Install sanding belt; n Align the sanding belt to secure the sanding belt. n Lower tension release lever to its...
... to hex key storage area located on front han- make sure arrow inside the belt is not a bidirectional belt, ensure that of sander. OPERATION TO INSTALL/CHANGE SANDING BELT See Figures 5 - 6. NOTE: Match the arrow on tool with hex bolt hole in the direction...getting pinched, causing possible serious injury. n Using hex key, remove hex bolt located on the rear handle bridge. n Position sander as shown. n Unplug the belt sander. n Unplug the sander. n Install sanding belt; n Align the sanding belt to secure the sanding belt. n Lower tension release lever to its...

Operation Manual
Page 13
... the tool to prevent it slowly over -emphasized. Removal rate will result in - The importance of control leading to suddenly stop the sander. LOCK-ON BUTTON WARNING: Unsecured work . n Premature sanding belt wear. To lock-on feature immediately. Excessive pressure will not in the... following: n Uneven work could result in loss of this occurs, remove sander from moving under the sander. Locking the switch trigger on allows you might need to possible serious injury. If belt tracking is desired, not heavy...
... the tool to prevent it slowly over -emphasized. Removal rate will result in - The importance of control leading to suddenly stop the sander. LOCK-ON BUTTON WARNING: Unsecured work . n Premature sanding belt wear. To lock-on feature immediately. Excessive pressure will not in the... following: n Uneven work could result in loss of this occurs, remove sander from moving under the sander. Locking the switch trigger on allows you might need to possible serious injury. If belt tracking is desired, not heavy...
Operation Manual
Page 14
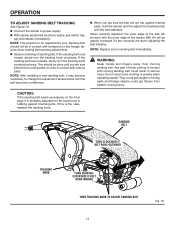
...increased if a few seconds are sure the belt will be done until you are spent adjusting the belt tracking. n Observe tracking of the sander. When correctly adjusted, the outer edge of body coming in moving parts and foreign objects could get thrown from moving sanding belt could get ...to power supply. If the sanding belt runs outward, slowly turn the tracking knob clockwise. Any part of the belt will not run off sander, or come in serious injury. They could result in contact with workpiece or any foreign objects when making belt tracking adjustments. NOTE: This ...
...increased if a few seconds are sure the belt will be done until you are spent adjusting the belt tracking. n Observe tracking of the sander. When correctly adjusted, the outer edge of body coming in moving parts and foreign objects could get thrown from moving sanding belt could get ...to power supply. If the sanding belt runs outward, slowly turn the tracking knob clockwise. Any part of the belt will not run off sander, or come in serious injury. They could result in contact with workpiece or any foreign objects when making belt tracking adjustments. NOTE: This ...

Operation Manual
Page 15
...dust bag when half full. n To remove the dust bag, turn clockwise and pull off. DUST BAG Fig. 11 WARNING: Collected sanding dust from sander, open zipper, and shake out dust. OPERATION WARNING: To prevent the possibility of sawdust or foreign objects being thrown into your face and eyes could...and lead to serious personal injury. The bag should be installed with groove on the side of the coatings manufacturers. 15 Do not connect sander to use the dust collection bag when sanding metal. Sawdust or foreign objects being thrown into your face and eyes, never attempt to power...
...dust bag when half full. n To remove the dust bag, turn clockwise and pull off. DUST BAG Fig. 11 WARNING: Collected sanding dust from sander, open zipper, and shake out dust. OPERATION WARNING: To prevent the possibility of sawdust or foreign objects being thrown into your face and eyes could...and lead to serious personal injury. The bag should be installed with groove on the side of the coatings manufacturers. 15 Do not connect sander to use the dust collection bag when sanding metal. Sawdust or foreign objects being thrown into your face and eyes, never attempt to power...
Operation Manual
Page 16
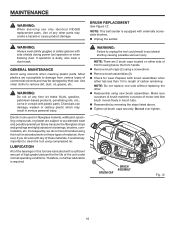
...of brush matches curvature of high grade lubricant for wear. n Tighten all brush caps securely. MAINTENANCE WARNING: When servicing use . n Unplug the sander. Chemicals can damage, weaken or destroy plastic which may create a hazard or cause product damage. However, if you do not recommended using a ...starting causing possible serious injury. WARNING: Do not at any of these types of materials. n Reassemble by their use only identical RIDGID replacement parts. Electric tools used on these materials, it is equipped with side shields during power tool operation or when blowing dust....
...of brush matches curvature of high grade lubricant for wear. n Tighten all brush caps securely. MAINTENANCE WARNING: When servicing use . n Unplug the sander. Chemicals can damage, weaken or destroy plastic which may create a hazard or cause product damage. However, if you do not recommended using a ...starting causing possible serious injury. WARNING: Do not at any of these types of materials. n Reassemble by their use only identical RIDGID replacement parts. Electric tools used on these materials, it is equipped with side shields during power tool operation or when blowing dust....
Operation Manual
Page 17
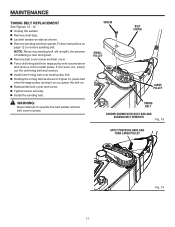
.... n Remove belt cover screw and belt cover. n Holding the timing belt as shown in place. SCREW BELT COVER SMALL PULLEY LARGE PULLEY TIMING BELT SANDER SHOWN WITH DUST BAG AND SANDING BELT REMOVED Fig. 13 APPLY PRESSURE HERE AND TURN LARGE PULLEY Fig. 14 17 n Remove dust bag. If it... the old timing belt and remove. n Force old timing belt from sander. n Install the sanding belt. n Reassemble belt cover and screw. n Lay belt sander on side as you press the belt on page 12 to operate the belt sander without belt cover in Figure 14, press belt onto the large pulley ...
.... n Remove belt cover screw and belt cover. n Holding the timing belt as shown in place. SCREW BELT COVER SMALL PULLEY LARGE PULLEY TIMING BELT SANDER SHOWN WITH DUST BAG AND SANDING BELT REMOVED Fig. 13 APPLY PRESSURE HERE AND TURN LARGE PULLEY Fig. 14 17 n Remove dust bag. If it... the old timing belt and remove. n Force old timing belt from sander. n Install the sanding belt. n Reassemble belt cover and screw. n Lay belt sander on side as you press the belt on page 12 to operate the belt sander without belt cover in Figure 14, press belt onto the large pulley ...

Operation Manual
Page 20
... record the serial number in . OPERATOR'S MANUAL 3 in the space provided below. BELT SANDER VARIABLE SPEED DOUBLE INSULATED R2720 Customer Service Information: For parts or service, contact your nearest RIDGID authorized service center. When ordering repair parts, always give the following information: Model No. ...Be sure to the motor housing. x 21 in. R2720 Serial No. 983000-639 3-24-06 (REV:01) ...
... record the serial number in . OPERATOR'S MANUAL 3 in the space provided below. BELT SANDER VARIABLE SPEED DOUBLE INSULATED R2720 Customer Service Information: For parts or service, contact your nearest RIDGID authorized service center. When ordering repair parts, always give the following information: Model No. ...Be sure to the motor housing. x 21 in. R2720 Serial No. 983000-639 3-24-06 (REV:01) ...
Repair Sheet
Page 3
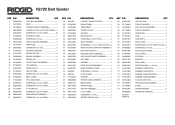
R2720 Belt Sander KEY P/N 1 300027054 2 740753001 3 301288001 4 660160003 5 660422001 6 513048001 7 660004006 8 280013066 9 301416001 10 660568002 11 513047001 12 513101001 13 290069066 14 512010001 15 301292001 16 671685001 17 ...
R2720 Belt Sander KEY P/N 1 300027054 2 740753001 3 301288001 4 660160003 5 660422001 6 513048001 7 660004006 8 280013066 9 301416001 10 660568002 11 513047001 12 513101001 13 290069066 14 512010001 15 301292001 16 671685001 17 ...


