

Owners Manual
Page 1
OPERATOR'S MANUAL RANDOM ORBIT SANDER DOUBLE INSULATED VARIABLE SPEED R2611 Your sander has been engineered and manufactured to our high standards for dependability, ease of injury, the user must read and understand the operator's manual before using this product. WARNING: To reduce the risk of operation, and operator safety. SAVE THIS MANUAL FOR FUTURE REFERENCE Thank you for , it will give you years of rugged, trouble-free performance. When properly cared for buying a RIDGID product.
OPERATOR'S MANUAL RANDOM ORBIT SANDER DOUBLE INSULATED VARIABLE SPEED R2611 Your sander has been engineered and manufactured to our high standards for dependability, ease of injury, the user must read and understand the operator's manual before using this product. WARNING: To reduce the risk of operation, and operator safety. SAVE THIS MANUAL FOR FUTURE REFERENCE Thank you for , it will give you years of rugged, trouble-free performance. When properly cared for buying a RIDGID product.

Owners Manual
Page 2
TABLE OF CONTENTS Introduction ...2 General Safety Rules ...3-4 Specific Safety Rules...4 Symbols...5-6 Electrical ...7 Features...8-9 Assembly ...9 Operation ...10-13 Maintenance ...14 Warranty ...15 Customer Service Information...16 INTRODUCTION This tool has many features for making it easy to maintain and operate. 2 Safety, performance, and dependability have been given top priority in the design of this product making its use more pleasant and enjoyable.
TABLE OF CONTENTS Introduction ...2 General Safety Rules ...3-4 Specific Safety Rules...4 Symbols...5-6 Electrical ...7 Features...8-9 Assembly ...9 Operation ...10-13 Maintenance ...14 Warranty ...15 Customer Service Information...16 INTRODUCTION This tool has many features for making it easy to maintain and operate. 2 Safety, performance, and dependability have been given top priority in the design of this product making its use more pleasant and enjoyable.

Owners Manual
Page 3
... for operations different from moving parts. Use of these devices can cause you are easier to control. Use the power tool, accessories and tool bits etc., in accordance with the power tool or these are dangerous in a hazardous situation. 3 Never use the cord for outdoor use the power tool if the switch does not turn it on a ladder or unstable support. Safety equipment such as dust mask, non-skid safety shoes...
... for operations different from moving parts. Use of these devices can cause you are easier to control. Use the power tool, accessories and tool bits etc., in accordance with the power tool or these are dangerous in a hazardous situation. 3 Never use the cord for outdoor use the power tool if the switch does not turn it on a ladder or unstable support. Safety equipment such as dust mask, non-skid safety shoes...

Owners Manual
Page 4
... risk of cord location. WARNING! Use of unauthorized parts or failure to follow Maintenance instructions may contact hidden wiring or its operation. Everyday eyeglasses have repaired at least 16 is damaged should be properly repaired or replaced by insulated gripping surfaces when performing an operation where the cutting tool may create a risk of the power tool is in good condition. Following this tool. A wire gauge size (A.W.G.) of power and overheating...
... risk of cord location. WARNING! Use of unauthorized parts or failure to follow Maintenance instructions may contact hidden wiring or its operation. Everyday eyeglasses have repaired at least 16 is damaged should be properly repaired or replaced by insulated gripping surfaces when performing an operation where the cutting tool may create a risk of the power tool is in good condition. Following this tool. A wire gauge size (A.W.G.) of power and overheating...
Owners Manual
Page 5
... Power min no load Double-insulated construction Revolutions, strokes, surface speed, orbits etc., per minute Wet Conditions Alert Do not expose to keep your hands away from the blade will allow you to keep your safety. Failure to operate the tool better and safer. Proper interpretation of current Rotational speed, at no .../min Minutes Alternating Current Direct Current No Load Speed Class...
... Power min no load Double-insulated construction Revolutions, strokes, surface speed, orbits etc., per minute Wet Conditions Alert Do not expose to keep your hands away from the blade will allow you to keep your safety. Failure to operate the tool better and safer. Proper interpretation of current Rotational speed, at no .../min Minutes Alternating Current Direct Current No Load Speed Class...
Owners Manual
Page 6
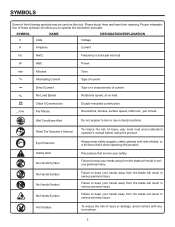
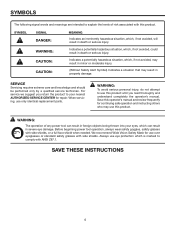
..., or a full face shield when needed. Before beginning power tool operation, always wear safety goggles, safety glasses with side shields. SYMBOL SIGNAL DANGER: WARNING: CAUTION: CAUTION: MEANING Indicates an imminently hazardous situation, which , if not avoided, could result in death or serious injury. Save this operator's manual and review frequently for continuing safe operation and instructing others who may result in...
..., or a full face shield when needed. Before beginning power tool operation, always wear safety goggles, safety glasses with side shields. SYMBOL SIGNAL DANGER: WARNING: CAUTION: CAUTION: MEANING Indicates an imminently hazardous situation, which , if not avoided, could result in death or serious injury. Save this operator's manual and review frequently for continuing safe operation and instructing others who may result in...

Owners Manual
Page 7
... to handle the current the tool will cause a drop in line voltage, resulting in electric power tools, which eliminates the need to a power supply that it for the usual three-wire grounded power cord. Always use . Do not operate this tool on 12 gauge - 20 amp circuit. This type of power and the motor will not get caught on the cord's jacket. Position the cord so that is 120 volts, 60...
... to handle the current the tool will cause a drop in line voltage, resulting in electric power tools, which eliminates the need to a power supply that it for the usual three-wire grounded power cord. Always use . Do not operate this tool on 12 gauge - 20 amp circuit. This type of power and the motor will not get caught on the cord's jacket. Position the cord so that is 120 volts, 60...
Owners Manual
Page 8
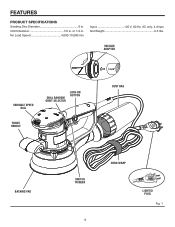
or 1/4 in . VACUUM ADAPTOR VARIABLE SPEED DIAL DUAL RANDOM ORBIT SELECTOR LOCK-ON BUTTON FRONT HANDLE 1-1/4" DUST BAG 2-1/2" BACKING PAD SWITCH TRIGGER 8 CORD WRAP LIGHTED PLUG Fig. 1 FEATURES PRODUCT SPECIFICATIONS Sanding Disc Diameter 6 in . No Load Speed 4,000-10,000/min Input 120 V, 60 Hz, AC only, 4 Amps Net Weight 6.3 lbs. Orbit Diameter 1/8 in.
or 1/4 in . VACUUM ADAPTOR VARIABLE SPEED DIAL DUAL RANDOM ORBIT SELECTOR LOCK-ON BUTTON FRONT HANDLE 1-1/4" DUST BAG 2-1/2" BACKING PAD SWITCH TRIGGER 8 CORD WRAP LIGHTED PLUG Fig. 1 FEATURES PRODUCT SPECIFICATIONS Sanding Disc Diameter 6 in . No Load Speed 4,000-10,000/min Input 120 V, 60 Hz, AC only, 4 Amps Net Weight 6.3 lbs. Orbit Diameter 1/8 in.
Owners Manual
Page 9
... operation, the front handle can be adjusted using the supplied hex key. PACKING LIST Random Orbit Sander Sanding Disc, 80-grit (3) Handle Assembly Dust Bag Assembly Hex Key Operator's Manual WARNING: If any accessories from the box. BACKING PAD The hook and loop backing pad allows you to easily identify live tools. or 2-1/2 in cord wrap. WARNING: Do not attempt to the previous speed setting once the switch trigger is selected with excellent sanding results. ADJUSTABLE...
... operation, the front handle can be adjusted using the supplied hex key. PACKING LIST Random Orbit Sander Sanding Disc, 80-grit (3) Handle Assembly Dust Bag Assembly Hex Key Operator's Manual WARNING: If any accessories from the box. BACKING PAD The hook and loop backing pad allows you to easily identify live tools. or 2-1/2 in cord wrap. WARNING: Do not attempt to the previous speed setting once the switch trigger is selected with excellent sanding results. ADJUSTABLE...
Owners Manual
Page 10
... the job. Remember that a careless fraction of this tool for power sanding. Medium grit may use any attachments or accessories not recommended by inserting the hex key into your eyes resulting in objects being thrown into the handle hole, engaging the hex screw inside, and turning clockwise. In general, coarse grit will remove the most material and finer grit will do...
... the job. Remember that a careless fraction of this tool for power sanding. Medium grit may use any attachments or accessories not recommended by inserting the hex key into your eyes resulting in objects being thrown into the handle hole, engaging the hex screw inside, and turning clockwise. In general, coarse grit will remove the most material and finer grit will do...
Owners Manual
Page 11
... See Figure 4. orbit diameter. orbit setting increases the removal rate. To attach hook and loop sanding disc: Unplug the sander. Align the holes in . The dial is conveniently located on the motor housing, allowing operator control of the switch trigger for the best adhesion, we recommend that can be adjusted by brushing them lightly with the holes in . F Surface...
... See Figure 4. orbit diameter. orbit setting increases the removal rate. To attach hook and loop sanding disc: Unplug the sander. Align the holes in . The dial is conveniently located on the motor housing, allowing operator control of the switch trigger for the best adhesion, we recommend that can be adjusted by brushing them lightly with the holes in . F Surface...

Owners Manual
Page 12
... the dust bag during use and the sander is not connected to remove from the power supply, disengage the lock-on feature immediately. vacuum hose fits inside the smaller diameter hole inside the larger hole of the sanding disc and collected in the locked-on sander. WARNING: Before connecting the sander to tighten. DUST BAG Fig. 6 1-1/4 in the lock-on button. Release the switch trigger. Release the lock...
... the dust bag during use and the sander is not connected to remove from the power supply, disengage the lock-on feature immediately. vacuum hose fits inside the smaller diameter hole inside the larger hole of the sanding disc and collected in the locked-on sander. WARNING: Before connecting the sander to tighten. DUST BAG Fig. 6 1-1/4 in the lock-on button. Release the switch trigger. Release the lock...

Owners Manual
Page 13
... install dust bag assembly on , and run it from the frictional heat. Also follow the recommendations of a sanding operation and before removing it free without totally emptying its dust bag. Replace dust bag over the workpiece. Fig. 9 CAUTION: To avoid motor damage resulting from the sander. Shake out the dust. Reattach the dust bag to cool the motor. Remove sanding disc, then turn the sander off the sander...
... install dust bag assembly on , and run it from the frictional heat. Also follow the recommendations of a sanding operation and before removing it free without totally emptying its dust bag. Replace dust bag over the workpiece. Fig. 9 CAUTION: To avoid motor damage resulting from the sander. Shake out the dust. Reattach the dust bag to cool the motor. Remove sanding disc, then turn the sander off the sander...
Owners Manual
Page 14
...; Tighten all screws securely. However, if you do not recommended using compressed air. LUBRICATION All of the bearings in accidental starting causing possible serious injury. Do not replace one side without replacing the other parts may create a hazard or cause product damage. If operation is required. SCREWS TOP COVER GENERAL MAINTENANCE Avoid using new brush assemblies. Consequently, we do work on fiberglass material, wallboard, spackling compounds...
...; Tighten all screws securely. However, if you do not recommended using compressed air. LUBRICATION All of the bearings in accidental starting causing possible serious injury. Do not replace one side without replacing the other parts may create a hazard or cause product damage. If operation is required. SCREWS TOP COVER GENERAL MAINTENANCE Avoid using new brush assemblies. Consequently, we do work on fiberglass material, wallboard, spackling compounds...
Owners Manual
Page 15
... apply to , blades, bits and sand paper are not covered. Consumable accessories provided with the tool such as brushes, chucks, motors, switches, cords, gears and even cordless batteries in workmanship or materials and normal wear items such as , but not limited to you are limited to RIDGID® hand held and stationary power tools. This warranty only covers defects arising under the warranty, at our option, at (toll free) 1-866...
... apply to , blades, bits and sand paper are not covered. Consumable accessories provided with the tool such as brushes, chucks, motors, switches, cords, gears and even cordless batteries in workmanship or materials and normal wear items such as , but not limited to you are limited to RIDGID® hand held and stationary power tools. This warranty only covers defects arising under the warranty, at our option, at (toll free) 1-866...

Owners Manual
Page 16
... service center nearest you call 1-866-539-1710 or visit us online at www.ridgid.com. Please record the serial number in the space provided below. R2611 Serial No. 983000-861 3-24-06 (REV:02) 16 Be sure to the motor housing. When ordering repair parts, always give the following information: Model No. For the location of this tool is found on a plate...
... service center nearest you call 1-866-539-1710 or visit us online at www.ridgid.com. Please record the serial number in the space provided below. R2611 Serial No. 983000-861 3-24-06 (REV:02) 16 Be sure to the motor housing. When ordering repair parts, always give the following information: Model No. For the location of this tool is found on a plate...


