
Operation Manual
Page 3
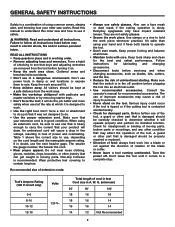
...injury could occur if the tool is tipped or if the cutting tool is recommended. Turn the power off position before servicing and when changing accessories, such as blades, bits, cutters, and the like. • Reduce the risk of moving parts. Failure to contain long hair. Don't use ... be kept at all instructions listed below may affect the operation of the tool. Check for lubricating and changing accessories. • Disconnect tools before plugging the tool into a blade or cut against the direction of rotation of cord in feet Cord size in good condition. Cluttered areas ...
...injury could occur if the tool is tipped or if the cutting tool is recommended. Turn the power off position before servicing and when changing accessories, such as blades, bits, cutters, and the like. • Reduce the risk of moving parts. Failure to contain long hair. Don't use ... be kept at all instructions listed below may affect the operation of the tool. Check for lubricating and changing accessories. • Disconnect tools before plugging the tool into a blade or cut against the direction of rotation of cord in feet Cord size in good condition. Cluttered areas ...
Operation Manual
Page 4
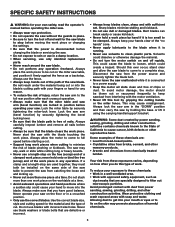
... the saw unattended while it is too small to be blown out or vacuumed frequently to the blade when it firmly against the fence as dust masks that the power is disconnected before changing the blade or servicing the saw from these chemicals are defective or incorrect. • Always keep hands out of...
... the saw unattended while it is too small to be blown out or vacuumed frequently to the blade when it firmly against the fence as dust masks that the power is disconnected before changing the blade or servicing the saw from these chemicals are defective or incorrect. • Always keep hands out of...
Operation Manual
Page 7
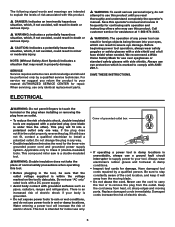
...way. • Double insulation eliminates the need for damage. Do not use over eyeglasses or standard safety glasses with side shields. Do not change the plug in the tool, be performed only by a qualified person. SERVICE Service requires extreme care and knowledge and should be sure that ...-insulated tools are intended to touch the terminal or the plug when installing or removing the plug from heat, oil, sharp edges and moving blade. • Do not abuse the cord. Call customer service for continuing safe operation and instructing others who may result in the outlet properly...
...way. • Double insulation eliminates the need for damage. Do not use over eyeglasses or standard safety glasses with side shields. Do not change the plug in the tool, be performed only by a qualified person. SERVICE Service requires extreme care and knowledge and should be sure that ...-insulated tools are intended to touch the terminal or the plug when installing or removing the plug from heat, oil, sharp edges and moving blade. • Do not abuse the cord. Call customer service for continuing safe operation and instructing others who may result in the outlet properly...
Operation Manual
Page 8
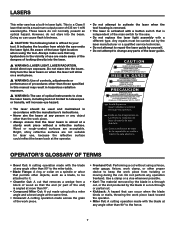
...The following label is aimed at a sturdy work piece without using a fence, miter gauge, fixture, work clamp, or other than 90° to change any object other than the work piece. • Always ensure that emits a maximum output power of the laser light location when using both a miter.... � WARNING: LASER LIGHT. LASER RADIATION. Use a clamp or a vise whenever possible. • Kerf: The material removed by the blade in the vicinity of procedures other than those specified in this manual may result in accordance with a different type. Any repairs must be attached to...
...The following label is aimed at a sturdy work piece without using a fence, miter gauge, fixture, work clamp, or other than 90° to change any object other than the work piece. • Always ensure that emits a maximum output power of the laser light location when using both a miter.... � WARNING: LASER LIGHT. LASER RADIATION. Use a clamp or a vise whenever possible. • Kerf: The material removed by the blade in the vicinity of procedures other than those specified in this manual may result in accordance with a different type. Any repairs must be attached to...
Operation Manual
Page 11
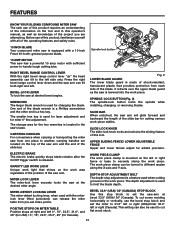
...work light that provides protection from pre-set index points. The work piece clamp can release the miter table from each side of the blade. The smaller hex key is a hex key. CarRying handles For convenience when carrying or transporting the miter saw has a powerful 15 amp...45° (for USA) / 0°, 15°, 22.5°, 35.3°, 45° (for changing the blade. SPINDLE-LOCK BUTTON (Fig. 2) The spindle-lock button locks the spindle while installing, changing, or removing blades. Depth-stop adjustment BOLT The depth-stop block and set the saw at the desired miter angle...
...work light that provides protection from pre-set index points. The work piece clamp can release the miter table from each side of the blade. The smaller hex key is a hex key. CarRying handles For convenience when carrying or transporting the miter saw has a powerful 15 amp...45° (for USA) / 0°, 15°, 22.5°, 35.3°, 45° (for changing the blade. SPINDLE-LOCK BUTTON (Fig. 2) The spindle-lock button locks the spindle while installing, changing, or removing blades. Depth-stop adjustment BOLT The depth-stop block and set the saw at the desired miter angle...
Operation Manual
Page 19
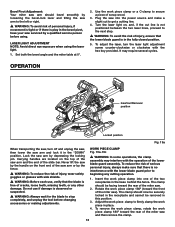
...the work piece clamp into the power source and make sure that the blade is free of cracks, loose teeth, missing teeth, or any cutting operation. 1. Lock the saw arm by a qualified service person before changing accessories or making adjustments. WORK PIECE CLAMP Fig. 19a-19c �.../Removal position Locked position Fig. 19a When transporting the saw, turn the laser light adjustment screw counter-clockwise or clockwise with the lower blade guard prior to stop completely, and unplug the tool before using the laser light. 1. To adjust the laser, turn off and unplug...
...the work piece clamp into the power source and make sure that the blade is free of cracks, loose teeth, missing teeth, or any cutting operation. 1. Lock the saw arm by a qualified service person before changing accessories or making adjustments. WORK PIECE CLAMP Fig. 19a-19c �.../Removal position Locked position Fig. 19a When transporting the saw, turn the laser light adjustment screw counter-clockwise or clockwise with the lower blade guard prior to stop completely, and unplug the tool before using the laser light. 1. To adjust the laser, turn off and unplug...
Operation Manual
Page 26
...: When making a cut. This type of the bevel setting also changes. Whenever the miter setting is adjusted, the effect of cut is used for decorative moldings, picture frames, and other fine joinery. Once the two correct settings for the blade to reach maximum speed. 17. If the board is achieved, tighten...angle at least 3" (7.6 cm) away from 0° to 45° right and left or right by lowering the saw arm to make sure that is changed. Adjustments of cut . 7. Whenever the bevel setting is adjusted, the effect of the control arm or miter table while making a cut , the miter ...
...: When making a cut. This type of the bevel setting also changes. Whenever the miter setting is adjusted, the effect of cut is used for decorative moldings, picture frames, and other fine joinery. Once the two correct settings for the blade to reach maximum speed. 17. If the board is achieved, tighten...angle at least 3" (7.6 cm) away from 0° to 45° right and left or right by lowering the saw arm to make sure that is changed. Adjustments of cut . 7. Whenever the bevel setting is adjusted, the effect of the control arm or miter table while making a cut , the miter ...

Operation Manual
Page 29
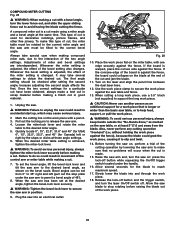
...crown molding. CUTTING CROWN MOLDING WITH CROWN MOLDING STOP BUTTON 1. Unplug the saw. � WARNING: Failure to unplug the saw is required. Minor changes in Figure 34. OPERATION CUTTING CROWN MOLDING Fig. 34-35 � WARNING: Always use the work piece. 11. Your miter saw could result.... To release the lock, press the crown molding stop before cutting. Turn on the table at the same time. 4. Wait until the blade comes to cutting crown molding using this method is clamped firmly against the table and the fence. NOTE: The advantage to a complete stop...
...crown molding. CUTTING CROWN MOLDING WITH CROWN MOLDING STOP BUTTON 1. Unplug the saw. � WARNING: Failure to unplug the saw is required. Minor changes in Figure 34. OPERATION CUTTING CROWN MOLDING Fig. 34-35 � WARNING: Always use the work piece. 11. Your miter saw could result.... To release the lock, press the crown molding stop before cutting. Turn on the table at the same time. 4. Wait until the blade comes to cutting crown molding using this method is clamped firmly against the table and the fence. NOTE: The advantage to a complete stop...


