
Operation Manual
Page 12
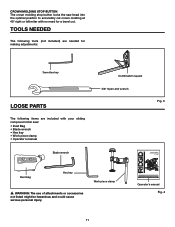
...bevel cut crown molding at 45° right or left miter with your sliding compound miter saw: • Dust Bag • Blade wrench • Hex key • Work piece clamp • Operator's manual Blade wrench Combination square 3/8" Open-end wrench Fig. 3 OPERATOR'S MANUAL 10 INCH SLIDING COMPOUND MITER SAW WITH DUAL LASER MS255SR...are included with no need for buying a RIDGID product. 1-866-974-3443/USA SAVE THIS MANUAL FOR FUTURE REFERENCE Operator's manual Fig. 4 11 Crown molding stop BUTTON The crown molding stop button locks the saw head into the optimal position to accurately ...
...bevel cut crown molding at 45° right or left miter with your sliding compound miter saw: • Dust Bag • Blade wrench • Hex key • Work piece clamp • Operator's manual Blade wrench Combination square 3/8" Open-end wrench Fig. 3 OPERATOR'S MANUAL 10 INCH SLIDING COMPOUND MITER SAW WITH DUAL LASER MS255SR...are included with no need for buying a RIDGID product. 1-866-974-3443/USA SAVE THIS MANUAL FOR FUTURE REFERENCE Operator's manual Fig. 4 11 Crown molding stop BUTTON The crown molding stop button locks the saw head into the optimal position to accurately ...
Operation Manual
Page 24
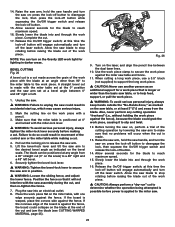
...the board is warped, place the convex side against the fence, the board could grab the work piece against the miter saw table, or at a bevel angle between the dual laser lines. 10. Turn on : press the lock-off button. 15. Release the On/Off trigger switch; Use the work piece... lock-off button to secure the saw arm. 5. Complete the cut (0° on the Gravity LED work piece. 14. Raise the saw arm, hold the saw handle, and turn on the scale) to do so could result in position. � WARNING: Loosen the sliding fence, and adjust the lower fence...
...the board is warped, place the convex side against the fence, the board could grab the work piece against the miter saw table, or at a bevel angle between the dual laser lines. 10. Turn on : press the lock-off button. 15. Release the On/Off trigger switch; Use the work piece... lock-off button to secure the saw arm. 5. Complete the cut (0° on the Gravity LED work piece. 14. Raise the saw arm, hold the saw handle, and turn on the scale) to do so could result in position. � WARNING: Loosen the sliding fence, and adjust the lower fence...
Operation Manual
Page 26
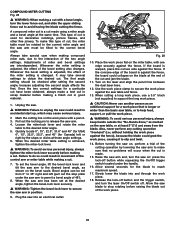
... pin to release the saw arm to the interaction of the control arm or miter table while making a cut is made using a miter angle and a bevel angle at the same time. Fig. 28 10. Also, never perform any...side against the fence), because the blade could collapse on the miter table, with a bevel angle, turn the lower fence out, and slide the upper sliding fence out to avoid having the blade cutting the fence. ... and align the pencil line between the dual laser lines. 12. This type of miter and bevel settings are interdependent. When the saw arm has been set from the blade.
... pin to release the saw arm to the interaction of the control arm or miter table while making a cut is made using a miter angle and a bevel angle at the same time. Fig. 28 10. Also, never perform any...side against the fence), because the blade could collapse on the miter table, with a bevel angle, turn the lower fence out, and slide the upper sliding fence out to avoid having the blade cutting the fence. ... and align the pencil line between the dual laser lines. 12. This type of miter and bevel settings are interdependent. When the saw arm has been set from the blade.

