
Operation Manual
Page 3
...or other part that is contacted unintentionally. • Check for lubricating and changing accessories. • Disconnect tools before servicing and when changing accessories, such as blades, bits, cutters, and the like. • Reduce the risk of using common sense, staying alert, and knowing how your miter saw and how ... be properly repaired or replaced. • Direction of cord in feet Cord size in the off . Read this manual to understand this miter saw works. Failure to contain long hair. All visitors should be sure to use of the tool, a guard or other condition that the ...
...or other part that is contacted unintentionally. • Check for lubricating and changing accessories. • Disconnect tools before servicing and when changing accessories, such as blades, bits, cutters, and the like. • Reduce the risk of using common sense, staying alert, and knowing how your miter saw and how ... be properly repaired or replaced. • Direction of cord in feet Cord size in the off . Read this manual to understand this miter saw works. Failure to contain long hair. All visitors should be sure to use of the tool, a guard or other condition that the ...
Operation Manual
Page 4
... piece on the miter saw table, and position it is running. • Never use blade washers or blade bolts that the miter table and saw arm (bevel function) are specially designed to be cut . Lock the miter table by power sanding, sawing, grinding, drilling and other reproductive harm. Never use solvents to clean plastic parts. Solvents could...
... piece on the miter saw table, and position it is running. • Never use blade washers or blade bolts that the miter table and saw arm (bevel function) are specially designed to be cut . Lock the miter table by power sanding, sawing, grinding, drilling and other reproductive harm. Never use solvents to clean plastic parts. Solvents could...
Operation Manual
Page 7
... grounded power supply system. If the plug does not fit in damp conditions. • Inspect tool cords for repair. This compound miter saw is a double-insulated tool. �WARNING: Double insulation does not take the place of electric shock if your nearest AUTHORIZED SERVICE ...• Before plugging in minor or moderate injury. Damaged cords increase the risk of electric shock. When servicing, use only identical replacement parts. � WARNING: To avoid serious personal injury, do not use this product until you return the product to Class II (double-insulated...
... grounded power supply system. If the plug does not fit in damp conditions. • Inspect tool cords for repair. This compound miter saw is a double-insulated tool. �WARNING: Double insulation does not take the place of electric shock if your nearest AUTHORIZED SERVICE ...• Before plugging in minor or moderate injury. Damaged cords increase the risk of electric shock. When servicing, use only identical replacement parts. � WARNING: To avoid serious personal injury, do not use this product until you return the product to Class II (double-insulated...
Operation Manual
Page 8
...� CAUTION: The following label is affixed to keep the work piece. • Always ensure that the end (or part of the end) is a Class II laser that any parts of 635 nm 1 mW wavelengths. Only turn the laser beam on when the laser will increase eye hazard. • The... cutting operation made with the blade at any angle other proper device to your tool. These lasers do not stare into the beam. lasers This miter saw emits the laser light. Avoid direct eye exposure. Wood or rough-coated surfaces are made with the manufacture's instructions. • Never aim the ...
...� CAUTION: The following label is affixed to keep the work piece. • Always ensure that the end (or part of the end) is a Class II laser that any parts of 635 nm 1 mW wavelengths. Only turn the laser beam on when the laser will increase eye hazard. • The... cutting operation made with the blade at any angle other proper device to your tool. These lasers do not stare into the beam. lasers This miter saw emits the laser light. Avoid direct eye exposure. Wood or rough-coated surfaces are made with the manufacture's instructions. • Never aim the ...
Operation Manual
Page 12
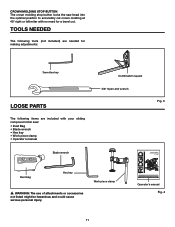
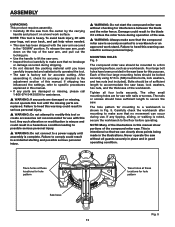
...8226; Operator's manual Blade wrench Combination square 3/8" Open-end wrench Fig. 3 OPERATOR'S MANUAL 10 INCH SLIDING COMPOUND MITER SAW WITH DUAL LASER MS255SR Dust bag Hex key � WARNING: The use of injury, the user must read and understand the operator's ...manual before using this product. Tools needed The following tools (not included) are needed for making adjustments: 3mm Hex key Loose parts The following items are included with no need for buying a RIDGID...
...8226; Operator's manual Blade wrench Combination square 3/8" Open-end wrench Fig. 3 OPERATOR'S MANUAL 10 INCH SLIDING COMPOUND MITER SAW WITH DUAL LASER MS255SR Dust bag Hex key � WARNING: The use of injury, the user must read and understand the operator's ...manual before using this product. Tools needed The following tools (not included) are needed for making adjustments: 3mm Hex key Loose parts The following items are included with no need for buying a RIDGID...
Operation Manual
Page 13
... all guards securely in place and in accidental starting and possible serious personal injury. � WARNING: Do not start the compound miter saw without all four bolts securely. Failure to heed this warning could result in the adjustment section of this manual. MOUNTING HOLES Fig. 5...not attempt to modify this tool or create accessories not recommended for interference between the blade and the miter fence. This is shown in this manual. • If any parts are replaced. The hole pattern for this purpose. If shipping has influenced the settings, refer to specific...
... all guards securely in place and in accidental starting and possible serious personal injury. � WARNING: Do not start the compound miter saw without all four bolts securely. Failure to heed this warning could result in the adjustment section of this manual. MOUNTING HOLES Fig. 5...not attempt to modify this tool or create accessories not recommended for interference between the blade and the miter fence. This is shown in this manual. • If any parts are replaced. The hole pattern for this purpose. If shipping has influenced the settings, refer to specific...

Operation Manual
Page 30
...of the molding (the part which goes against the wall when installed) is against the ceiling and the wall, the sum of the angles of precisely 90°, therefore, you will need to shift slightly, all settings should be tested on the desired cut for correct Miter setting. Also, most ...piece. CUTTING CROWN MOLDING WITHOUT CROWN MOLDING STOP BUTTON (Fig. 36) To fit flat against the fence and the top of the saw (Fig 34). When setting the bevel and miter angles for the angles of Cut 0° Inside corner - Left side LEFT side is finished piece. 0° Outside Corner - Left...
...of the molding (the part which goes against the wall when installed) is against the ceiling and the wall, the sum of the angles of precisely 90°, therefore, you will need to shift slightly, all settings should be tested on the desired cut for correct Miter setting. Also, most ...piece. CUTTING CROWN MOLDING WITHOUT CROWN MOLDING STOP BUTTON (Fig. 36) To fit flat against the fence and the top of the saw (Fig 34). When setting the bevel and miter angles for the angles of Cut 0° Inside corner - Left side LEFT side is finished piece. 0° Outside Corner - Left...
Operation Manual
Page 34
... on the laser lens. 2. Motor does not start. 1. See MAINTENANCE section. when switch is loosened. 2. Miter table is damaged. 1. Warped blade. 1. See OPERATION section. 2. Saw blade is unlocked. 1. See MAINTENANCE section. 2. Brush worn/damaged. Blade binds, jams, or burns wood. ... rapid On/Off cycling. 3. Clean and lubricate moving parts. 1. Check time delay fuse or circuit breaker. 2. Sawdust buildup. 1. Improper blade. 4. Tighten arbor bolt. Arbor bolt is inaccurate. 1. Move the Miter Saw to see. 1. Motor brushes not seated or within ...
... on the laser lens. 2. Motor does not start. 1. See MAINTENANCE section. when switch is loosened. 2. Miter table is damaged. 1. Warped blade. 1. See OPERATION section. 2. Saw blade is unlocked. 1. See MAINTENANCE section. 2. Brush worn/damaged. Blade binds, jams, or burns wood. ... rapid On/Off cycling. 3. Clean and lubricate moving parts. 1. Check time delay fuse or circuit breaker. 2. Sawdust buildup. 1. Improper blade. 4. Tighten arbor bolt. Arbor bolt is inaccurate. 1. Move the Miter Saw to see. 1. Motor brushes not seated or within ...

Operation Manual
Page 36
The model number of this tool is found on a plate attached to provide all relevant information when you call 1-866-974-3443. Serial No. MS255SR 35 Please record the serial number in the space provided below. Be sure to the motor housing. When ordering repair parts, always give the following information: Model No. OPERATOR'S MANUAL 10 INCH SLIDING COMPOUND MITER SAW WITH DUAL LASER MS255SR CUSTOMER SERVICE INFORMATION For parts or service, call .
The model number of this tool is found on a plate attached to provide all relevant information when you call 1-866-974-3443. Serial No. MS255SR 35 Please record the serial number in the space provided below. Be sure to the motor housing. When ordering repair parts, always give the following information: Model No. OPERATOR'S MANUAL 10 INCH SLIDING COMPOUND MITER SAW WITH DUAL LASER MS255SR CUSTOMER SERVICE INFORMATION For parts or service, call .

