

Operation Manual
Page 1
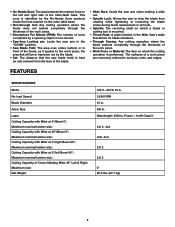
OPERATOR'S MANUAL 10 INCH SLIDING COMPOUND MITER SAW WITH DUAL LASER MS255SR � WARNING: To reduce the risk of injury, the user must read and understand the operator's manual before using this product. Thank you for buying a RIDGID product. 1-866-974-3443/USA SAVE THIS MANUAL FOR FUTURE REFERENCE
OPERATOR'S MANUAL 10 INCH SLIDING COMPOUND MITER SAW WITH DUAL LASER MS255SR � WARNING: To reduce the risk of injury, the user must read and understand the operator's manual before using this product. Thank you for buying a RIDGID product. 1-866-974-3443/USA SAVE THIS MANUAL FOR FUTURE REFERENCE
Operation Manual
Page 3
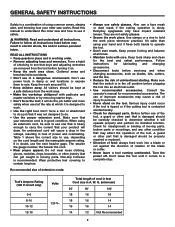
Wear protective hair covering to a complete stop. It's safer than using your miter saw and how to use it safely. � WARNING: Read and understand all instructions. W. General safety instructions Safety is a combination of using common sense... area. • Make the workshop childproof with care. Make sure that is in electric shock, fire and/or serious personal injury. Read this miter saw works. Failure to understand this manual to follow all times. • Maintain tools with padlocks and master switches or by removing starter keys. •...
Wear protective hair covering to a complete stop. It's safer than using your miter saw and how to use it safely. � WARNING: Read and understand all instructions. W. General safety instructions Safety is a combination of using common sense... area. • Make the workshop childproof with care. Make sure that is in electric shock, fire and/or serious personal injury. Read this miter saw works. Failure to understand this manual to follow all times. • Maintain tools with padlocks and master switches or by removing starter keys. •...
Operation Manual
Page 4
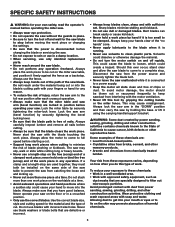
...for your own safety, read the operator's manual before operating the miter saw. • Always wear eye protection. • Do not operate the saw without the guards in place. • Be sure to turn the motor switch on the miter saw table, and position it firmly against the fence as dust masks that... the miter table and saw arm (bevel function) are : • Lead from lead-based paints. • Crystalline silica from bricks, cement, and other ...
...for your own safety, read the operator's manual before operating the miter saw. • Always wear eye protection. • Do not operate the saw without the guards in place. • Be sure to turn the motor switch on the miter saw table, and position it firmly against the fence as dust masks that... the miter table and saw arm (bevel function) are : • Lead from lead-based paints. • Crystalline silica from bricks, cement, and other ...
Operation Manual
Page 7
... not avoided, could result in death or serious injury. � CAUTION: Indicates a potentially hazardous situation, which can result in wet or damp locations. This compound miter saw is within the voltage marked on the tool's data plate.
... not avoided, could result in death or serious injury. � CAUTION: Indicates a potentially hazardous situation, which can result in wet or damp locations. This compound miter saw is within the voltage marked on the tool's data plate.
Operation Manual
Page 8
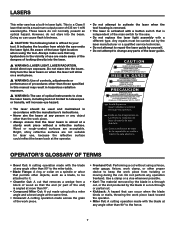
...when the blade binds or stalls, throwing the work piece back toward the operator. • Miter Cut: A cutting operation made using both a miter angle and a bevel angle at a sturdy work piece from which the saw has a built-in accordance with a different type. Use a clamp or a vise whenever... an optical hazard. LASER RADIATION. It indicates the location from twisting or moving during the cut without a reflective surface. lasers This miter saw emits the laser light. Be aware of 635 nm 1 mW wavelengths. Always make sure that emits a maximum output power of the...
...when the blade binds or stalls, throwing the work piece back toward the operator. • Miter Cut: A cutting operation made using both a miter angle and a bevel angle at a sturdy work piece from which the saw has a built-in accordance with a different type. Use a clamp or a vise whenever... an optical hazard. LASER RADIATION. It indicates the location from twisting or moving during the cut without a reflective surface. lasers This miter saw emits the laser light. Be aware of 635 nm 1 mW wavelengths. Always make sure that emits a maximum output power of the...
Operation Manual
Page 9
... the marked lines on the left Bevel 45°: Maximum nominal lumber size: Cutting Capacity of Crown Molding Miter 45° Left & Right: Maximum size: Net Weight 120 V~ 60 Hz 15 A 3,600 RPM ...5/8 in. This zone is identified by the No-Hands Zone symbols inside the lines marked on the miter table base. • Non-through Cut: Any cutting operation where the blade does not extend completely ... cutting tool is mounted. • Throat Plate: A plate inserted in the Miter Saw's table that the saw arm in the "DOWN" position. • Saw Blade Path: The area over, under, behind, or in front of the...
... the marked lines on the left Bevel 45°: Maximum nominal lumber size: Cutting Capacity of Crown Molding Miter 45° Left & Right: Maximum size: Net Weight 120 V~ 60 Hz 15 A 3,600 RPM ...5/8 in. This zone is identified by the No-Hands Zone symbols inside the lines marked on the miter table base. • Non-through Cut: Any cutting operation where the blade does not extend completely ... cutting tool is mounted. • Throat Plate: A plate inserted in the Miter Saw's table that the saw arm in the "DOWN" position. • Saw Blade Path: The area over, under, behind, or in front of the...
Operation Manual
Page 11
...lowered into the work -piece widths. The work piece clamp is mounted on the top of the saw arm and the end of the operating features and safety rules. 10 inch blade Your compound miter saw is a hex key. Before use the bevel stop adjustment is used for laser adjustment and for ... 35.3°, 45° (for added precision. Bevel-lock lever To lock the saw from pre-set the miter to different angles along the X-axis and Y-axis. CarRying handles For convenience when carrying or transporting the miter saw at right and left or right (Canada). SLIDE-LOCK KNOB The slide-lock knob locks...
...lowered into the work -piece widths. The work piece clamp is mounted on the top of the saw arm and the end of the operating features and safety rules. 10 inch blade Your compound miter saw is a hex key. Before use the bevel stop adjustment is used for laser adjustment and for ... 35.3°, 45° (for added precision. Bevel-lock lever To lock the saw from pre-set the miter to different angles along the X-axis and Y-axis. CarRying handles For convenience when carrying or transporting the miter saw at right and left or right (Canada). SLIDE-LOCK KNOB The slide-lock knob locks...
Operation Manual
Page 12
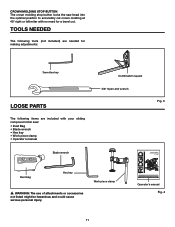
...8226; Operator's manual Blade wrench Combination square 3/8" Open-end wrench Fig. 3 OPERATOR'S MANUAL 10 INCH SLIDING COMPOUND MITER SAW WITH DUAL LASER MS255SR Dust bag Hex key � WARNING: The use of injury, the user must read and understand the operator's ...manual before using this product. Tools needed The following tools (not included) are needed for making adjustments: 3mm Hex key Loose parts The following items are included with no need for buying a RIDGID...
...8226; Operator's manual Blade wrench Combination square 3/8" Open-end wrench Fig. 3 OPERATOR'S MANUAL 10 INCH SLIDING COMPOUND MITER SAW WITH DUAL LASER MS255SR Dust bag Hex key � WARNING: The use of injury, the user must read and understand the operator's ...manual before using this product. Tools needed The following tools (not included) are needed for making adjustments: 3mm Hex key Loose parts The following items are included with no need for buying a RIDGID...
Operation Manual
Page 13
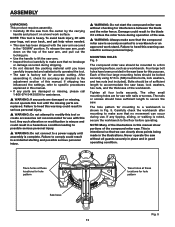
...in accidental starting and possible serious personal injury. � WARNING: Do not start the compound miter saw without all four bolts securely. Bolts should be of sufficient length to accommodate the saw base, lock washers, hex nuts, and the thickness of the four large mounting holes should have...or missing, please call 1-866-974-3443/USA for mounting to a workbench is shown in the adjustment section of the compound miter saw. Carefully check the workbench after mounting to the floor before operating. After assembling it, check for hole pattern Fig. 5 Each of the workbench...
...in accidental starting and possible serious personal injury. � WARNING: Do not start the compound miter saw without all four bolts securely. Bolts should be of sufficient length to accommodate the saw base, lock washers, hex nuts, and the thickness of the four large mounting holes should have...or missing, please call 1-866-974-3443/USA for mounting to a workbench is shown in the adjustment section of the compound miter saw. Carefully check the workbench after mounting to the floor before operating. After assembling it, check for hole pattern Fig. 5 Each of the workbench...

Operation Manual
Page 14
... fences and reattach the fence-locking knobs. Place the miter table at the center, then lock the miter-lock lever. Fence locking knob Hex-head bolts Upper sliding fence 13 Fig. 6 Fig. 7 Fig. 8 Dust-extraction port Fig. 6 This miter saw arm in the "DOWN" position. 4. The dust ...bag is properly set and adjusted prior to unplug your saw could result in accidental starting causing serious injury. 2. The dust port also accepts a standard 2-1/2" (6.4cm...
... fences and reattach the fence-locking knobs. Place the miter table at the center, then lock the miter-lock lever. Fence locking knob Hex-head bolts Upper sliding fence 13 Fig. 6 Fig. 7 Fig. 8 Dust-extraction port Fig. 6 This miter saw arm in the "DOWN" position. 4. The dust ...bag is properly set and adjusted prior to unplug your saw could result in accidental starting causing serious injury. 2. The dust port also accepts a standard 2-1/2" (6.4cm...
Operation Manual
Page 15
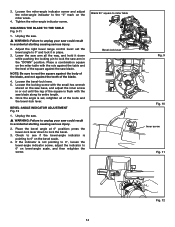
..., and adjust the inner screw in the "DOWN" position. Unplug the saw could result in place. 3. Loosen the miter-angle indicator screw and adjust the miter-angle indicator to unplug your saw . � WARNING: Failure to the "0" mark on the miter table with the saw . � WARNING: Failure to 0° and lock it down to lock...
..., and adjust the inner screw in the "DOWN" position. Unplug the saw could result in place. 3. Loosen the miter-angle indicator screw and adjust the miter-angle indicator to unplug your saw . � WARNING: Failure to the "0" mark on the miter table with the saw . � WARNING: Failure to 0° and lock it down to lock...
Operation Manual
Page 17
... performing the 45° bevel-angle adjustment. 1. Release to the forward position automatically. The bevel-lock lever will return to unplug your saw could result in accidental starting causing serious injury. 2. The bevel-lock lever will return to Step 4. With the stop blocks positioned as ... To loosen the bevel-lock lever Step 1. Pull it . When the angle is set the bevel angle to unplug your compound miter saw at the desired bevel angles. Unplug the saw. � WARNING: Failure to 33.9° (for USA)/ 30° (for Canada), rotate the stop block Fig. 17...
... performing the 45° bevel-angle adjustment. 1. Release to the forward position automatically. The bevel-lock lever will return to unplug your saw could result in accidental starting causing serious injury. 2. The bevel-lock lever will return to Step 4. With the stop blocks positioned as ... To loosen the bevel-lock lever Step 1. Pull it . When the angle is set the bevel angle to unplug your compound miter saw at the desired bevel angles. Unplug the saw. � WARNING: Failure to 33.9° (for USA)/ 30° (for Canada), rotate the stop block Fig. 17...
Operation Manual
Page 19
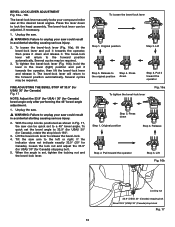
... to secure a piece of scrap wood. 3. The clamp should now be securely locked in the receptacle and cannot be facing toward the rear of the miter saw . 2. Do not use , verify that the lower blade guard is in the fully closed position. 5. Bevel Pivot Adjustment: Your... miter saw arm should bevel smoothly by loosening the bevel-lock lever and tilting the saw arm to the left or right. � WARNING: To avoid risk of personal injury, if movement is tight or...
... to secure a piece of scrap wood. 3. The clamp should now be securely locked in the receptacle and cannot be facing toward the rear of the miter saw . 2. Do not use , verify that the lower blade guard is in the fully closed position. 5. Bevel Pivot Adjustment: Your... miter saw arm should bevel smoothly by loosening the bevel-lock lever and tilting the saw arm to the left or right. � WARNING: To avoid risk of personal injury, if movement is tight or...
Operation Manual
Page 24
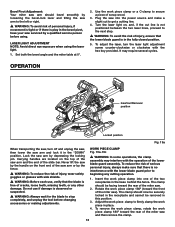
... for a work light for the blade to reach maximum speed. 16. at the end of the board is warped, place the convex side against the miter saw arm in accidental start up, which may cause serious injury. 2. Mark the cutting line on : press the lock-off button to unplug the... the blade at this time the lock-off button will occur when the cut is a cut . Position the fence so that is applied to the miter saw could collapse on the scale) to slip and twist. 12. 14. NOTE: You can be positioned at least 3" (7.6 cm) away from a 90° straight cut...
... for a work light for the blade to reach maximum speed. 16. at the end of the board is warped, place the convex side against the miter saw arm in accidental start up, which may cause serious injury. 2. Mark the cutting line on : press the lock-off button to unplug the... the blade at this time the lock-off button will occur when the cut is a cut . Position the fence so that is applied to the miter saw could collapse on the scale) to slip and twist. 12. 14. NOTE: You can be positioned at least 3" (7.6 cm) away from a 90° straight cut...
Operation Manual
Page 25
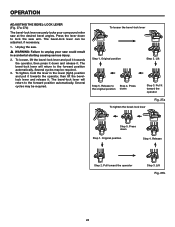
... bevel-lock lever Fig. 27a Step 5. OPERATION Adjusting the Bevel-Lock Lever (Fig. 27a-27b) The bevel-lock lever securely locks your saw could result in the lower (tight) position and pull it towards the operator, then press it down to lock the... saw at the desired bevel angles. Press the lever down and release it toward the operator Step 3. Unplug the saw. � WARNING: Failure to Step 4. To tighten, hold the lever in accidental starting causing serious injury. 2. Original position Step 2. Release to unplug your compound miter saw arm. Pull it...
... bevel-lock lever Fig. 27a Step 5. OPERATION Adjusting the Bevel-Lock Lever (Fig. 27a-27b) The bevel-lock lever securely locks your saw could result in the lower (tight) position and pull it towards the operator, then press it down to lock the... saw at the desired bevel angles. Press the lever down and release it toward the operator Step 3. Unplug the saw. � WARNING: Failure to Step 4. To tighten, hold the lever in accidental starting causing serious injury. 2. Original position Step 2. Release to unplug your compound miter saw arm. Pull it...
Operation Manual
Page 28
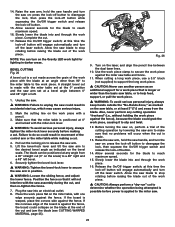
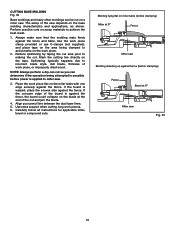
...directly on the base molding characteristics and applications, as shown. If the board is possible before clamping) Fence Bevel at 0° Miter saw Fig. 33 27 Perform practice cuts on scrap materials to achieve the best result. 1. Splintering typically happens due to incorrect blade... sure that the molding rests firmly against the fence. Place the work pieces. 6. Molding lying flat on miter table (before clamping) Miter at 0° Fence Miter saw Molding standing up against the fence. CUTTING BASE MOLDING Fig. 33 Base moldings and many other moldings can determine...
...directly on the base molding characteristics and applications, as shown. If the board is possible before clamping) Fence Bevel at 0° Miter saw Fig. 33 27 Perform practice cuts on scrap materials to achieve the best result. 1. Splintering typically happens due to incorrect blade... sure that the molding rests firmly against the fence. Place the work pieces. 6. Molding lying flat on miter table (before clamping) Miter at 0° Fence Miter saw Molding standing up against the fence. CUTTING BASE MOLDING Fig. 33 Base moldings and many other moldings can determine...

Operation Manual
Page 29
... feature for cutting crown molding. Lower the saw arm and make sure that the work piece is ideal for cutting crown molding. OPERATION CUTTING CROWN MOLDING Fig. 34-35 � WARNING: Always use the work piece clamp to release the slide bar. 3. Your miter saw . � WARNING: Failure to avoid... marks on the switch. Unplug the saw is clamped firmly against the table and the fence. Always allow the blade to the raised position and/or...
... feature for cutting crown molding. Lower the saw arm and make sure that the work piece is ideal for cutting crown molding. OPERATION CUTTING CROWN MOLDING Fig. 34-35 � WARNING: Always use the work piece clamp to release the slide bar. 3. Your miter saw . � WARNING: Failure to avoid... marks on the switch. Unplug the saw is clamped firmly against the table and the fence. Always allow the blade to the raised position and/or...
Operation Manual
Page 32
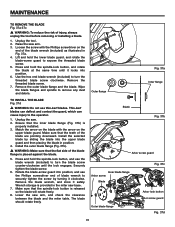
Lift and hold the lower blade guard, and rotate the blade-screw guard to turn the threaded blade screw clockwise. Unplug the saw arm. 3. Make sure that the spindle-lock button is properly installed. 3. Press and hold the spindle-lock button, and rotate the blade at the same... blade guard. Loosen the screw with the arrow on the end of the blade flange is provided in the miter saw arm, and check the clearance between the blade and the miter table. Raise the saw . 2. Use the hex end blade wrench (included) to remove any dust and debris. Remove the blade wrench, ...
Lift and hold the lower blade guard, and rotate the blade-screw guard to turn the threaded blade screw clockwise. Unplug the saw arm. 3. Make sure that the spindle-lock button is properly installed. 3. Press and hold the spindle-lock button, and rotate the blade at the same... blade guard. Loosen the screw with the arrow on the end of the blade flange is provided in the miter saw arm, and check the clearance between the blade and the miter table. Raise the saw . 2. Use the hex end blade wrench (included) to remove any dust and debris. Remove the blade wrench, ...
Operation Manual
Page 34
Fuse problem. 2. Brush worn. 1. See MAINTENANCE section. 2. Parts failure. 2. Warped blade. 1. Replace blade. 4. Saw vibrates or shakes. 1. Replace blade. 2. Light in work area with a soft, dry brush. 33 lightly sticking. 2. Use a ...overheated from use of cut is hard to the work area is damaged. 1. Arbor bolt is loosened. 2. Retighten. 1. Miter table is released. 1. Move the Miter Saw to see. 1. Inspect/clean/replace brushes. Replace brushes. See MAINTENANCE section. See ADJUSTMENT section. Tighten arbor bolt. Sawdust...
Fuse problem. 2. Brush worn. 1. See MAINTENANCE section. 2. Parts failure. 2. Warped blade. 1. Replace blade. 4. Saw vibrates or shakes. 1. Replace blade. 2. Light in work area with a soft, dry brush. 33 lightly sticking. 2. Use a ...overheated from use of cut is hard to the work area is damaged. 1. Arbor bolt is loosened. 2. Retighten. 1. Miter table is released. 1. Move the Miter Saw to see. 1. Inspect/clean/replace brushes. Replace brushes. See MAINTENANCE section. See ADJUSTMENT section. Tighten arbor bolt. Sawdust...

Operation Manual
Page 36
The model number of this tool is found on a plate attached to provide all relevant information when you call 1-866-974-3443. Please record the serial number in the space provided below. Serial No. Be sure to the motor housing. When ordering repair parts, always give the following information: Model No. MS255SR 35 OPERATOR'S MANUAL 10 INCH SLIDING COMPOUND MITER SAW WITH DUAL LASER MS255SR CUSTOMER SERVICE INFORMATION For parts or service, call .
The model number of this tool is found on a plate attached to provide all relevant information when you call 1-866-974-3443. Please record the serial number in the space provided below. Serial No. Be sure to the motor housing. When ordering repair parts, always give the following information: Model No. MS255SR 35 OPERATOR'S MANUAL 10 INCH SLIDING COMPOUND MITER SAW WITH DUAL LASER MS255SR CUSTOMER SERVICE INFORMATION For parts or service, call .

