

Owners Manual
Page 3
...outdoors, use , before turning it on the tool while it will draw. An undersized cord will do a job for lubricating and changing accessories. DISCONNECT TOOLS. Also wear protective hair covering to this tool. GUARD AGAINST ELECTRICAL SHOCK BY PREVENTING BODY ...designed. USE THE RIGHT TOOL. Everyday eyeglasses have only impactresistant lenses, they are removed from tool before servicing, or when changing attachments, blades, bits, cutters, etc., all instructions listed below, could occur if the tool is damaged must be kept a safe distance from...
...outdoors, use , before turning it on the tool while it will draw. An undersized cord will do a job for lubricating and changing accessories. DISCONNECT TOOLS. Also wear protective hair covering to this tool. GUARD AGAINST ELECTRICAL SHOCK BY PREVENTING BODY ...designed. USE THE RIGHT TOOL. Everyday eyeglasses have only impactresistant lenses, they are removed from tool before servicing, or when changing attachments, blades, bits, cutters, etc., all instructions listed below, could occur if the tool is damaged must be kept a safe distance from...
Owners Manual
Page 4
... clean tool. STAY ALERT AND EXERCISE CONTROL. Do not rush. Never use only identical replacement parts. If repair or replacement of blade pinching and kickback. Lock the miter table by a qualified service technician at a time. If damaged, have repaired by securely tightening the miter... lock lever. Repair or replace a damaged or worn cord immediately. Do not change the plug in the outlet, reverse the plug. Always turn the power off. ALWAYS SUPPORT LONG WORKPIECES while cutting to prevent the...
... clean tool. STAY ALERT AND EXERCISE CONTROL. Do not rush. Never use only identical replacement parts. If repair or replacement of blade pinching and kickback. Lock the miter table by a qualified service technician at a time. If damaged, have repaired by securely tightening the miter... lock lever. Repair or replace a damaged or worn cord immediately. Do not change the plug in the outlet, reverse the plug. Always turn the power off. ALWAYS SUPPORT LONG WORKPIECES while cutting to prevent the...

Owners Manual
Page 5
... without guards in line with approved safety equipment, such as applicable) before moving workpiece or changing settings. NEVER leave the saw blade. Refer to them these chemicals: work . Disconnect the saw blade to loosen and could cause your exposure to these instructions also. If you while making a.... g) Disconnect power (or unplug tool as those dust masks that no obstructions will interfere with your saw blade to stop . ALWAYS secure this ever occur, stand clear and allow the saw blade to a complete stop before changing blade or servicing.
... without guards in line with approved safety equipment, such as applicable) before moving workpiece or changing settings. NEVER leave the saw blade. Refer to them these chemicals: work . Disconnect the saw blade to loosen and could cause your exposure to these instructions also. If you while making a.... g) Disconnect power (or unplug tool as those dust masks that no obstructions will interfere with your saw blade to stop . ALWAYS secure this ever occur, stand clear and allow the saw blade to a complete stop before changing blade or servicing.
Owners Manual
Page 12
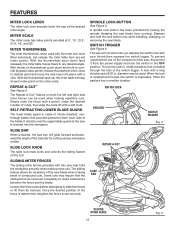
... LOCK KNOB The slide lock knob locks and unlocks the sliding feature of this saw help hold the lock button only while installing, changing, or removing the saw arm will not start until you depress the switch lock with the miter lock lever lifted (unlocked), can be used . SLIDING ... been provided for clearance of the saw will glide forward and backward the length of the fence is inoperable. To prevent unauthorized use of the blade. When the lock is installed and locked, the switch is determined, retighten the fence screw securely. With thumb on both the left and right side...
... LOCK KNOB The slide lock knob locks and unlocks the sliding feature of this saw help hold the lock button only while installing, changing, or removing the saw arm will not start until you depress the switch lock with the miter lock lever lifted (unlocked), can be used . SLIDING ... been provided for clearance of the saw will glide forward and backward the length of the fence is inoperable. To prevent unauthorized use of the blade. When the lock is installed and locked, the switch is determined, retighten the fence screw securely. With thumb on both the left and right side...
Owners Manual
Page 29
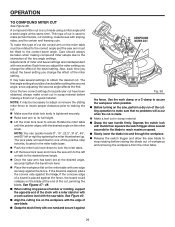
...of the two angle settings. See Figure 40. Align the cutting line on the blade at the desired angle, securely tighten the bevel lock lever. Place the workpiece flat...you change the effect of the bevel setting. The first angle setting should always be checked after setting the second angle, since adjusting the second angle affects the first. This type of saw blade.... its full height. Lift the miter lock lever to make a test cut , jamming the blade. Depress the switch lock with sloping sides, and for a particular cut have been obtained, always make ...
...of the two angle settings. See Figure 40. Align the cutting line on the blade at the desired angle, securely tighten the bevel lock lever. Place the workpiece flat...you change the effect of the bevel setting. The first angle setting should always be checked after setting the second angle, since adjusting the second angle affects the first. This type of saw blade.... its full height. Lift the miter lock lever to make a test cut , jamming the blade. Depress the switch lock with sloping sides, and for a particular cut have been obtained, always make ...

Owners Manual
Page 37
...series or equivalent). MOTOR BELT TENSION See Figure 51. Tighten screw securely. MAINTENANCE WARNING: Failure to unplug the saw . Rotate and hold lower blade guard up. Using the hex key (1/16 in . Brush assembly is oriented correctly (straight) and replace. Tighten brush cap securely... at the factory but don't remove, the six motor mount screws. Increase the belt tension by squeezing the belt. CHANGING THE BATTERIES See Figure 52. Unplug the saw could result in . CAUTION: Use of controls or adjustments or performance of carbon remaining....
...series or equivalent). MOTOR BELT TENSION See Figure 51. Tighten screw securely. MAINTENANCE WARNING: Failure to unplug the saw . Rotate and hold lower blade guard up. Using the hex key (1/16 in . Brush assembly is oriented correctly (straight) and replace. Tighten brush cap securely... at the factory but don't remove, the six motor mount screws. Increase the belt tension by squeezing the belt. CHANGING THE BATTERIES See Figure 52. Unplug the saw could result in . CAUTION: Use of controls or adjustments or performance of carbon remaining....

