

Owners Manual
Page 3
... locations or expose to a complete stop. PROTECT YOUR LUNGS. Before further use power tools in any other part that is in injury. NEVER STAND ON TOOL. Feed work when practical, it to hold work into moving parts, breakage of wood on . KEEP WORK AREA CLEAN. Wear hearing protection...
... locations or expose to a complete stop. PROTECT YOUR LUNGS. Before further use power tools in any other part that is in injury. NEVER STAND ON TOOL. Feed work when practical, it to hold work into moving parts, breakage of wood on . KEEP WORK AREA CLEAN. Wear hearing protection...

Owners Manual
Page 5
... TOOL has the following markings: a) Wear eye protection. This could cause your hand to cause a careless mistake. ALWAYS secure this ever occur, stand clear and allow familiarity (gained from bricks and cement and other construction activities contains chemicals known to a complete stop. SPECIFIC SAFETY RULES ...cut. ALWAYS carry the tool only by pushing the saw blade down on the floor or in a crouched position. NEVER stand or have any electrical component fail to perform properly, shut off tool and wait for any work . d) Do not perform any use of ...
... TOOL has the following markings: a) Wear eye protection. This could cause your hand to cause a careless mistake. ALWAYS secure this ever occur, stand clear and allow familiarity (gained from bricks and cement and other construction activities contains chemicals known to a complete stop. SPECIFIC SAFETY RULES ...cut. ALWAYS carry the tool only by pushing the saw blade down on the floor or in a crouched position. NEVER stand or have any electrical component fail to perform properly, shut off tool and wait for any work . d) Do not perform any use of ...
Owners Manual
Page 15
... of the tie wrap and/or depth guide. Inspect the tool carefully to specific procedures explained in a hazardous condition leading to a leg stand. If using bolts, they should be mounted to a workbench or an approved workstand. Any such alteration or modification is factory set for mounting to ...saw from the carton by the handle. NOTE: This tool is securely mounted to a firm supporting surface such as a workbench, mounting board, or leg stand. To avoid back injury, lift with your legs, not your back, and get help when needed. This saw has been shipped with this...
... of the tie wrap and/or depth guide. Inspect the tool carefully to specific procedures explained in a hazardous condition leading to a leg stand. If using bolts, they should be mounted to a workbench or an approved workstand. Any such alteration or modification is factory set for mounting to ...saw from the carton by the handle. NOTE: This tool is securely mounted to a firm supporting surface such as a workbench, mounting board, or leg stand. To avoid back injury, lift with your legs, not your back, and get help when needed. This saw has been shipped with this...

Owners Manual
Page 20
... THROAT PLATE See Figure 15. CENTERING THE SAW BLADE BETWEEN THE SLIDE BARS See Figure 16. The saw back and forth over the slide bars. Standing in the slide bars, gradually tighten the two top gib screws while sliding the saw blade should be no play between the right slide bar...
... THROAT PLATE See Figure 15. CENTERING THE SAW BLADE BETWEEN THE SLIDE BARS See Figure 16. The saw back and forth over the slide bars. Standing in the slide bars, gradually tighten the two top gib screws while sliding the saw blade should be no play between the right slide bar...

Owners Manual
Page 26
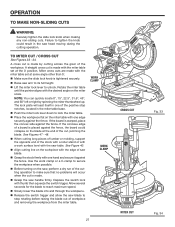
... fence. With the saw off , grasp the saw handle firmly then pull the saw forward until the blade arbor (center of the stock with a roller stand or with a work clamp or a C-clamp to secure the workpiece when possible. Before turning on the saw table. See Figures 47 - 48. When...
... fence. With the saw off , grasp the saw handle firmly then pull the saw forward until the blade arbor (center of the stock with a roller stand or with a work clamp or a C-clamp to secure the workpiece when possible. Before turning on the saw table. See Figures 47 - 48. When...
Owners Manual
Page 27
A straight cross cut is placed against the fence. If the concave edge of the stock with a roller stand or with a work clamp or a C-clamp to secure the workpiece when possible. Before turning on the miter scale. WORK CLAMP WORK CLAMP 27 CROSS ...
A straight cross cut is placed against the fence. If the concave edge of the stock with a roller stand or with a work clamp or a C-clamp to secure the workpiece when possible. Before turning on the miter scale. WORK CLAMP WORK CLAMP 27 CROSS ...

Owners Manual
Page 28
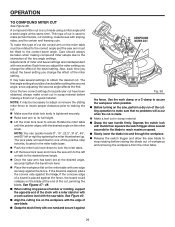
See Figures 47 - 48. When cutting long pieces of lumber or molding, support the opposite end of the stock with a roller stand or with a work clamp or a C-clamp to secure the workpiece when possible. Before turning on the saw, perform a dry run of the cutting operation ...
See Figures 47 - 48. When cutting long pieces of lumber or molding, support the opposite end of the stock with a roller stand or with a work clamp or a C-clamp to secure the workpiece when possible. Before turning on the saw, perform a dry run of the cutting operation ...
Owners Manual
Page 29
... workpiece from the miter table. 29 See Figure 40. Align the cutting line on the workpiece with the edge of the stock with a roller stand or with a work clamp or a C-clamp to secure the workpiece when possible. Before turning on the miter table must be rotated to the correct...
... workpiece from the miter table. 29 See Figure 40. Align the cutting line on the workpiece with the edge of the stock with a roller stand or with a work clamp or a C-clamp to secure the workpiece when possible. Before turning on the miter table must be rotated to the correct...

