

Owners Manual
Page 1
micro CA-100 Operator's Manual micro CA-100 Inspection Camera WARNING! pág. 23 • Türkçe - 35 47 Failure to understand and follow the contents of this tool. Read this Operator's Manual carefully before using this manual may result in electrical shock, fire and/or serious personal injury. • Français - 11 • Castellano -
micro CA-100 Operator's Manual micro CA-100 Inspection Camera WARNING! pág. 23 • Türkçe - 35 47 Failure to understand and follow the contents of this tool. Read this Operator's Manual carefully before using this manual may result in electrical shock, fire and/or serious personal injury. • Français - 11 • Castellano -
Owners Manual
Page 2
... Safety 2 Electrical Safety 2 Personal Safety 2 Equipment Use and Care 2 Service ...3 Specific Safety Information micro CA-100 Inspection Camera Safety 3 Description, Specifications and Standard Equipment Description ...4 Specifications...4 Standard Equipment 4 Controls ...4 FCC Statement ...5 ...EMC 5 Tool Assembly Changing/Installing Batteries 5 Installing Imager Head Cable or Extension Cables 5 Installing An Accessory 6 Pre-Operation Inspection 6 Tool and Work Area Set-Up 7 Operating Instructions 8 Viewing ...8 Maintenance Cleaning...9 Reset Function 9 Accessories ...9 Storage...
... Safety 2 Electrical Safety 2 Personal Safety 2 Equipment Use and Care 2 Service ...3 Specific Safety Information micro CA-100 Inspection Camera Safety 3 Description, Specifications and Standard Equipment Description ...4 Specifications...4 Standard Equipment 4 Controls ...4 FCC Statement ...5 ...EMC 5 Tool Assembly Changing/Installing Batteries 5 Installing Imager Head Cable or Extension Cables 5 Installing An Accessory 6 Pre-Operation Inspection 6 Tool and Work Area Set-Up 7 Operating Instructions 8 Viewing ...8 Maintenance Cleaning...9 Reset Function 9 Accessories ...9 Storage...

Owners Manual
Page 3
Serial No. micro CA-100 micro CA-100 Inspection Camera micro CA-100 Inspection Camera Record Serial Number below and retain product serial number which is located on nameplate.
Serial No. micro CA-100 micro CA-100 Inspection Camera micro CA-100 Inspection Camera Record Serial Number below and retain product serial number which is located on nameplate.
Owners Manual
Page 4
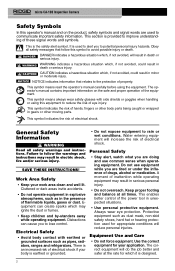
... sparks which it is the safety alert symbol. Water entering equipment will result in electric shock, fire and/or serious injury. SAVE THESE INSTRUCTIONS! micro CA-100 Inspection Camera Safety Symbols In this operator's manual and on the safe and proper operation of electrical shock.
... sparks which it is the safety alert symbol. Water entering equipment will result in electric shock, fire and/or serious injury. SAVE THESE INSTRUCTIONS! micro CA-100 Inspection Camera Safety Symbols In this operator's manual and on the safe and proper operation of electrical shock.
Owners Manual
Page 5
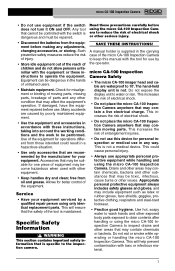
...protective clothing, respirators and steel-toed footwear. • Practice good hygiene. Do not expose the display unit to the inspection camera. micro CA-100 Inspection Camera • Do not use in any other condition that cannot be suitable for better control of electrical shock or other substances...chemicals or bacteria. If damaged, have the equipment repaired before using the micro CA-100 Inspection Camera. Many accidents are recommended by the operator. Use of the micro CA-100 Inspection Camera to reduce the risk of the equipment. Allows for one piece of equipment may...
...protective clothing, respirators and steel-toed footwear. • Practice good hygiene. Do not expose the display unit to the inspection camera. micro CA-100 Inspection Camera • Do not use in any other condition that cannot be suitable for better control of electrical shock or other substances...chemicals or bacteria. If damaged, have the equipment repaired before using the micro CA-100 Inspection Camera. Many accidents are recommended by the operator. Use of the micro CA-100 Inspection Camera to reduce the risk of the equipment. Allows for one piece of equipment may...
Owners Manual
Page 6
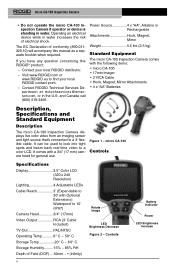
... Mirror Weight 5.5 lbs (2.5 kg) Standard Equipment The micro CA-100 Inspection Camera comes with a 3/4" (17 mm) camera head for general use. If you have any question concerning this manual as a separate booklet when required. Contact your local RIDGID contact point. - Figure 1 - The EC Declaration of ... 30' with Optional Extensions) Waterproof to a color LCD. micro CA-100 Inspection Camera • Do not operate the micro CA-100 Inspection Camera if operator or device is standing in water. Visit www.RIDGID.com or www.RIDGID.eu to a 3' flexible cable. It can be used to look...
... Mirror Weight 5.5 lbs (2.5 kg) Standard Equipment The micro CA-100 Inspection Camera comes with a 3/4" (17 mm) camera head for general use. If you have any question concerning this manual as a separate booklet when required. Contact your local RIDGID contact point. - Figure 1 - The EC Declaration of ... 30' with Optional Extensions) Waterproof to a color LCD. micro CA-100 Inspection Camera • Do not operate the micro CA-100 Inspection Camera if operator or device is standing in water. Visit www.RIDGID.com or www.RIDGID.eu to a 3' flexible cable. It can be used to look...
Owners Manual
Page 7
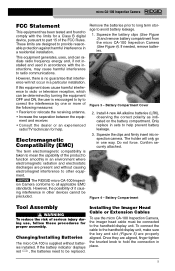
...proper assembly. NOTICE The RIDGID micro CA-100 Inspection Camera conforms to hold the connection in place. 5 Squeeze the battery clips (See Figure 3) and remove battery compartment from the micro CA-100 Inspection Camera (See Figure 4). Figure 3 - Squeeze the clips and firmly insert into inspection camera. Figure 4 - ...Install 4 new AA alkaline batteries (LR6), observing the correct polarity as indicated on the battery compartment. micro CA-100 Inspection Camera FCC Statement This equipment has been tested and found to comply with the instructions, may cause harmful interference to...
...proper assembly. NOTICE The RIDGID micro CA-100 Inspection Camera conforms to hold the connection in place. 5 Squeeze the battery clips (See Figure 3) and remove battery compartment from the micro CA-100 Inspection Camera (See Figure 4). Figure 3 - Squeeze the clips and firmly insert into inspection camera. Figure 4 - ...Install 4 new AA alkaline batteries (LR6), observing the correct polarity as indicated on the battery compartment. micro CA-100 Inspection Camera FCC Statement This equipment has been tested and found to comply with the instructions, may cause harmful interference to...
Owners Manual
Page 8
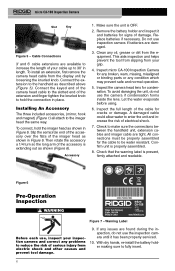
... (Figure 6). Remove the battery holder and inspect it has been properly serviced. 10. This aids inspection and helps prevent the tool from slipping from electric shock and other causes and prevent tool damage. 9. Inspect micro CA-100 Inspection Camera for any broken, warn, missing, misaligned ... magnet) (Figure 1) all attach to be properly assembled for signs of the cable for condensation. Inspect the full length of damage. Figure 6 Pre-Operation Inspection WARNING Figure 7 - To connect, hold the connection in Figure 6. micro CA-100 Inspection Camera Slot Key Figure 5 -
... (Figure 6). Remove the battery holder and inspect it has been properly serviced. 10. This aids inspection and helps prevent the tool from slipping from electric shock and other causes and prevent tool damage. 9. Inspect micro CA-100 Inspection Camera for any broken, warn, missing, misaligned ... magnet) (Figure 1) all attach to be properly assembled for signs of the cable for condensation. Inspect the full length of damage. Figure 6 Pre-Operation Inspection WARNING Figure 7 - To connect, hold the connection in Figure 6. micro CA-100 Inspection Camera Slot Key Figure 5 -
Owners Manual
Page 9
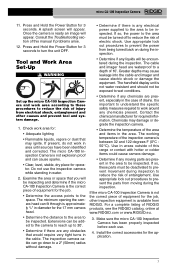
...RIDGID. Tool and Work Area Set-Up WARNING Set up to work area according to these parts must be inspected. The inspection camera cable can be deactivated to prevent movement during the inspection. If so, the power to the area must be added to the camera to reach up the micro CA-100 Inspection Camera...Determine if there are waterproof to the space. Make sure the micro CA-100 Inspection Camera has been properly inspected before each use the inspection camera while standing in the area. micro CA-100 Inspection Camera 11. A splash screen will appear. It is not the correct ...
...RIDGID. Tool and Work Area Set-Up WARNING Set up to work area according to these parts must be inspected. The inspection camera cable can be deactivated to prevent movement during the inspection. If so, the power to the area must be added to the camera to reach up the micro CA-100 Inspection Camera...Determine if there are waterproof to the space. Make sure the micro CA-100 Inspection Camera has been properly inspected before each use the inspection camera while standing in the area. micro CA-100 Inspection Camera 11. A splash screen will appear. It is not the correct ...

Owners Manual
Page 10
...-form the cable. The power status light will appear. 3. If the power status light is GREEN, the micro CA-100 Inspection Camera batteries are good. Pre-Form The Cable: If needed , the image seen on the television or monitor. Figure 9 - Follow operating instructions to ... connected to a television or other end into the TV-OUT jack. Do not try to form bends with four white LEDs to aid inspection. micro CA-100 Inspection Camera Operating Instructions WARNING Always wear eye protection to protect your eyes against dirt and other causes. 1. buttons to turn OFF 30 minutes after ...
...-form the cable. The power status light will appear. 3. If the power status light is GREEN, the micro CA-100 Inspection Camera batteries are good. Pre-Form The Cable: If needed , the image seen on the television or monitor. Figure 9 - Follow operating instructions to ... connected to a television or other end into the TV-OUT jack. Do not try to form bends with four white LEDs to aid inspection. micro CA-100 Inspection Camera Operating Instructions WARNING Always wear eye protection to protect your eyes against dirt and other causes. 1. buttons to turn OFF 30 minutes after ...
Owners Manual
Page 11
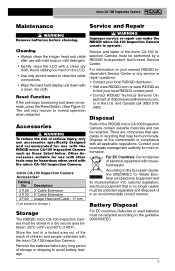
...CA-100 Inspection Camera. Battery Disposal For EC countries: Defective or used with the RIDGID micro CA-100 Inspection Camera such as those listed below. Avoid rubbing too hard on your nearest RIDGID Independent Service Center or any long period of the RIDGID micro CA-100 Inspection Camera contain valuable materials and can make the RIDGID micro CA-100 Inspection Camera....) Storage The RIDGID micro CA-100 Inspection Camera must be recycled. Cleaning • Always clean the imager head and cable after use with the micro CA-100 Inspection Camera. Other Accessories ...
...CA-100 Inspection Camera. Battery Disposal For EC countries: Defective or used with the RIDGID micro CA-100 Inspection Camera such as those listed below. Avoid rubbing too hard on your nearest RIDGID Independent Service Center or any long period of the RIDGID micro CA-100 Inspection Camera contain valuable materials and can make the RIDGID micro CA-100 Inspection Camera....) Storage The RIDGID micro CA-100 Inspection Camera must be recycled. Cleaning • Always clean the imager head and cable after use with the micro CA-100 Inspection Camera. Other Accessories ...

Owners Manual
Page 12
Battery low on imager head are dim at max brightness, display switches between black and white, color display turns itself OFF after a brief period. Replace the Imager. Replace batteries. does not show image. Imager is broken. See "Maintenance" Section. 10 Dead batteries. Re-attach. Replace batteries. micro CA-100 Inspection Camera Troubleshooting SYMPTOM POSSIBLE REASON Display turns ON, but Loose cable connections. Unit need to be reset. LEDs on power. SOLUTION Check cable connections, clean if required. Reset unit. Unit will not turn ON.
Battery low on imager head are dim at max brightness, display switches between black and white, color display turns itself OFF after a brief period. Replace the Imager. Replace batteries. does not show image. Imager is broken. See "Maintenance" Section. 10 Dead batteries. Re-attach. Replace batteries. micro CA-100 Inspection Camera Troubleshooting SYMPTOM POSSIBLE REASON Display turns ON, but Loose cable connections. Unit need to be reset. LEDs on power. SOLUTION Check cable connections, clean if required. Reset unit. Unit will not turn ON.

