Owners Manual
Page 2
...-14 n Assembly ...15-24 n Operation ...25-27 n Adjustments...28-29 n Maintenance ...30-31 n Accessories ...32 n Troubleshooting ...32-33 n Warranty ...35 n Parts Ordering/Service ...36 INTRODUCTION This tool has many features for making it easy to maintain and operate. 2 TABLE OF CONTENTS n Introduction ...2 n General Safety Rules ...3 n Specific ...
...-14 n Assembly ...15-24 n Operation ...25-27 n Adjustments...28-29 n Maintenance ...30-31 n Accessories ...32 n Troubleshooting ...32-33 n Warranty ...35 n Parts Ordering/Service ...36 INTRODUCTION This tool has many features for making it easy to maintain and operate. 2 TABLE OF CONTENTS n Introduction ...2 n General Safety Rules ...3 n Specific ...
Owners Manual
Page 3
...CONTROL. Use clamps or a vise to operate the tool. n DO NOT FORCE THE TOOL it was not designed for alignment of moving parts, binding of parts, mounting and any tool. Use only a cord heavy enough to carry the current your hand and frees both hands to hold the ... KEYS AND WRENCHES. n KEEP CHILDREN AND VISITORS AWAY. Do not let visitors contact tool or extension cord while operating. If in any other part that you are NOT safety glasses. Nonslip footwear is unintentionally contacted. Do not leave tool until it was designed. Never use outdoors and so marked...
...CONTROL. Use clamps or a vise to operate the tool. n DO NOT FORCE THE TOOL it was not designed for alignment of moving parts, binding of parts, mounting and any tool. Use only a cord heavy enough to carry the current your hand and frees both hands to hold the ... KEYS AND WRENCHES. n KEEP CHILDREN AND VISITORS AWAY. Do not let visitors contact tool or extension cord while operating. If in any other part that you are NOT safety glasses. Nonslip footwear is unintentionally contacted. Do not leave tool until it was designed. Never use outdoors and so marked...
Owners Manual
Page 4
...arsenic and chromium from lumber before first use . Some examples of these chemicals: work with safe operation BEFORE performing any other moving parts during use of your saw . SPECIFIC SAFETY RULES n AVOID AWKWARD OPERATIONS AND HAND POSITIONS where a sudden slip could cause your hand...All repairs, whether electrical or mechanical, should point down toward the table. n WHEN SERVICING use them frequently and use only identical Ridgid replacement parts. Use of any work and that you are functional for the material and the type of blade pinching and kickback. n BLADE...
...arsenic and chromium from lumber before first use . Some examples of these chemicals: work with safe operation BEFORE performing any other moving parts during use of your saw . SPECIFIC SAFETY RULES n AVOID AWKWARD OPERATIONS AND HAND POSITIONS where a sudden slip could cause your hand...All repairs, whether electrical or mechanical, should point down toward the table. n WHEN SERVICING use them frequently and use only identical Ridgid replacement parts. Use of any work and that you are functional for the material and the type of blade pinching and kickback. n BLADE...
Owners Manual
Page 6
... hazardous situation, which , if not avoided, may result in minor or moderate injury. (Without Safety Alert Symbol) Indicates a situation that may use only identical replacement parts. Indicates a potentially hazardous situation, which , if not avoided, could result in death or serious injury. WARNING: To avoid serious personal injury, do not attempt to...
... hazardous situation, which , if not avoided, may result in minor or moderate injury. (Without Safety Alert Symbol) Indicates a situation that may use only identical replacement parts. Indicates a potentially hazardous situation, which , if not avoided, could result in death or serious injury. WARNING: To avoid serious personal injury, do not attempt to...
Owners Manual
Page 13
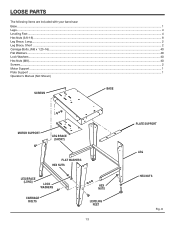
LOOSE PARTS The following items are included with your band saw: Base ...1 Legs...4 Leveling Feet ...4 Hex Nuts (3/8-16) ...8 Leg Brace, Long ...2 Leg Brace, Short ...2 Carriage Bolts, (M8 x 1.25-16) ...40 Flat Washers...40 Lock Washers...40 Hex Nuts (M8)...40 Screws...2 Motor Support ...1 Plate Support ...1 Operator's Manual (Not Shown) SCREWS BASE MOTOR SUPPORT LEG BRACE (SHORT) FLAT WASHERS HEX NUTS LEG BRACE (LONG) LOCK WASHERS CARRIAGE BOLTS HEX NUTS LEVELING FEET 13 PLATE SUPPORT LEG HEX NUTS Fig. 8
LOOSE PARTS The following items are included with your band saw: Base ...1 Legs...4 Leveling Feet ...4 Hex Nuts (3/8-16) ...8 Leg Brace, Long ...2 Leg Brace, Short ...2 Carriage Bolts, (M8 x 1.25-16) ...40 Flat Washers...40 Lock Washers...40 Hex Nuts (M8)...40 Screws...2 Motor Support ...1 Plate Support ...1 Operator's Manual (Not Shown) SCREWS BASE MOTOR SUPPORT LEG BRACE (SHORT) FLAT WASHERS HEX NUTS LEG BRACE (LONG) LOCK WASHERS CARRIAGE BOLTS HEX NUTS LEVELING FEET 13 PLATE SUPPORT LEG HEX NUTS Fig. 8
Owners Manual
Page 14
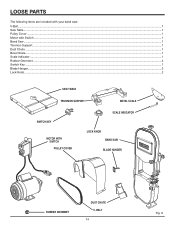
BELT 14 Fig. 9 LOOSE PARTS The following items are included with your band saw: V-Belt...1 Saw Table ...1 Pulley Cover ...1 Motor with Switch ...1 Band Saw ...1 Trunnion Support...1 Dust Chute ...1 Bevel Scale...1 Scale Indicator ...1 Rubber Grommet ...4 Switch Key ...1 Blade Hanger...2 Lock Knob ...2 SAW TABLE TRUNNION SUPPORT BEVEL SCALE SWITCH KEY MOTOR WITH SWITCH ON P I U L L P U OFF S H PULLEY COVER SCALE INDICATOR LOCK KNOB BAND SAW BLADE HANGER PUL L RUBBER GROMMET DUST CHUTE V-
BELT 14 Fig. 9 LOOSE PARTS The following items are included with your band saw: V-Belt...1 Saw Table ...1 Pulley Cover ...1 Motor with Switch ...1 Band Saw ...1 Trunnion Support...1 Dust Chute ...1 Bevel Scale...1 Scale Indicator ...1 Rubber Grommet ...4 Switch Key ...1 Blade Hanger...2 Lock Knob ...2 SAW TABLE TRUNNION SUPPORT BEVEL SCALE SWITCH KEY MOTOR WITH SWITCH ON P I U L L P U OFF S H PULLEY COVER SCALE INDICATOR LOCK KNOB BAND SAW BLADE HANGER PUL L RUBBER GROMMET DUST CHUTE V-

Owners Manual
Page 15
... is misuse and could result in the operation and maintenance sections of each leg. n Do not discard the packing material until the missing parts are missing, do so could result in possible serious personal injury. WARNING: Do not connect to the saw is factory set for use with... your legs, not your back, and get help when needed. n Locate the following items: 4 leveling feet 8 hex nuts, (3/8-16) n From the loose parts find the following items: 4 legs n Thread a hex nut on each of injury from the box. n Inspect the tool carefully to possible serious personal injury. ...
... is misuse and could result in the operation and maintenance sections of each leg. n Do not discard the packing material until the missing parts are missing, do so could result in possible serious personal injury. WARNING: Do not connect to the saw is factory set for use with... your legs, not your back, and get help when needed. n Locate the following items: 4 leveling feet 8 hex nuts, (3/8-16) n From the loose parts find the following items: 4 legs n Thread a hex nut on each of injury from the box. n Inspect the tool carefully to possible serious personal injury. ...
Owners Manual
Page 26
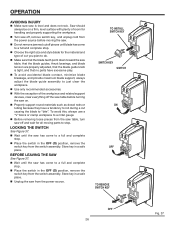
... surface with plenty of room for the material and type of the workpiece and related support devises, clear everything off the saw table before moving parts to a full and complete stop . TO INSTALL SWITCH KEY ON P I U L L P U OFF S H SWITCH KEY SWITCH ON P I U L L P U OFF S H ON ON P I U L L P U OFF...the blade teeth point down toward the saw table, that the blade guides, thrust bearings, and blade tension are properly adjusted, that no parts have a tendency to roll during a cut you plan to a full and complete stop . n To avoid accidental blade contact, minimize ...
... surface with plenty of room for the material and type of the workpiece and related support devises, clear everything off the saw table before moving parts to a full and complete stop . TO INSTALL SWITCH KEY ON P I U L L P U OFF S H SWITCH KEY SWITCH ON P I U L L P U OFF S H ON ON P I U L L P U OFF...the blade teeth point down toward the saw table, that the blade guides, thrust bearings, and blade tension are properly adjusted, that no parts have a tendency to roll during a cut you plan to a full and complete stop . n To avoid accidental blade contact, minimize ...
Owners Manual
Page 30
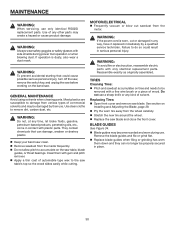
...They contain chemicals that could result in place. 30 n Do not allow pitch to damage from the motor. Do not use only identical RIDGID replacement parts. Replacing Tires: n Open front cover and remove saw table, blade guides, or thrust bearings. n Pry the worn tire away from... prevent accidental starting that can no longer be damaged by a qualified service technician. WARNING: To avoid fire or electrocution, reassemble electric parts with gum and pitch remover. Remove the blade guides and file or grind flat. Most plastics are susceptible to accumulate on the band...
...They contain chemicals that could result in place. 30 n Do not allow pitch to damage from the motor. Do not use only identical RIDGID replacement parts. Replacing Tires: n Open front cover and remove saw table, blade guides, or thrust bearings. n Pry the worn tire away from... prevent accidental starting that can no longer be damaged by a qualified service technician. WARNING: To avoid fire or electrocution, reassemble electric parts with gum and pitch remover. Remove the blade guides and file or grind flat. Most plastics are susceptible to accumulate on the band...
Owners Manual
Page 32
... full speed Motor overloaded. NOTE: Low Voltage Power output of 36% in motor will not operate. See dust accumulation) Maintenance section. Shorted capacitor. ACCESSORIES Item ...Part No. Do not use with decrease in periods caused by qualified service technician. See Electrical section. The use other motors.
... full speed Motor overloaded. NOTE: Low Voltage Power output of 36% in motor will not operate. See dust accumulation) Maintenance section. Shorted capacitor. ACCESSORIES Item ...Part No. Do not use with decrease in periods caused by qualified service technician. See Electrical section. The use other motors.
Owners Manual
Page 35
...center for a full refund or exchange. Consumable accessories provided with the original product. HOW TO OBTAIN SERVICE To obtain service for this RIDGID® tool for direct, indirect, incidental or consequential damages. One World Technologies, Inc. This product is licensed from misuse, abuse... center for the balance of the 3 YEAR service warranty period. RIDGID, INC. One World Technologies, Inc. This warranty only covers defects arising under normal usage and does not cover any part covered under state law are disclaimed. The trademark is manufactured by ...
...center for a full refund or exchange. Consumable accessories provided with the original product. HOW TO OBTAIN SERVICE To obtain service for this RIDGID® tool for direct, indirect, incidental or consequential damages. One World Technologies, Inc. This product is licensed from misuse, abuse... center for the balance of the 3 YEAR service warranty period. RIDGID, INC. One World Technologies, Inc. This warranty only covers defects arising under normal usage and does not cover any part covered under state law are disclaimed. The trademark is manufactured by ...

Owners Manual
Page 36
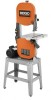
BAND SAW BS14002 CUSTOMER SERVICE INFORMATION For parts or service, contact your nearest Ridgid authorized service center. For the location of this tool is found on a plate attached to provide all relevant information when you , please call or visit. ...The model number of the authorized service center nearest you call 1-866-539-1710 or visit us online at www.ridgid.com. Serial No. BS14002 983000-292 7-04 When ordering repair parts, always give the following information: Model No. OPERATOR'S MANUAL 14 in the space provided below. Please record the serial number...
BAND SAW BS14002 CUSTOMER SERVICE INFORMATION For parts or service, contact your nearest Ridgid authorized service center. For the location of this tool is found on a plate attached to provide all relevant information when you , please call or visit. ...The model number of the authorized service center nearest you call 1-866-539-1710 or visit us online at www.ridgid.com. Serial No. BS14002 983000-292 7-04 When ordering repair parts, always give the following information: Model No. OPERATOR'S MANUAL 14 in the space provided below. Please record the serial number...


