
Operating Instructions
Page 1
For safe and correct use this manual before using the machine. Image Scanner Operating Instructions Guide to Components Setting up the Scanner Installing Software Setting Originals Using the TWAIN Driver Appendix Read this manual carefully before you use , be sure to read the Safety Information in this machine and keep it handy for future reference.
For safe and correct use this manual before using the machine. Image Scanner Operating Instructions Guide to Components Setting up the Scanner Installing Software Setting Originals Using the TWAIN Driver Appendix Read this manual carefully before you use , be sure to read the Safety Information in this machine and keep it handy for future reference.
Operating Instructions
Page 2
...refer to the inch version. Caution Certain options might result from the supplier with your office products. Two kinds of this manual. With this manual in some countries. Do not copy or print any damage or expense that might not be slightly different from the machine....® NT 4.0 are trademarks of Microsoft Corporation. For your local dealer. For details, please contact your safety and benefit, read this manual might be sure to connect the power cord to those marks. Copying or printing the following items is a trademark of their respective companies....
...refer to the inch version. Caution Certain options might result from the supplier with your office products. Two kinds of this manual. With this manual in some countries. Do not copy or print any damage or expense that might not be slightly different from the machine....® NT 4.0 are trademarks of Microsoft Corporation. For your local dealer. For details, please contact your safety and benefit, read this manual might be sure to connect the power cord to those marks. Copying or printing the following items is a trademark of their respective companies....

Operating Instructions
Page 3
...the Scanner Confirmations Before the Setup 11 Location, Space and Environment 11 Disengaging the lock for This Scanner 5 How to Read This Manual 6 1. Guide to Components Guide to a Power Source 31 Turning the Power On/Off 33 Turning the Power On when Connected ...Driver 40 System Requirements 40 Installing ISIS Driver 41 i TABLE OF CONTENTS Safety Information 1 Safety During Operation 1 Energy Star Program 4 Manuals for transportation 13 Installing Options 16 Installing the Image-Processing Unit 16 Installing the IEEE1394 Interface Board 18 Connecting to the Computer 21 ...
...the Scanner Confirmations Before the Setup 11 Location, Space and Environment 11 Disengaging the lock for This Scanner 5 How to Read This Manual 6 1. Guide to Components Guide to a Power Source 31 Turning the Power On/Off 33 Turning the Power On when Connected ...Driver 40 System Requirements 40 Installing ISIS Driver 41 i TABLE OF CONTENTS Safety Information 1 Safety During Operation 1 Energy Star Program 4 Manuals for transportation 13 Installing Options 16 Installing the Image-Processing Unit 16 Installing the IEEE1394 Interface Board 18 Connecting to the Computer 21 ...

Operating Instructions
Page 5
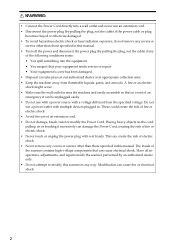
R CAUTION: Indicates a potentially hazardous situation which , if instructions are not followed, may result in death or serious injury. Safety During Operation In this machine, the following important symbols are used: R WARNING: Indicates a potentially hazardous situation which , if instructions are not followed, could result in minor or moderate injury or damage to property. 1 Safety Information When using this manual, the following safety precautions should always be followed.
R CAUTION: Indicates a potentially hazardous situation which , if instructions are not followed, may result in death or serious injury. Safety During Operation In this machine, the following important symbols are used: R WARNING: Indicates a potentially hazardous situation which , if instructions are not followed, could result in minor or moderate injury or damage to property. 1 Safety Information When using this manual, the following safety precautions should always be followed.
Operating Instructions
Page 6
...performed by an authorized dealer only. • Do not attempt to modify this scanner in any covers or screws other than those specified in this manual. • Turn off the power and disconnect the power plug (by pulling the plug, not the cable) if the power cable or plug ... damaged. • To avoid hazardous electric shock or laser radiation exposure, do not remove any covers or screws other than those specified in this manual. Modification can cause electrical shock. Placing heavy objects on the cord, pulling on or bending it can damage the Power Cord, creating the risk ...
...performed by an authorized dealer only. • Do not attempt to modify this scanner in any covers or screws other than those specified in this manual. • Turn off the power and disconnect the power plug (by pulling the plug, not the cable) if the power cable or plug ... damaged. • To avoid hazardous electric shock or laser radiation exposure, do not remove any covers or screws other than those specified in this manual. Modification can cause electrical shock. Placing heavy objects on the cord, pulling on or bending it can damage the Power Cord, creating the risk ...

Operating Instructions
Page 9
This manual is a CD-ROM that comes with this scanner. 5 Note ❒ There is provided as a PDF file. Manuals for This Scanner The following manuals describe the operational and maintenance procedures of the information how to install the scanner. ❖ Operating Instructions (this manual) Provides all of this machine. To enhance safe and efficient operation of this scanner, all users should read and follow the instructions carefully. ❖ Quick Installation Guide Describes how to install, set up, and use the scanner.
This manual is a CD-ROM that comes with this scanner. 5 Note ❒ There is provided as a PDF file. Manuals for This Scanner The following manuals describe the operational and maintenance procedures of the information how to install the scanner. ❖ Operating Instructions (this manual) Provides all of this machine. To enhance safe and efficient operation of this scanner, all users should read and follow the instructions carefully. ❖ Quick Installation Guide Describes how to install, set up, and use the scanner.
Operating Instructions
Page 10
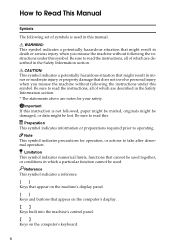
How to Read This Manual Symbols The following set of which are described in the Safety Information section. * The statements above are described in the Safety Information section. Be sure ... symbol indicates a potentially hazardous situation that might result in minor or moderate injury or property damage that cannot be used together, or conditions in this manual. Be sure to read this symbol. Limitation This symbol indicates numerical limits, functions that does not involve personal injury when you misuse the machine without...
How to Read This Manual Symbols The following set of which are described in the Safety Information section. * The statements above are described in the Safety Information section. Be sure ... symbol indicates a potentially hazardous situation that might result in minor or moderate injury or property damage that cannot be used together, or conditions in this manual. Be sure to read this symbol. Limitation This symbol indicates numerical limits, functions that does not involve personal injury when you misuse the machine without...

Operating Instructions
Page 11
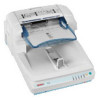
...than 128g/m2 (242.5bls) settings of this machine. ⇒ p.9 "Understanding Indicators" 10. {Clear Modes} key Press this key to stop the manual scanning. 11. {Start} key Press this key to automatically load multi- Power Switch Turns this machine using ADF. 4. Hard Reset Switch This switch resets ...Components Guide to your side. Original Table Set originals here to be loaded into this switch when validate the When you to start the manual scanning 12. ADF (Automatic Document Feed- 7. Paper Thickness Changeover Le- ver 8. Original Stopper Stops the originals scanned by the ADF ...
...than 128g/m2 (242.5bls) settings of this machine. ⇒ p.9 "Understanding Indicators" 10. {Clear Modes} key Press this key to stop the manual scanning. 11. {Start} key Press this key to automatically load multi- Power Switch Turns this machine using ADF. 4. Hard Reset Switch This switch resets ...Components Guide to your side. Original Table Set originals here to be loaded into this switch when validate the When you to start the manual scanning 12. ADF (Automatic Document Feed- 7. Paper Thickness Changeover Le- ver 8. Original Stopper Stops the originals scanned by the ADF ...

Operating Instructions
Page 13
... Error No originals are set to the ADF No error or the current status Scan Wait SADF When SADF mode or during standby for the manual scan *1 Sometimes it looks like blinking. Contact your service representative. All indicators blinking: System error.
... Error No originals are set to the ADF No error or the current status Scan Wait SADF When SADF mode or during standby for the manual scan *1 Sometimes it looks like blinking. Contact your service representative. All indicators blinking: System error.
Operating Instructions
Page 27
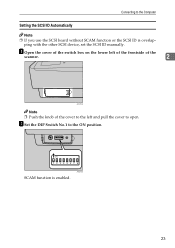
ADC016S SCAM function is overlapping with the other SCSI device, set the SCSI ID manually. A Open the cover of the switch box on the lower left of the frontside of the scanner. 2 ADC015S Note ❒ Push the knob of the cover to the left and pull the cover to the ON position. Connecting to the Computer Setting the SCSI ID Automatically Note ❒ If you use the SCSI board without SCAM function or the SCSI ID is enabled. 23 B Set the DIP Switch No.1 to open.
ADC016S SCAM function is overlapping with the other SCSI device, set the SCSI ID manually. A Open the cover of the switch box on the lower left of the frontside of the scanner. 2 ADC015S Note ❒ Push the knob of the cover to the left and pull the cover to the ON position. Connecting to the Computer Setting the SCSI ID Automatically Note ❒ If you use the SCSI board without SCAM function or the SCSI ID is enabled. 23 B Set the DIP Switch No.1 to open.

Operating Instructions
Page 51
... such as translucent paper • Thin originals that cannot be set in the ADF Placing the following types of originals, so select the original size manually. • Originals with indexes, tags, or other projecting parts • The originals with large curl on them and still not completely dry • Originals with...
... such as translucent paper • Thin originals that cannot be set in the ADF Placing the following types of originals, so select the original size manually. • Originals with indexes, tags, or other projecting parts • The originals with large curl on them and still not completely dry • Originals with...

Operating Instructions
Page 72
.... • There is an error in parameter setting to original. then restart 6 scanning. Panel on Close all other applications, your computer. Then set [Original Size:] manually. ⇒ p.52 "Changing the Color of your computer is set [Background Panel] in the [Back.Panel] tab in [Initial Settings] on the TWAIN driver to...
.... • There is an error in parameter setting to original. then restart 6 scanning. Panel on Close all other applications, your computer. Then set [Original Size:] manually. ⇒ p.52 "Changing the Color of your computer is set [Background Panel] in the [Back.Panel] tab in [Initial Settings] on the TWAIN driver to...
Operating Instructions
Page 75
... comes with water-dampened and tightly wrung cloth. Rollers are to hold onto the plug. Note ❒ Please make sure to be used. If this manual. We recommend periodically cleaning the scanner to pinch your fingers when closing the Automatic Document Feeder (ADF). 71 gent. R CAUTION: • Be careful not to...
... comes with water-dampened and tightly wrung cloth. Rollers are to hold onto the plug. Note ❒ Please make sure to be used. If this manual. We recommend periodically cleaning the scanner to pinch your fingers when closing the Automatic Document Feeder (ADF). 71 gent. R CAUTION: • Be careful not to...

Operating Instructions
Page 86
... to store as image data. form a scanning operation with the application. For information about the maximum data size that the application can handle, see the manual 6 that the combination of the values displays the memory size to the limitation of a scanned data. The following tables, each of the relevant settings is...
... to store as image data. form a scanning operation with the application. For information about the maximum data size that the application can handle, see the manual 6 that the combination of the values displays the memory size to the limitation of a scanned data. The following tables, each of the relevant settings is...
Operating Instructions
Page 93
..., 8 Q Quick Installation Guide, 5 QuickScan Installation, 43 R Resolution and Data Size, 82 Rotary Switch, 7 S Scan Area and Data Size, 82 SCSI ID Setting Automatically, 23 Setting Manually, 22 SCSI Interface Connector, 8 SD Card Slot, 8 Setting Originals, 45 Sizes Automatically Detected, 46 Specifications, 86 {Start} key, 7 Surroundings for Setup, 11 T Transporting, 78 Troubleshooting...
..., 8 Q Quick Installation Guide, 5 QuickScan Installation, 43 R Resolution and Data Size, 82 Rotary Switch, 7 S Scan Area and Data Size, 82 SCSI ID Setting Automatically, 23 Setting Manually, 22 SCSI Interface Connector, 8 SD Card Slot, 8 Setting Originals, 45 Sizes Automatically Detected, 46 Specifications, 86 {Start} key, 7 Surroundings for Setup, 11 T Transporting, 78 Troubleshooting...