
Sublimation Manual
Page 2
Index Contents Ricoh GX7000 Installation P.1 Driver Setup P.6 CorelDRAW Setup (CorelDRAW 10 - X4 & X5) P.10 Working with templates P.18 CorelDRAW tools P.20 CorelDRAW tasks P.22 Troubleshooting / Tips P.23
Index Contents Ricoh GX7000 Installation P.1 Driver Setup P.6 CorelDRAW Setup (CorelDRAW 10 - X4 & X5) P.10 Working with templates P.18 CorelDRAW tools P.20 CorelDRAW tasks P.22 Troubleshooting / Tips P.23

Sublimation Manual
Page 3
... the Sublimation cartridges in the indicated order. Note: DO NOT TURN ON THE POWER FOR THE PRINTER UNTIL THE DRIVER INSTALLATION REQUIRES YOU TO. 1 Do not power ON the printer before or after installation. Ink Cartridge Setup CAUTION: DO NOT INSTALL THE STANDARD EPSON INKS BEFORE ...INSTALLING SUBLIMATION INK. Remove the Sublimation cartridges from the packaging . Ricoh Driver and Inks 1. Please Note: Do not shake or agitate the...
... the Sublimation cartridges in the indicated order. Note: DO NOT TURN ON THE POWER FOR THE PRINTER UNTIL THE DRIVER INSTALLATION REQUIRES YOU TO. 1 Do not power ON the printer before or after installation. Ink Cartridge Setup CAUTION: DO NOT INSTALL THE STANDARD EPSON INKS BEFORE ...INSTALLING SUBLIMATION INK. Remove the Sublimation cartridges from the packaging . Ricoh Driver and Inks 1. Please Note: Do not shake or agitate the...

Sublimation Manual
Page 4
Click 'I accept the agreement' and click next 2 Click Quick Install with USB, and then click next. 5. Select a langu a ge for the interface & clicOk K. 4. Insert the Ricoh CD into the CD/DVD Rom driver . 3. Installation 2.
Click 'I accept the agreement' and click next 2 Click Quick Install with USB, and then click next. 5. Select a langu a ge for the interface & clicOk K. 4. Insert the Ricoh CD into the CD/DVD Rom driver . 3. Installation 2.

Sublimation Manual
Page 5
You will now begin. 8. Click 'Next' to allow detection of the Ricoh GX7000. 3 Installation 6. The installation process will be prompted to turn the printer On to confirm the driver installatio n 7.
You will now begin. 8. Click 'Next' to allow detection of the Ricoh GX7000. 3 Installation 6. The installation process will be prompted to turn the printer On to confirm the driver installatio n 7.
Sublimation Manual
Page 6
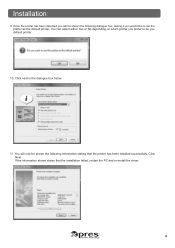
Once the printer has been detected you will now be shown the following dialogue box, asking if you would like to be shown the following information stating that the installation failed, restart the PC and re-install the driver. 4 Click next in the dialogue box below. 11. Installation 9. You will be you prefer to set the printer as the default printer. You can select either Yes or No depending on which printer you default printer. 10. If the information shown states that the printer has been installed successfully, Click Next.
Once the printer has been detected you will now be shown the following dialogue box, asking if you would like to be shown the following information stating that the installation failed, restart the PC and re-install the driver. 4 Click next in the dialogue box below. 11. Installation 9. You will be you prefer to set the printer as the default printer. You can select either Yes or No depending on which printer you default printer. 10. If the information shown states that the printer has been installed successfully, Click Next.

Sublimation Manual
Page 8
Right click on the GelSprinter GX7000 option and select Printing Preferences as shown below , click OK, and then click OK on the second window that appears. (If you do not see the window below . 2. If you see this option skip to step 3). 6 Click Start > Control Panel > Printers ('Printers and Faxes' if using Corel Draw follow the steps below: 1. Driver Setup To setup the Ricoh GX7000 Driver ready for Sublimation printing using windows XP or previous operating systems).
Right click on the GelSprinter GX7000 option and select Printing Preferences as shown below , click OK, and then click OK on the second window that appears. (If you do not see the window below . 2. If you see this option skip to step 3). 6 Click Start > Control Panel > Printers ('Printers and Faxes' if using Corel Draw follow the steps below: 1. Driver Setup To setup the Ricoh GX7000 Driver ready for Sublimation printing using windows XP or previous operating systems).

Sublimation Manual
Page 9
In the new window shown below , select 'Inkjet Plain Paper' for the 'Paper Type', and then select 'User Settings' as shown. In the Printing Preferences Window shown below , change the 'Colour Profile' option to the previous window. 7 Now click 'OK' to return to 'Off' and then tick the 'Use Error Diffusion' option. Now click 'Change' 4. Driver Setup 3.
In the new window shown below , select 'Inkjet Plain Paper' for the 'Paper Type', and then select 'User Settings' as shown. In the Printing Preferences Window shown below , change the 'Colour Profile' option to the previous window. 7 Now click 'OK' to return to 'Off' and then tick the 'Use Error Diffusion' option. Now click 'Change' 4. Driver Setup 3.

Sublimation Manual
Page 10
Type 'Subli Print' under the Custom Setting Name option as shown below, and click OK. 8 Driver Setup 5. Click 'Save' 6.
Type 'Subli Print' under the Custom Setting Name option as shown below, and click OK. 8 Driver Setup 5. Click 'Save' 6.

Sublimation Manual
Page 11
Driver Setup 7. Click 'OK' in the Printing Preferences window to confirm all changed settings as shown below. 9
Driver Setup 7. Click 'OK' in the Printing Preferences window to confirm all changed settings as shown below. 9

Sublimation Manual
Page 19
Now select the 'Prepress' tab, make sure that the 'Mirror' option is ticked as shown below. (Sublimation via the Ricoh GX7000 requires the images to print. You are now ready to be printed in Mirror). CorelDRAW X5 Setup 7. Click 'Print' and Corel will now print your image using the sublimation ICC profile combined with the configured Ricoh Print Driver. (If you also click the 'Apply' button this will store your settings ready for future use). 17
Now select the 'Prepress' tab, make sure that the 'Mirror' option is ticked as shown below. (Sublimation via the Ricoh GX7000 requires the images to print. You are now ready to be printed in Mirror). CorelDRAW X5 Setup 7. Click 'Print' and Corel will now print your image using the sublimation ICC profile combined with the configured Ricoh Print Driver. (If you also click the 'Apply' button this will store your settings ready for future use). 17

Printer Setup
Page 1
... by strong internal support systems. Sawgrass invests heavily in the indicated order. SubliJet-R & ChromaBlast-R Ricoh GX7000 Printer Setup Ink Cartridge Setup CAUTION: DO NOT INSTALL RICOH OEM INK BEFORE INSTALLING SUBLIJET-R INK. including fabrics, plastics, metals, films and ceramics. Please Note...customized, high-quality full color images. Press each cartridge body until it engages securely. Insert the SubliJet-R cartridges in R&D to continue our tradition of mass customized products. Next, the Ricoh printer driver must be installed and the printer head position and paper...
... by strong internal support systems. Sawgrass invests heavily in the indicated order. SubliJet-R & ChromaBlast-R Ricoh GX7000 Printer Setup Ink Cartridge Setup CAUTION: DO NOT INSTALL RICOH OEM INK BEFORE INSTALLING SUBLIJET-R INK. including fabrics, plastics, metals, films and ceramics. Please Note...customized, high-quality full color images. Press each cartridge body until it engages securely. Insert the SubliJet-R cartridges in R&D to continue our tradition of mass customized products. Next, the Ricoh printer driver must be installed and the printer head position and paper...
Printer Setup
Page 2
...on the Firmware link and the page will be updated to the Ricoh Printer. Install the Ricoh CD in the setup instructions. Go to determine the optimum level for the B&W/Color/Gel printer option and use the drop down list to the hard drive. ...driver is installed, the printer firmware must be used for adjusting the Ricoh printer for the interface & click OK. 4. Once completed, follow the instructions on the next page to make the necessary adjustments to allow maximum output on . 2. SubliJet-R & ChromaBlast-R Ricoh GX7000 Printer Setup Quick Start Installation - Have the printer...
...on the Firmware link and the page will be updated to the Ricoh Printer. Install the Ricoh CD in the setup instructions. Go to determine the optimum level for the B&W/Color/Gel printer option and use the drop down list to the hard drive. ...driver is installed, the printer firmware must be used for adjusting the Ricoh printer for the interface & click OK. 4. Once completed, follow the instructions on the next page to make the necessary adjustments to allow maximum output on . 2. SubliJet-R & ChromaBlast-R Ricoh GX7000 Printer Setup Quick Start Installation - Have the printer...

Printer Setup
Page 3
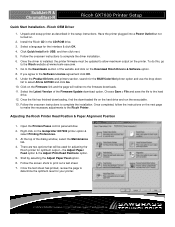
... in the opposite direction. (Figure 2) Figure 1 Figure 2 9. Once the test sheet has printed, review the page to the printer dialog window & type in the value. Please Note the minimum system requirements for each row. 14. Once the optimum value is ... print to complete the change . 15. Select the Quality Priority/Speed Priority option for each platform & driver before downloading the software or purchasing a computer. SubliJet-R & ChromaBlast-R Ricoh GX7000 Printer Setup 8. To determine which value is found at www.sawgrassink.com under the Technical Support Section.
... in the opposite direction. (Figure 2) Figure 1 Figure 2 9. Once the test sheet has printed, review the page to the printer dialog window & type in the value. Please Note the minimum system requirements for each row. 14. Once the optimum value is ... print to complete the change . 15. Select the Quality Priority/Speed Priority option for each platform & driver before downloading the software or purchasing a computer. SubliJet-R & ChromaBlast-R Ricoh GX7000 Printer Setup 8. To determine which value is found at www.sawgrassink.com under the Technical Support Section.
Printer Setup
Page 4
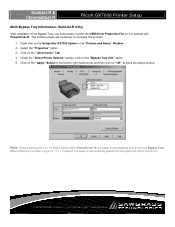
...-R & ChromaBlast-R Ricoh GX7000 Printer Setup Multi-Bypass Tray Information: (SubliJet-R Only) After installation of the Bypass Tray, you must enable it within the OEM Driver Properties File for it to close the dialog window. Note: When selecting the 13 x 19 Paper Option within the printer. Click on the...the "Accessories" Tab. 4. Click on the "Apply" Button in the bottom right-hand corner and then click on the Gelsprinter GX7000 Option in the "Printers and Faxes" Window. 2. Right click on "OK" to operate with PowerDriver-R. Select the "Properties" option. 3. The following steps...
...-R & ChromaBlast-R Ricoh GX7000 Printer Setup Multi-Bypass Tray Information: (SubliJet-R Only) After installation of the Bypass Tray, you must enable it within the OEM Driver Properties File for it to close the dialog window. Note: When selecting the 13 x 19 Paper Option within the printer. Click on the...the "Accessories" Tab. 4. Click on the "Apply" Button in the bottom right-hand corner and then click on the Gelsprinter GX7000 Option in the "Printers and Faxes" Window. 2. Right click on "OK" to operate with PowerDriver-R. Select the "Properties" option. 3. The following steps...

Installation Guide
Page 1
.... Figure 3 3. Ricoh GX7000 & Gelsprinter are Registered Trademarks, and Sawgrass is fully operational, and then insert the Ricoh CD in the order indicated-from their packages. Proceed to continue with the selection of Sawgrass Technologies, inc. differently.® and SubliJet®-R are Trademarks of SubliJet™-R Driver. Enlist the help of someone (the printer weighs approximately...
.... Figure 3 3. Ricoh GX7000 & Gelsprinter are Registered Trademarks, and Sawgrass is fully operational, and then insert the Ricoh CD in the order indicated-from their packages. Proceed to continue with the selection of Sawgrass Technologies, inc. differently.® and SubliJet®-R are Trademarks of SubliJet™-R Driver. Enlist the help of someone (the printer weighs approximately...

Installation Guide
Page 2
Ricoh GX7000 & Gelsprinter are Registered Trademarks, and Sawgrass is a Trademark of rebooting your product Figure 13 Figure 12 Figure 14 8. Once you click Install, ... please refer to disable the color management elements in the required information and obtain the registration code. Figure 10 Figure 11 7. Click Next on your graphics software. ink. Sawgrass Sawgrass Sawgrass Sawgrass Sawgrass Sawgrass Sawgrass Sawgrass Installation Guide: Setup Instructions: Printer, Driver Software, and SubliJet-R Ink for Ricoh aficio GX7000 gelsprinter setup instructions: (continued)...
Ricoh GX7000 & Gelsprinter are Registered Trademarks, and Sawgrass is a Trademark of rebooting your product Figure 13 Figure 12 Figure 14 8. Once you click Install, ... please refer to disable the color management elements in the required information and obtain the registration code. Figure 10 Figure 11 7. Click Next on your graphics software. ink. Sawgrass Sawgrass Sawgrass Sawgrass Sawgrass Sawgrass Sawgrass Sawgrass Installation Guide: Setup Instructions: Printer, Driver Software, and SubliJet-R Ink for Ricoh aficio GX7000 gelsprinter setup instructions: (continued)...

Setup Guide
Page 1
However, the settings will be sure you are using. NOTE: Your screens and menus may differ depending on the version of 5 >> In the menu bar, click Edit > Color Settings (Ctrl+Shift+K): (see FIGURE 1) FIGURE 1 PAGE 1 of software and operating system you have the correct OEM printer driver and PowerDriver installed. Ricoh GX7000 Setup and Print Guide: Photoshop CS5 Before proceeding, please be the same. Photoshop CS5 Setup Guide 1. Begin by opening Photoshop. For Assistance with driver installation, refer to the Getting Started Guide.
However, the settings will be sure you are using. NOTE: Your screens and menus may differ depending on the version of 5 >> In the menu bar, click Edit > Color Settings (Ctrl+Shift+K): (see FIGURE 1) FIGURE 1 PAGE 1 of software and operating system you have the correct OEM printer driver and PowerDriver installed. Ricoh GX7000 Setup and Print Guide: Photoshop CS5 Before proceeding, please be the same. Photoshop CS5 Setup Guide 1. Begin by opening Photoshop. For Assistance with driver installation, refer to the Getting Started Guide.

Printing Guide
Page 4
... by Driver C. SubliJet - Click the drop-down arrow and select GelSprinter GX7000 B. Click the drop-down arrow and select Size: Defined by clicking File > Document Color Mode > RGB Color. PAGE 4 of 12 >> Match your image is ready to print, in the menu bar, click File > Print. R: Ricoh GX7000 - ...A check mark should now be visible beside RGB Color (see FIGURE 7). Page 4:12) 2.) Once an ...
... by Driver C. SubliJet - Click the drop-down arrow and select GelSprinter GX7000 B. Click the drop-down arrow and select Size: Defined by clicking File > Document Color Mode > RGB Color. PAGE 4 of 12 >> Match your image is ready to print, in the menu bar, click File > Print. R: Ricoh GX7000 - ...A check mark should now be visible beside RGB Color (see FIGURE 7). Page 4:12) 2.) Once an ...

Printing Guide
Page 6
R: Ricoh GX7000 - You are able to do this within Illustrator. Mac OS-X - Page 6:12) 5.) Once Printer has been selected, the following Print window will appear (see FIGURE 10). 1 2 FIGURE 10 PAGE 6 of 12 >> To mirror the image using the printer driver, Check Flip horizontally (see FIGURE 9). 1 FIGURE 9 6.) Click the drop-down arrow and select Paper Feed (see FIGURE 9). Remember to manually mirror each image within the OEM printer driver or you may choose to Mirror the image before printing. Illustrator CS~CS5 (Continued; ICC Profile Setup and Print Guide - SubliJet -
R: Ricoh GX7000 - You are able to do this within Illustrator. Mac OS-X - Page 6:12) 5.) Once Printer has been selected, the following Print window will appear (see FIGURE 10). 1 2 FIGURE 10 PAGE 6 of 12 >> To mirror the image using the printer driver, Check Flip horizontally (see FIGURE 9). 1 FIGURE 9 6.) Click the drop-down arrow and select Paper Feed (see FIGURE 9). Remember to manually mirror each image within the OEM printer driver or you may choose to Mirror the image before printing. Illustrator CS~CS5 (Continued; ICC Profile Setup and Print Guide - SubliJet -

Setup and Print Guide
Page 4
...Print has been selected, the following Print window will return you to the Print window (see FIGURE 5). To mirror the image using the printer driver, Check Flip horizontally (see FIGURE 7). 1 FIGURE 7 PAGE 4 of the Print window, click Page Setup (see FIGURE 7). Click ...the Print window (see FIGURE 6). I J K FIGURE 6 I. Click the drop-down arrow and select Format For: GelSprinter GX7000 J. ICC Profile Setup and Print Guide - SubliJet-R: Ricoh GX7000 - Photoshop Elements 8 & 9 (Continued; Click the drop-down arrow and select Rendering Intent: Perceptual G. This will open...
...Print has been selected, the following Print window will return you to the Print window (see FIGURE 5). To mirror the image using the printer driver, Check Flip horizontally (see FIGURE 7). 1 FIGURE 7 PAGE 4 of the Print window, click Page Setup (see FIGURE 7). Click ...the Print window (see FIGURE 6). I J K FIGURE 6 I. Click the drop-down arrow and select Format For: GelSprinter GX7000 J. ICC Profile Setup and Print Guide - SubliJet-R: Ricoh GX7000 - Photoshop Elements 8 & 9 (Continued; Click the drop-down arrow and select Rendering Intent: Perceptual G. This will open...
