User Guide
Page 2
... an error, or find a description lacking, please refer to the end of this manual are registered trademarks of Apple Computer, Inc. Macintosh, Power Macintosh, and Mac OS are trademarks of Adobe Systems Incorporated. Ricoh Co., Ltd. Operating this product in the future, without the consent of the copyright...test shooting to make the best use of your camera, be reproduced in whole or in the United States of Ricoh. © 2005 RICOH CO.,LTD. Preface This manual provides information on how to use the shooting and playback functions of this product, as well as possible from ...
... an error, or find a description lacking, please refer to the end of this manual are registered trademarks of Apple Computer, Inc. Macintosh, Power Macintosh, and Mac OS are trademarks of Adobe Systems Incorporated. Ricoh Co., Ltd. Operating this product in the future, without the consent of the copyright...test shooting to make the best use of your camera, be reproduced in whole or in the United States of Ricoh. © 2005 RICOH CO.,LTD. Preface This manual provides information on how to use the shooting and playback functions of this product, as well as possible from ...
User Guide
Page 3
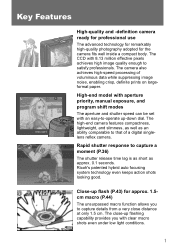
Close-up flash (P.43) for the camera fits well inside a compact body. High-end model with aperture priority, manual exposure, and program shift modes The aperture and shutter speed can be set with an easy-to-operate up flashing capability provides you to capture ... shots even under low light conditions. 1 Rapid shutter response to that of voluminous data while suppressing image noise, enabling crisp, definite prints on largeformat paper. Ricoh's patented hybrid auto focusing system technology even keeps action shots looking good.
Close-up flash (P.43) for the camera fits well inside a compact body. High-end model with aperture priority, manual exposure, and program shift modes The aperture and shutter speed can be set with an easy-to-operate up flashing capability provides you to capture ... shots even under low light conditions. 1 Rapid shutter response to that of voluminous data while suppressing image noise, enabling crisp, definite prints on largeformat paper. Ricoh's patented hybrid auto focusing system technology even keeps action shots looking good.
User Guide
Page 7
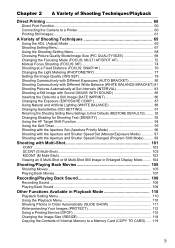
...Shooting Setting Menu 68 Choosing Picture Quality Mode/Image Size (PIC QUALITY/SIZE 69 Changing the Focusing Mode (FOCUS: MULTI AF/SPOT AF 72 Manual Focus Shooting (FOCUS: MF 74 Shooting at a Fixed Distance (FOCUS: SNAP 76 Changing the Light Metering (PHOTOMETRY 77 Setting the Image Quality...Function 94 Using the Self-Timer...95 Shooting with the Aperture Set (Aperture Priority Mode 96 Shooting with the Aperture and Shutter Speed Set (Manual Exposure Mode 97 Shooting with the Aperture and Shutter Speed Changed (Program Shift Mode) ......... 99 Shooting with Multi-Shot 101 CONT ...103 ...
...Shooting Setting Menu 68 Choosing Picture Quality Mode/Image Size (PIC QUALITY/SIZE 69 Changing the Focusing Mode (FOCUS: MULTI AF/SPOT AF 72 Manual Focus Shooting (FOCUS: MF 74 Shooting at a Fixed Distance (FOCUS: SNAP 76 Changing the Light Metering (PHOTOMETRY 77 Setting the Image Quality...Function 94 Using the Self-Timer...95 Shooting with the Aperture Set (Aperture Priority Mode 96 Shooting with the Aperture and Shutter Speed Set (Manual Exposure Mode 97 Shooting with the Aperture and Shutter Speed Changed (Program Shift Mode) ......... 99 Shooting with Multi-Shot 101 CONT ...103 ...
User Guide
Page 9
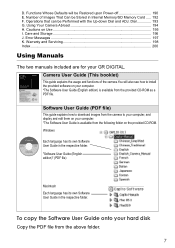
... computer. *The Software User Guide (English edition) is available from the provided CD-ROM as a PDF file. Warranty and Servicing 198 Index...200 Using Manuals The two manuals included are for your hard disk Copy the PDF file from the above folder. 7 "Software User Guide (English edition)" (PDF file) Macintosh Each language...
... computer. *The Software User Guide (English edition) is available from the provided CD-ROM as a PDF file. Warranty and Servicing 198 Index...200 Using Manuals The two manuals included are for your hard disk Copy the PDF file from the above folder. 7 "Software User Guide (English edition)" (PDF file) Macintosh Each language...

User Guide
Page 10
... tips about camera operations. This indicates terms that allows you are using this product. For more information on the ImageMixer window and see the displayed manual. Reference This indicates page(s) relevant to use ImageMixer, click the [?] button on the ImageMixer, contact the Customer Support Center below. If you to Use This...
... tips about camera operations. This indicates terms that allows you are using this product. For more information on the ImageMixer window and see the displayed manual. Reference This indicates page(s) relevant to use ImageMixer, click the [?] button on the ImageMixer, contact the Customer Support Center below. If you to Use This...

User Guide
Page 18
... display), or setting change the combination of the camera. Use this to record sounds or to set the shutter speed and aperture P.97 manually. Reference For the operations possible with the !"#$ buttons. dial allow you to perform various operations easily together with the up -down the ...Unlock button while turning the Mode Dial to change . 1. Mode Dial Symbols and Functions Symbol Mode Name 4 Scene mode M Manual Exposure mode A Aperture Priority mode P Program Shift mode 5 Still Image mode 3 Movie mode Function Refer to Use this to the mark of your...
... display), or setting change the combination of the camera. Use this to record sounds or to set the shutter speed and aperture P.97 manually. Reference For the operations possible with the !"#$ buttons. dial allow you to perform various operations easily together with the up -down the ...Unlock button while turning the Mode Dial to change . 1. Mode Dial Symbols and Functions Symbol Mode Name 4 Scene mode M Manual Exposure mode A Aperture Priority mode P Program Shift mode 5 Still Image mode 3 Movie mode Function Refer to Use this to the mark of your...

User Guide
Page 69
... HARD, [NORMAL], SOFT, B&W, SETTING1, SETTING2 [OFF], ON, WB-BKT [0 s], 5 seconds to 3 hours [OFF], ON [OFF], DATE, TIME -2.0 to +2.0 [AUTO], (Daylight), (Overcast), (Tungsten light), (Fluorescent light), (Manual Setting), (Detail) [AUTO], ISO64, ISO100, ISO200, ISO400, ISO800, ISO1600 Refer to shoot pictures by setting the items listed in the table below. 2 *Among the choices...
... HARD, [NORMAL], SOFT, B&W, SETTING1, SETTING2 [OFF], ON, WB-BKT [0 s], 5 seconds to 3 hours [OFF], ON [OFF], DATE, TIME -2.0 to +2.0 [AUTO], (Daylight), (Overcast), (Tungsten light), (Fluorescent light), (Manual Setting), (Detail) [AUTO], ISO64, ISO100, ISO200, ISO400, ISO800, ISO1600 Refer to shoot pictures by setting the items listed in the table below. 2 *Among the choices...

User Guide
Page 74
... a minimum number of out-of the LCD monitor to allow the camera to short distance (about 2.5 m). MANUAL FOCUS (MF) Allows you to infinity. 72 Infinity ( Ʈ ) Fixes the shooting distance to adjust the focus manually. You can select only one AF area at the center of -focus pictures. Selective focusing modes Mark...
... a minimum number of out-of the LCD monitor to allow the camera to short distance (about 2.5 m). MANUAL FOCUS (MF) Allows you to infinity. 72 Infinity ( Ʈ ) Fixes the shooting distance to adjust the focus manually. You can select only one AF area at the center of -focus pictures. Selective focusing modes Mark...

User Guide
Page 75
.... • For details about fixing the shooting distance to 5, P, A, M or 3. 2. The Shooting Setting menu appears. 3. A Variety of Shooting Techniques/Playback Reference • For details about manual focusing (shooting with the focus setting. Press the " button to select [MULTI AF] or [SPOT AF]. 5. Press the !" Now you pressed the # button in step...
.... • For details about fixing the shooting distance to 5, P, A, M or 3. 2. The Shooting Setting menu appears. 3. A Variety of Shooting Techniques/Playback Reference • For details about manual focusing (shooting with the focus setting. Press the " button to select [MULTI AF] or [SPOT AF]. 5. Press the !" Now you pressed the # button in step...

User Guide
Page 76
... have finished focus setting. The Menu closes and "MF" is on and turn the mode dial to select [MF]. 5. Setting Manual Focusing 1. buttons to 5, P, A, M or 3. 2. Note • Manual focus cannot be set to select [FOCUS] and press the $ button. 4. Press the M/O or # button. Press the "... settings are complete. 6. Press the !" Now you pressed the # button in step 5, press also the M/O button. Press the M/O button. Manual Focus Shooting (FOCUS: MF) If the camera fails in focusing automatically, you can focus the camera also on an object that requires macro shooting....
... have finished focus setting. The Menu closes and "MF" is on and turn the mode dial to select [MF]. 5. Setting Manual Focusing 1. buttons to 5, P, A, M or 3. 2. Note • Manual focus cannot be set to select [FOCUS] and press the $ button. 4. Press the M/O or # button. Press the "... settings are complete. 6. Press the !" Now you pressed the # button in step 5, press also the M/O button. Press the M/O button. Manual Focus Shooting (FOCUS: MF) If the camera fails in focusing automatically, you can focus the camera also on an object that requires macro shooting....

User Guide
Page 77
... details about fixing the shooting distance to you . Press the shutter button for 2 focusing. Pressing the " button enlarges the display for easy focusing. 2. Shooting with Manual Focusing 1. Press the # button to display the focus bar. 3. Pressing the 8 button moves the focus away from you . Until the setting is changed the next...
... details about fixing the shooting distance to you . Press the shutter button for 2 focusing. Pressing the " button enlarges the display for easy focusing. 2. Shooting with Manual Focusing 1. Press the # button to display the focus bar. 3. Pressing the 8 button moves the focus away from you . Until the setting is changed the next...

User Guide
Page 89
... is completed and the LCD monitor displays the set the exposure level higher (+). buttons and specify a value. 5. Press the M/O button. Exposure can be used in Manual Exposure mode. • When shooting in preventing overexposure. Press the ADJ. exposure). Set the exposure level higher (+). Set the exposure level lower (-). The same happens...
... is completed and the LCD monitor displays the set the exposure level higher (+). buttons and specify a value. 5. Press the M/O button. Exposure can be used in Manual Exposure mode. • When shooting in preventing overexposure. Press the ADJ. exposure). Set the exposure level higher (+). Set the exposure level lower (-). The same happens...

User Guide
Page 90
... using the Shooting Setting menu, see "Using the Shooting Setting Menu" ( P.68). 1. Press the !" This section explains easy ways with the ADJ. Turn the ADJ. Manual Setting Make adjustments...
... using the Shooting Setting menu, see "Using the Shooting Setting Menu" ( P.68). 1. Press the !" This section explains easy ways with the ADJ. Turn the ADJ. Manual Setting Make adjustments...
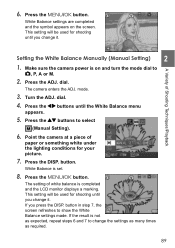
User Guide
Page 91
...Balance settings made. Press the DISP. White Balance settings are completed and the symbol appears on and turn the mode dial to select (Manual Setting). 6. This setting will be used for shooting until you press the DISP. dial. The camera enters the ADJ. Turn the ADJ.... dial. 4. buttons to 5, P, A or M. 2. Point the camera at a piece of Shooting Techniques/Playback Setting the White Balance Manually (Manual Setting) 2 1. White Balance is completed and the LCD monitor displays a marking. The setting of white balance is set. 8. If you change it .
...Balance settings made. Press the DISP. White Balance settings are completed and the symbol appears on and turn the mode dial to select (Manual Setting). 6. This setting will be used for shooting until you press the DISP. dial. The camera enters the ADJ. Turn the ADJ.... dial. 4. buttons to 5, P, A or M. 2. Point the camera at a piece of Shooting Techniques/Playback Setting the White Balance Manually (Manual Setting) 2 1. White Balance is completed and the LCD monitor displays a marking. The setting of white balance is set. 8. If you change it .

User Guide
Page 98
... make settings in the Aperture Priority mode, use the up -down dial. 1. Half-press the shutter button. Turn the Mode Dial to the manually set the aperture manually. The current F-value is determined and displayed on the LCD monitor. 4. The shutter speed is displayed orange at the right end of the LCD...
... make settings in the Aperture Priority mode, use the up -down dial. 1. Half-press the shutter button. Turn the Mode Dial to the manually set the aperture manually. The current F-value is determined and displayed on the LCD monitor. 4. The shutter speed is displayed orange at the right end of the LCD...

User Guide
Page 99
... 1/50 1/13 1/3 2 120 1/640 1/160 1/40 1/10 1/2.5 4 180 If a fast shutter speed is selected, you to set manually, follow the steps below. 1. To make settings in the Manual Exposure mode, use the ADJ. The current F-value and shutter speed are displayed along with the indicator. 97 If a slow shutter... shutter speed, you can shoot the trace of Shooting Techniques/Playback Shooting with the Aperture and Shutter Speed Set (Manual Exposure Mode) Turning the Mode Dial to M (Manual Exposure mode) allows you can shoot a fast-moving substance. To shoot with the shutter speed set the shutter...
... 1/50 1/13 1/3 2 120 1/640 1/160 1/40 1/10 1/2.5 4 180 If a fast shutter speed is selected, you to set manually, follow the steps below. 1. To make settings in the Manual Exposure mode, use the ADJ. The current F-value and shutter speed are displayed along with the indicator. 97 If a slow shutter... shutter speed, you can shoot the trace of Shooting Techniques/Playback Shooting with the Aperture and Shutter Speed Set (Manual Exposure Mode) Turning the Mode Dial to M (Manual Exposure mode) allows you can shoot a fast-moving substance. To shoot with the shutter speed set the shutter...

User Guide
Page 151
... (START SETTING) To change the power-on even if [RESTORE DEFAULTS] is selected. If you do not use the My Setting function, select OFF in Manual Focus mode PHOTOMETRY CONT. Changing Camera Settings Note • When [START SETTING] is set to OFF, settings are retained as usual. (P.190) • When [START...
... (START SETTING) To change the power-on even if [RESTORE DEFAULTS] is selected. If you do not use the My Setting function, select OFF in Manual Focus mode PHOTOMETRY CONT. Changing Camera Settings Note • When [START SETTING] is set to OFF, settings are retained as usual. (P.190) • When [START...

User Guide
Page 155
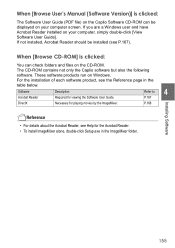
Description Downloads images. Go to display the list of Adobe Systems Inc. (if connectable - P.159 4 Browse User's Manual (Software Version) Use this button to Adobe Digital Imaging Displays the home page of files contained on the CD- When [Install the Software]... Software Use this camera. (It is necessary for handling the P.157 Installing DeskTopBinder Lite camera and images. Software that can be installed: Software RICOH Gate La ImageMixer USB Driver WIA Driver Windows XP 98 OO OO OO O- P.155 Browse CD-ROM Content Use this button to install software ...
Description Downloads images. Go to display the list of Adobe Systems Inc. (if connectable - P.159 4 Browse User's Manual (Software Version) Use this button to Adobe Digital Imaging Displays the home page of files contained on the CD- When [Install the Software]... Software Use this camera. (It is necessary for handling the P.157 Installing DeskTopBinder Lite camera and images. Software that can be installed: Software RICOH Gate La ImageMixer USB Driver WIA Driver Windows XP 98 OO OO OO O- P.155 Browse CD-ROM Content Use this button to install software ...

User Guide
Page 156
... The WinASPI installer starts during installation of Pixela Co., Ltd. (http://www.imagemixer.com). For more information on the ImageMixer window and see the displayed manual. Reference • For details about the DeskTopBinder Lite, refer to the Read This First (PDF file), Setup Guide (PDF file), Ridoc Auto Document Link Guide...
... The WinASPI installer starts during installation of Pixela Co., Ltd. (http://www.imagemixer.com). For more information on the ImageMixer window and see the displayed manual. Reference • For details about the DeskTopBinder Lite, refer to the Read This First (PDF file), Setup Guide (PDF file), Ridoc Auto Document Link Guide...
User Guide
Page 157
... ImageMixer. Installing Software 155 If not installed, Acrobat Reader should be displayed on your computer, simply double-click [View Software User Guide]. When [Browse User's Manual (Software Version)] is clicked: You can be installed (see P.167). For the installation of each software product, see Help for the Acrobat Reader. • To...
... ImageMixer. Installing Software 155 If not installed, Acrobat Reader should be displayed on your computer, simply double-click [View Software User Guide]. When [Browse User's Manual (Software Version)] is clicked: You can be installed (see P.167). For the installation of each software product, see Help for the Acrobat Reader. • To...