User Guide
Page 2
... no responsibility for personal, home or similarly limited purposes, without the express written permission of Ricoh. © 2005 RICOH CO.,LTD. If, however, you are trademarks of Adobe Systems Incorporated. Ricoh Co., Ltd. Should the product fail or malfunction while you have a question, spot an...properly before use. Adobe and Adobe Acrobat are abroad, the manufacturer assumes no liability for failure to record or play back images caused by malfunction of this booklet for ease of reference. Operating this manual thoroughly before normal use. Macintosh, Power Macintosh,...
... no responsibility for personal, home or similarly limited purposes, without the express written permission of Ricoh. © 2005 RICOH CO.,LTD. If, however, you are trademarks of Adobe Systems Incorporated. Ricoh Co., Ltd. Should the product fail or malfunction while you have a question, spot an...properly before use. Adobe and Adobe Acrobat are abroad, the manufacturer assumes no liability for failure to record or play back images caused by malfunction of this booklet for ease of reference. Operating this manual thoroughly before normal use. Macintosh, Power Macintosh,...
User Guide
Page 3
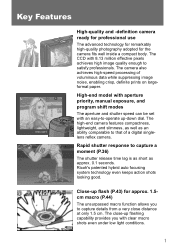
...a very close -up flash (P.43) for the camera fits well inside a compact body. The close distance at only 1.5 cm. Ricoh's patented hybrid auto focusing system technology even keeps action shots looking good. High-end model with aperture priority, manual exposure, and program shift... modes The aperture and shutter speed can be set with 8.13 million effective pixels achieves high image quality enough to satisfy professionals. The high-end camera features compactness, lightweight, and slimness, as well as an ability comparable to capture...
...a very close -up flash (P.43) for the camera fits well inside a compact body. The close distance at only 1.5 cm. Ricoh's patented hybrid auto focusing system technology even keeps action shots looking good. High-end model with aperture priority, manual exposure, and program shift... modes The aperture and shutter speed can be set with 8.13 million effective pixels achieves high image quality enough to satisfy professionals. The high-end camera features compactness, lightweight, and slimness, as well as an ability comparable to capture...
User Guide
Page 5
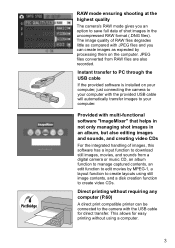
... edit function to edit movies by processing them on your computer, just connecting the camera to your computer. Direct printing without using still image contents, and a disk creation function to create video CDs. Instant transfer to PC through the USB cable If the provided software is ...installed on the computer. The image quality of images, this software has a input function to download still images, movies, and sounds from RAW files are also recorded. RAW mode ensuring shooting at the highest quality The...
... edit function to edit movies by processing them on your computer, just connecting the camera to your computer. Direct printing without using still image contents, and a disk creation function to create video CDs. Instant transfer to PC through the USB cable If the provided software is ...installed on the computer. The image quality of images, this software has a input function to download still images, movies, and sounds from RAW files are also recorded. RAW mode ensuring shooting at the highest quality The...
User Guide
Page 6
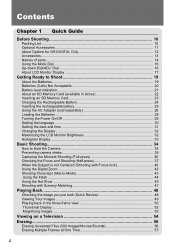
Contents Chapter 1 Quick Guide Before Shooting 10 Packing List ...10 Optional Accessories...11 About Options for GR DIGITAL Only 12 Accessories ...13 Names of parts ...14 Using the Mode Dial ...16 Up-down Dial/ADJ. Dial 16 About LCD Monitor Display 17 ... with Scenery-Matching 47 Playing Back 48 Checking the image you just took (Quick Review 48 Viewing Your Images 49 Playing back in the three-frame view 50 Thumbnail Display...52 Magnifying Images ...53 Viewing on a Television 54 Erasing...56 Erasing Unwanted Files (Still Images/Movies/Sounds 56 Erasing Multiple Frames at One Time...
Contents Chapter 1 Quick Guide Before Shooting 10 Packing List ...10 Optional Accessories...11 About Options for GR DIGITAL Only 12 Accessories ...13 Names of parts ...14 Using the Mode Dial ...16 Up-down Dial/ADJ. Dial 16 About LCD Monitor Display 17 ... with Scenery-Matching 47 Playing Back 48 Checking the image you just took (Quick Review 48 Viewing Your Images 49 Playing back in the three-frame view 50 Thumbnail Display...52 Magnifying Images ...53 Viewing on a Television 54 Erasing...56 Erasing Unwanted Files (Still Images/Movies/Sounds 56 Erasing Multiple Frames at One Time...
User Guide
Page 7
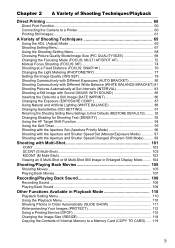
...Manual Focus Shooting (FOCUS: MF 74 Shooting at a Fixed Distance (FOCUS: SNAP 76 Changing the Light Metering (PHOTOMETRY 77 Setting the Image Quality (IMG SET 78 Shooting Consecutively with Different Exposures (AUTO BRACKET 80 Shooting Consecutively with Different White Balance (WHITE BALANCE BRACKET) 81...-Shot 101 CONT ...103 SCONT (S Multi-Shot 103 MCONT (M Multi-Shot 103 Viewing an S Multi-Shot or M Multi-Shot Still Image in Enlarged Display Mode ........ 104 Shooting/Playing Back Movies 105 Shooting Movies ...105 Playing Back Movies 107 Recording/Playing Back Sound 108 Recording ...
...Manual Focus Shooting (FOCUS: MF 74 Shooting at a Fixed Distance (FOCUS: SNAP 76 Changing the Light Metering (PHOTOMETRY 77 Setting the Image Quality (IMG SET 78 Shooting Consecutively with Different Exposures (AUTO BRACKET 80 Shooting Consecutively with Different White Balance (WHITE BALANCE BRACKET) 81...-Shot 101 CONT ...103 SCONT (S Multi-Shot 103 MCONT (M Multi-Shot 103 Viewing an S Multi-Shot or M Multi-Shot Still Image in Enlarged Display Mode ........ 104 Shooting/Playing Back Movies 105 Shooting Movies ...105 Playing Back Movies 107 Recording/Playing Back Sound 108 Recording ...

User Guide
Page 8
... 156 Installing the Software on Your Computer 157 Installing the DeskTopBinder Lite 159 Connecting the Camera to Your Computer 161 Downloading Images from an SD Memory Card 166 Installing Acrobat Reader 167 Installing DirectX ...168 Uninstalling the Software 169 Uninstalling the ImageMixer 170.... LIGHT 145 Setting Whether to Use Digital Zooming (DIGITAL ZOOM 146 Changing the Zoom Button Setting (ZOOM BTN. SETTINGS 130 Changing Image Confirmation Time (LCD CONFIRM 131 Changing File Name Settings (SEQUENTIAL NO 132 Setting the Date and Time (DATE SETTINGS 134 Changing the...
... 156 Installing the Software on Your Computer 157 Installing the DeskTopBinder Lite 159 Connecting the Camera to Your Computer 161 Downloading Images from an SD Memory Card 166 Installing Acrobat Reader 167 Installing DirectX ...168 Uninstalling the Software 169 Uninstalling the ImageMixer 170.... LIGHT 145 Setting Whether to Use Digital Zooming (DIGITAL ZOOM 146 Changing the Zoom Button Setting (ZOOM BTN. SETTINGS 130 Changing Image Confirmation Time (LCD CONFIRM 131 Changing File Name Settings (SEQUENTIAL NO 132 Setting the Date and Time (DATE SETTINGS 134 Changing the...
User Guide
Page 9
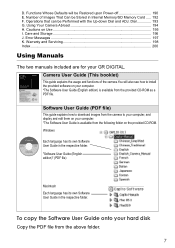
... User Guide is available from the above folder. 7 Dial 193 G. Camera User Guide (This booklet) This guide explains the usage and functions of Images That Can be Stored in Internal Memory/SD Memory Card ..... 192 F. Windows Each language has its own Software User Guide in the respective folder. ... CD-ROM. Care and Storage ...196 J. Software User Guide (PDF file) This guide explains how to download images from the camera to install the provided software on Use ...195 I. Cautions on your GR DIGITAL. D. Number of the camera.You will be Performed with the Up-down Dial and ADJ.
... User Guide is available from the above folder. 7 Dial 193 G. Camera User Guide (This booklet) This guide explains the usage and functions of Images That Can be Stored in Internal Memory/SD Memory Card ..... 192 F. Windows Each language has its own Software User Guide in the respective folder. ... CD-ROM. Care and Storage ...196 J. Software User Guide (PDF file) This guide explains how to download images from the camera to install the provided software on Use ...195 I. Cautions on your GR DIGITAL. D. Number of the camera.You will be Performed with the Up-down Dial and ADJ.

User Guide
Page 10
.... If you to a particular function. The LCD Monitor Display examples may be different from your computer. Reference This indicates page(s) relevant to display and edit images from actual display screens. 8 North America (Los Angeles) TEL: +1-213-341-0163 Europe (U.K.) TEL: +44-1489-564-764 Asia (Philippines) TEL: +63-2-438-0090 China...
.... If you to a particular function. The LCD Monitor Display examples may be different from your computer. Reference This indicates page(s) relevant to display and edit images from actual display screens. 8 North America (Los Angeles) TEL: +1-213-341-0163 Europe (U.K.) TEL: +44-1489-564-764 Asia (Philippines) TEL: +63-2-438-0090 China...
User Guide
Page 12
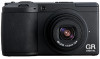
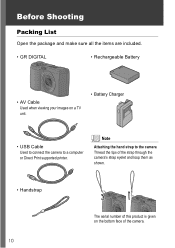
Note Attaching the hand strap to a computer or Direct Print supported printer. Before Shooting Packing List Open the package and make sure all the items are included. • GR DIGITAL • Rechargeable Battery • AV Cable Used when viewing your images on a TV unit. • Battery Charger • USB Cable Used to connect the camera to the camera Thread the tips of the strap through the camera's strap eyelet and loop them as shown. • Handstrap The serial number of this product is given on the bottom face of the camera. 10
Note Attaching the hand strap to a computer or Direct Print supported printer. Before Shooting Packing List Open the package and make sure all the items are included. • GR DIGITAL • Rechargeable Battery • AV Cable Used when viewing your images on a TV unit. • Battery Charger • USB Cable Used to connect the camera to the camera Thread the tips of the strap through the camera's strap eyelet and loop them as shown. • Handstrap The serial number of this product is given on the bottom face of the camera. 10

User Guide
Page 18
...97 manually. Mode Dial Symbols and Functions Symbol Mode Name 4 Scene mode M Manual Exposure mode A Aperture Priority mode P Program Shift mode 5 Still Image mode 3 Movie mode Function Refer to Use this to shoot text. Use this to record sounds or to change . 1. P.36 Use this to .... 16 Hold down Dial/ADJ. Use this to shoot movies. Use this to set the aperture manually. dials as shooting, playback (still image display), or setting change the combination of aperture and P.99 shutter speed. P.105 Up-down the Unlock button while turning the Mode Dial to...
...97 manually. Mode Dial Symbols and Functions Symbol Mode Name 4 Scene mode M Manual Exposure mode A Aperture Priority mode P Program Shift mode 5 Still Image mode 3 Movie mode Function Refer to Use this to shoot text. Use this to record sounds or to change . 1. P.36 Use this to .... 16 Hold down Dial/ADJ. Use this to shoot movies. Use this to set the aperture manually. dials as shooting, playback (still image display), or setting change the combination of aperture and P.99 shutter speed. P.105 Up-down the Unlock button while turning the Mode Dial to...

User Guide
Page 19
... 20 25 1 296 11 121 21 13 14 15 16 17 18 19 22 23 24 (When the shutter release button is half-pressed) Still Image Mode Movie Mode Item Name Refer to 1 Flash P.44 2 External flash P.45 3 Macro Shooting P.43 4 Self-timer P.95 5 Mode Types - 6 Recording... Destination P.22 7 Remaining Number of Still Images P.192 8 Picture Quality P.69 9 Image Size P.69 10 Digital zoom P.42 11 Focus P.72 12 Auto Bracket P.80 13 White Balance P.88 Item Name 14 Photometry 15...
... 20 25 1 296 11 121 21 13 14 15 16 17 18 19 22 23 24 (When the shutter release button is half-pressed) Still Image Mode Movie Mode Item Name Refer to 1 Flash P.44 2 External flash P.45 3 Macro Shooting P.43 4 Self-timer P.95 5 Mode Types - 6 Recording... Destination P.22 7 Remaining Number of Still Images P.192 8 Picture Quality P.69 9 Image Size P.69 10 Digital zoom P.42 11 Focus P.72 12 Auto Bracket P.80 13 White Balance P.88 Item Name 14 Photometry 15...

User Guide
Page 20
... messages to inform you of remaining shots is 10,000 or more, "9999" is displayed. The Screen During Playback 12 34 56 13 8, 9 10 7 Still Image Mode 11 12 14 Movie Mode Item Name 1 Protect 2 DPOF 3 Mode Types 4 Playback Data Source 5 Number of Playback Files 6 Total Number of Files 7 Setting at... Shooting 13 Recording Time or Lapsed Time 14 Indicator Refer to P.112 P.115 P.49 - - Item Name 8 Picture Quality 9 Image Size 10 File No. 11 Battery 12 Date at Shooting (Recording) Refer to P.69 P.69 P.19 P.86 P.134 -
... messages to inform you of remaining shots is 10,000 or more, "9999" is displayed. The Screen During Playback 12 34 56 13 8, 9 10 7 Still Image Mode 11 12 14 Movie Mode Item Name 1 Protect 2 DPOF 3 Mode Types 4 Playback Data Source 5 Number of Playback Files 6 Total Number of Files 7 Setting at... Shooting 13 Recording Time or Lapsed Time 14 Indicator Refer to P.112 P.115 P.49 - - Item Name 8 Picture Quality 9 Image Size 10 File No. 11 Battery 12 Date at Shooting (Recording) Refer to P.69 P.69 P.19 P.86 P.134 -

User Guide
Page 22
... Acceptable The camera does not accept the following batteries (cells): • Manganese dry cell (R03) • Ni-Cd battery Note Indication of the number of images you can recharge and use it is for setting and playback, the shooting time (the number of shots is using the AAA Alkaline Batteries by...
... Acceptable The camera does not accept the following batteries (cells): • Manganese dry cell (R03) • Ni-Cd battery Note Indication of the number of images you can recharge and use it is for setting and playback, the shooting time (the number of shots is using the AAA Alkaline Batteries by...

User Guide
Page 24
..., be sure to format the SD memory card, see P.192. • For how to format it 's a good idea to switch to record a lot of still images, movies or sounds at high resolutions, use a high-capacity SD Memory Card. When no memory card is loaded When an SD Memory Card is loaded... and internal memory during playback, see P.49. • For recording capacities, see P.124. 22 So it . The internal memory capacity is inserted, the camera records images in the internal memory; About an SD Memory Card (available in stores) You can be recorded on the card. When you want to LOCK when...
..., be sure to format the SD memory card, see P.192. • For how to format it 's a good idea to switch to record a lot of still images, movies or sounds at high resolutions, use a high-capacity SD Memory Card. When no memory card is loaded When an SD Memory Card is loaded... and internal memory during playback, see P.49. • For recording capacities, see P.124. 22 So it . The internal memory capacity is inserted, the camera records images in the internal memory; About an SD Memory Card (available in stores) You can be recorded on the card. When you want to LOCK when...

User Guide
Page 28
.... 1. Slide the release lever to the OPEN side to open the battery/ card cover. 2. Using the AC Adapter (sold separately) When shooting or viewing still images for a long time, or when connecting to lock the cover. Removing the rechargeable battery If you have already used this camera, make sure it is...
.... 1. Slide the release lever to the OPEN side to open the battery/ card cover. 2. Using the AC Adapter (sold separately) When shooting or viewing still images for a long time, or when connecting to lock the cover. Removing the rechargeable battery If you have already used this camera, make sure it is...

User Guide
Page 34
Normal Symbol Display Histogram On Grid Guide Switches screens with images. button down returns the brightness to the level set in the order of symbols, etc. Term Grid Guide Displays auxiliary lines on the LCD monitor ..., LCD Monitor Off, and Normal Symbol Display. button, the view cycles in [LCD BRIGHTNESS] (P.126). Subsequently, full-pressing the shutter release button displays the shot image on . Changing the Display If you press DISP., you press the DISP.
Normal Symbol Display Histogram On Grid Guide Switches screens with images. button down returns the brightness to the level set in the order of symbols, etc. Term Grid Guide Displays auxiliary lines on the LCD monitor ..., LCD Monitor Off, and Normal Symbol Display. button, the view cycles in [LCD BRIGHTNESS] (P.126). Subsequently, full-pressing the shutter release button displays the shot image on . Changing the Display If you press DISP., you press the DISP.

User Guide
Page 35
.... If the histogram has only peaks on the left . Note • The histogram displayed on the LCD monitor is a graph indicating the number of an image without being affected by the brightness around the LCD monitor. Depending on the shooting condition (flashing is required, the surrounding light is dark, and so...
.... If the histogram has only peaks on the left . Note • The histogram displayed on the LCD monitor is a graph indicating the number of an image without being affected by the brightness around the LCD monitor. Depending on the shooting condition (flashing is required, the surrounding light is dark, and so...

User Guide
Page 37
... current shooting condition. 1 To prevent camera shake, use a tripod or hold the camera securely with both hands when you press the shutter button, the still image might not come out clearly (due to Forced Flash Mode) (P.44). • Raising the ISO sensitivity (P.91). • Using the self-timer (P.95). 35...
... current shooting condition. 1 To prevent camera shake, use a tripod or hold the camera securely with both hands when you press the shutter button, the still image might not come out clearly (due to Forced Flash Mode) (P.44). • Raising the ISO sensitivity (P.91). • Using the self-timer (P.95). 35...

User Guide
Page 38
...shutter release button for a moment on and turn the mode dial to 5, P, A, or M. 2. Put the subject of using the shutter button; While the shot image is on the LCD Monitor and is recorded. (P.131) • Full-press is apt to miss a shooting opportunity. 1. Capturing the Moment Shooting (Full-press) ...36 Compose your photo right in two steps. pressing the shutter button all the way down at the LCD monitor. 3. Note • The still image you have taken freezes for quick focusing not to cause camera shake. Make sure the camera power is being written onto the card, the auto...
...shutter release button for a moment on and turn the mode dial to 5, P, A, or M. 2. Put the subject of using the shutter button; While the shot image is on the LCD Monitor and is recorded. (P.131) • Full-press is apt to miss a shooting opportunity. 1. Capturing the Moment Shooting (Full-press) ...36 Compose your photo right in two steps. pressing the shutter button all the way down at the LCD monitor. 3. Note • The still image you have taken freezes for quick focusing not to cause camera shake. Make sure the camera power is being written onto the card, the auto...

User Guide
Page 40
Gently press the shutter button all the way. The still image you have taken freezes for a moment on the LCD Monitor and is being written onto the card, the auto-focus/flash lamp blinks. Before focusing Focused Focusing failure Frame color White Green Blink (red) Auto Focus/Flash Lamp Off On (green) Blink (green) The focal distance is measured at macro shooting, use the AF target shift function. (P.94) 4. . Green frames appear to indicate focus positions. Reference When specifying a focus position at five points. While the shot image is recorded. 38
Gently press the shutter button all the way. The still image you have taken freezes for a moment on the LCD Monitor and is being written onto the card, the auto-focus/flash lamp blinks. Before focusing Focused Focusing failure Frame color White Green Blink (red) Auto Focus/Flash Lamp Off On (green) Blink (green) The focal distance is measured at macro shooting, use the AF target shift function. (P.94) 4. . Green frames appear to indicate focus positions. Reference When specifying a focus position at five points. While the shot image is recorded. 38