User Guide
Page 3
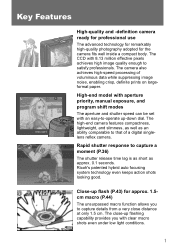
Ricoh's patented hybrid auto focusing system technology even keeps action shots looking good. The camera also achieves high-speed processing of a digital singlelens reflex camera. The high-end camera features compactness, lightweight, and slimness, as well as approx. 0.1 seconds. Close-up flashing capability provides you to satisfy ...
Ricoh's patented hybrid auto focusing system technology even keeps action shots looking good. The camera also achieves high-speed processing of a digital singlelens reflex camera. The high-end camera features compactness, lightweight, and slimness, as well as approx. 0.1 seconds. Close-up flashing capability provides you to satisfy ...
User Guide
Page 5
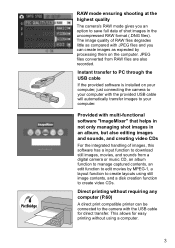
JPEG files converted from a digital camera or music CD, an album function to manage captured contents, an edit function to edit movies by processing them on your computer, just connecting ...
JPEG files converted from a digital camera or music CD, an album function to manage captured contents, an edit function to edit movies by processing them on your computer, just connecting ...
User Guide
Page 6
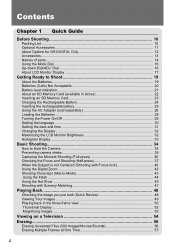
Contents Chapter 1 Quick Guide Before Shooting 10 Packing List ...10 Optional Accessories...11 About Options for GR DIGITAL Only 12 Accessories ...13 Names of parts ...14 Using the Mode Dial ...16 Up-down Dial/ADJ. Dial 16 About LCD Monitor Display 17 Getting ... Shooting (Full-press 36 Checking the Focus and Shooting (Half-press 37 When the Subject is not Centered (Shooting with Focus-lock 40 Using the Digital Zoom 42 Shooting Close-Ups (Macro-Mode 43 Using the Flash ...44 Using the Hot Shoe ...45 Shooting with Scenery-Matching 47 Playing Back 48...
Contents Chapter 1 Quick Guide Before Shooting 10 Packing List ...10 Optional Accessories...11 About Options for GR DIGITAL Only 12 Accessories ...13 Names of parts ...14 Using the Mode Dial ...16 Up-down Dial/ADJ. Dial 16 About LCD Monitor Display 17 Getting ... Shooting (Full-press 36 Checking the Focus and Shooting (Half-press 37 When the Subject is not Centered (Shooting with Focus-lock 40 Using the Digital Zoom 42 Shooting Close-Ups (Macro-Mode 43 Using the Flash ...44 Using the Hot Shoe ...45 Shooting with Scenery-Matching 47 Playing Back 48...

User Guide
Page 8
... Under Windows XP Service Pack 2 185 Appendices 187 A. MEM 125 Adjusting the Brightness of the LCD Monitor (LCD BRIGHTNESS 126 Setting a Function to Use Digital Zooming (DIGITAL ZOOM 146 Changing the Zoom Button Setting (ZOOM BTN. Chapter 3 Changing Camera Settings Changing Camera Settings 122 SETUP Menu ...122 Using the SETUP Menu 123...
... Under Windows XP Service Pack 2 185 Appendices 187 A. MEM 125 Adjusting the Brightness of the LCD Monitor (LCD BRIGHTNESS 126 Setting a Function to Use Digital Zooming (DIGITAL ZOOM 146 Changing the Zoom Button Setting (ZOOM BTN. Chapter 3 Changing Camera Settings Changing Camera Settings 122 SETUP Menu ...122 Using the SETUP Menu 123...
User Guide
Page 9
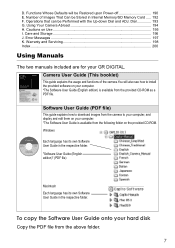
... Guide is available from the above folder. 7 Software User Guide (PDF file) This guide explains how to download images from the following folder on your GR DIGITAL. To copy the Software User Guide onto your computer. *The Software User Guide (English edition) is available from the camera to install the provided software...
... Guide is available from the above folder. 7 Software User Guide (PDF file) This guide explains how to download images from the following folder on your GR DIGITAL. To copy the Software User Guide onto your computer. *The Software User Guide (English edition) is available from the camera to install the provided software...
User Guide
Page 12
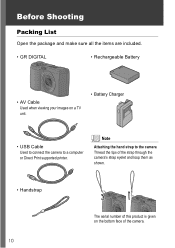
Before Shooting Packing List Open the package and make sure all the items are included. • GR DIGITAL • Rechargeable Battery • AV Cable Used when viewing your images on the bottom face of the camera. 10 Note Attaching the hand strap to the camera Thread the tips of the strap through the camera's strap eyelet and loop them as shown. • Handstrap The serial number of this product is given on a TV unit. • Battery Charger • USB Cable Used to connect the camera to a computer or Direct Print supported printer.
Before Shooting Packing List Open the package and make sure all the items are included. • GR DIGITAL • Rechargeable Battery • AV Cable Used when viewing your images on the bottom face of the camera. 10 Note Attaching the hand strap to the camera Thread the tips of the strap through the camera's strap eyelet and loop them as shown. • Handstrap The serial number of this product is given on a TV unit. • Battery Charger • USB Cable Used to connect the camera to a computer or Direct Print supported printer.
User Guide
Page 14
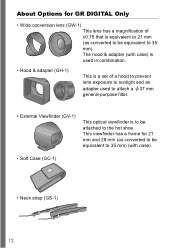
... combination. • Hood & adapter (GH-1) This is a set of x0.75 that is to be equivalent to the hot shoe. This viewfinder has a frame for GR DIGITAL Only • Wide conversion lens (GW-1) This lens has a magnification of a hood to prevent lens exposure to sunlight and an adapter used to attach a ij...
... combination. • Hood & adapter (GH-1) This is a set of x0.75 that is to be equivalent to the hot shoe. This viewfinder has a frame for GR DIGITAL Only • Wide conversion lens (GW-1) This lens has a magnification of a hood to prevent lens exposure to sunlight and an adapter used to attach a ij...

User Guide
Page 19
... P.45 3 Macro Shooting P.43 4 Self-timer P.95 5 Mode Types - 6 Recording Destination P.22 7 Remaining Number of Still Images P.192 8 Picture Quality P.69 9 Image Size P.69 10 Digital zoom P.42 11 Focus P.72 12 Auto Bracket P.80 13 White Balance P.88 Item Name 14 Photometry 15 Image Setting 16 Exposure 17 ISO Setting...
... P.45 3 Macro Shooting P.43 4 Self-timer P.95 5 Mode Types - 6 Recording Destination P.22 7 Remaining Number of Still Images P.192 8 Picture Quality P.69 9 Image Size P.69 10 Digital zoom P.42 11 Focus P.72 12 Auto Bracket P.80 13 White Balance P.88 Item Name 14 Photometry 15 Image Setting 16 Exposure 17 ISO Setting...

User Guide
Page 37
... following cases: • When shooting in a dark place without using the flash. • When shooting in Slow Sync Mode (P.44). • When shooting using the Digital Zoom (P.42).
... following cases: • When shooting in a dark place without using the flash. • When shooting in Slow Sync Mode (P.44). • When shooting using the Digital Zoom (P.42).

User Guide
Page 44
.... The magnification is displayed on the SETUP menu allows you to assign the exposure compensation or white balancing to the 89 button. • The digital zoom function cannot be used when [PIC QUALITY/SIZE] is set to RAW MODE. press the shutter release button. 3. With the camera ready...the 89 button, see P.146. 42 SET.] on the LCD monitor. 2. Using the Digital Zoom Set DIGITAL ZOOM on /off , selecting [ZOOM BTN. The digital zoom function can magnify the subject up to use the digital zoom function. Reference • For how to assign another function to enlarge the subject. When...
.... The magnification is displayed on the SETUP menu allows you to assign the exposure compensation or white balancing to the 89 button. • The digital zoom function cannot be used when [PIC QUALITY/SIZE] is set to RAW MODE. press the shutter release button. 3. With the camera ready...the 89 button, see P.146. 42 SET.] on the LCD monitor. 2. Using the Digital Zoom Set DIGITAL ZOOM on /off , selecting [ZOOM BTN. The digital zoom function can magnify the subject up to use the digital zoom function. Reference • For how to assign another function to enlarge the subject. When...
User Guide
Page 62
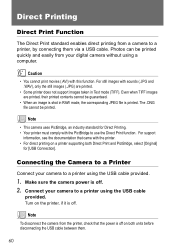
... units before disconnecting the USB cable between them via a USB cable. Direct Printing Direct Print Function The Direct Print standard enables direct printing from your digital camera without using a computer. Make sure the camera power is off . 2. For support information, see the documentation that the power is off on both Direct...
... units before disconnecting the USB cable between them via a USB cable. Direct Printing Direct Print Function The Direct Print standard enables direct printing from your digital camera without using a computer. Make sure the camera power is off . 2. For support information, see the documentation that the power is off on both Direct...
User Guide
Page 72
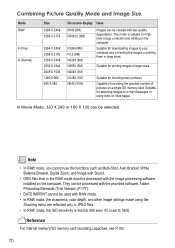
... correction and editing on the computer. Note • In RAW mode, you cannot use the functions such as Multi-Shot, Auto Bracket, White Balance Bracket, Digital Zoom, and Image with less quality degradation.
... correction and editing on the computer. Note • In RAW mode, you cannot use the functions such as Multi-Shot, Auto Bracket, White Balance Bracket, Digital Zoom, and Image with less quality degradation.
User Guide
Page 117
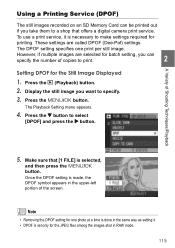
... the still image you can be printed out if you take them to print. 2 Setting DPOF for the Still Image Displayed 1. Make sure that offers a digital camera print service. To use a print service, it . • DPOF is set only for the JPEG files among the images shot in the upper-left...
... the still image you can be printed out if you take them to print. 2 Setting DPOF for the Still Image Displayed 1. Make sure that offers a digital camera print service. To use a print service, it . • DPOF is set only for the JPEG files among the images shot in the upper-left...

User Guide
Page 124
... enables you to P.124 P.125 P.126 P.127 P.128 P.129 P.130 P.131 P.132 P.134 P.135 P.136 P.137 P.138 P.142 P.143 P.145 P.146 P.147 P.148 P.149 LIGHT DIGITAL ZOOM ZOOM BTN. SET. 1 ADJ.
... enables you to P.124 P.125 P.126 P.127 P.128 P.129 P.130 P.131 P.132 P.134 P.135 P.136 P.137 P.138 P.142 P.143 P.145 P.146 P.147 P.148 P.149 LIGHT DIGITAL ZOOM ZOOM BTN. SET. 1 ADJ.

User Guide
Page 134
... to RIMG9999.jpg. For detailed operation, see P.123. 2. Press the !" When you are switching SD Memory Cards, you take, in the format of "R" followed by 7 digits, from the previously loaded SD Memory Card. If numbering exceeds RIMG9999, further recording is switched with a consecutively numbered file name automatically assigned. Possible Settings ON...
... to RIMG9999.jpg. For detailed operation, see P.123. 2. Press the !" When you are switching SD Memory Cards, you take, in the format of "R" followed by 7 digits, from the previously loaded SD Memory Card. If numbering exceeds RIMG9999, further recording is switched with a consecutively numbered file name automatically assigned. Possible Settings ON...

User Guide
Page 145
...) You can select a color space between sRGB (a standard color space used in step 4, press the M/O button. 143 Press !" If you pressed the # button in the digital world) and Adobe RGB (a color space wider than sRGB). Display the SETUP menu. 3 For the operating procedure, see P.123. 2. uses for image editing applications such...
...) You can select a color space between sRGB (a standard color space used in step 4, press the M/O button. 143 Press !" If you pressed the # button in the digital world) and Adobe RGB (a color space wider than sRGB). Display the SETUP menu. 3 For the operating procedure, see P.123. 2. uses for image editing applications such...

User Guide
Page 148
...) is set whether to use . These settings are used until they are changed the next time. Reference For details about using the Digital Zoom, see P.123. 2. For the operating procedure, see P.42. 146 Press the M/O or # button. 5. Press the !" If the # button was pressed ...in Step 4, press the M/O button. Setting Whether to Use Digital Zooming (DIGITAL ZOOM) You can set to OFF (not use), the exposure compensation or the white balance function can be assigned to the 8/9 button. 1. If this is...
...) is set whether to use . These settings are used until they are changed the next time. Reference For details about using the Digital Zoom, see P.123. 2. For the operating procedure, see P.42. 146 Press the M/O or # button. 5. Press the !" If the # button was pressed ...in Step 4, press the M/O button. Setting Whether to Use Digital Zooming (DIGITAL ZOOM) You can set to OFF (not use), the exposure compensation or the white balance function can be assigned to the 8/9 button. 1. If this is...

User Guide
Page 149
..., follow the steps below. 1. Press the " button to select [EXPO. If the # button was pressed in Step 4, press the M/O button. If you do not use digital zooming, you have completed zoom button setting. Now you can assign the exposure compensation or white balancing function to the zoom button (8/9 button). Press the...
..., follow the steps below. 1. Press the " button to select [EXPO. If the # button was pressed in Step 4, press the M/O button. If you do not use digital zooming, you have completed zoom button setting. Now you can assign the exposure compensation or white balancing function to the zoom button (8/9 button). Press the...

User Guide
Page 150
.... 3. MY SETTINGS) The My Setting function allows you do not want to select [REG. Select [SETTING 1] or [SETTING 2] and press the M/O button. For example, when a digital camera is turned on Settings (REG. Two types of my settings can use the camera without regard to the settings made by multiple persons, each...
.... 3. MY SETTINGS) The My Setting function allows you do not want to select [REG. Select [SETTING 1] or [SETTING 2] and press the M/O button. For example, when a digital camera is turned on Settings (REG. Two types of my settings can use the camera without regard to the settings made by multiple persons, each...
User Guide
Page 153
Chapter 4 Installing Software Installing the Provided Software (For Windows)..152 Installing the Provided Software (For Macintosh 171 Note The Caplio Software contained on the supplied CD-ROM is used for Ricoh digital camera series, GR DIGITAL and Caplio, in common.
Chapter 4 Installing Software Installing the Provided Software (For Windows)..152 Installing the Provided Software (For Macintosh 171 Note The Caplio Software contained on the supplied CD-ROM is used for Ricoh digital camera series, GR DIGITAL and Caplio, in common.
