User Guide
Page 3
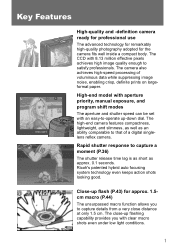
... comparable to that of voluminous data while suppressing image noise, enabling crisp, definite prints on largeformat paper. The camera also achieves high-speed processing of a digital singlelens reflex camera. The high-end camera features compactness, lightweight, and slimness, as well as approx. 0.1 seconds. The CCD with clear macro shots even under...
... comparable to that of voluminous data while suppressing image noise, enabling crisp, definite prints on largeformat paper. The camera also achieves high-speed processing of a digital singlelens reflex camera. The high-end camera features compactness, lightweight, and slimness, as well as approx. 0.1 seconds. The CCD with clear macro shots even under...
User Guide
Page 5
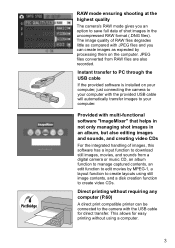
... to your computer with the provided USB cable will automatically transfer images to create video CDs. This allows for direct transfer. JPEG files converted from a digital camera or music CD, an album function to manage captured contents, an edit function to edit movies by processing them on your computer, just connecting...
... to your computer with the provided USB cable will automatically transfer images to create video CDs. This allows for direct transfer. JPEG files converted from a digital camera or music CD, an album function to manage captured contents, an edit function to edit movies by processing them on your computer, just connecting...
User Guide
Page 6
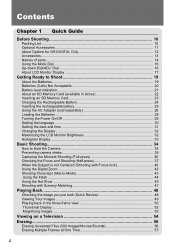
Contents Chapter 1 Quick Guide Before Shooting 10 Packing List ...10 Optional Accessories...11 About Options for GR DIGITAL Only 12 Accessories ...13 Names of parts ...14 Using the Mode Dial ...16 Up-down Dial/ADJ. Dial 16 About LCD Monitor Display 17 Getting ... Shooting (Full-press 36 Checking the Focus and Shooting (Half-press 37 When the Subject is not Centered (Shooting with Focus-lock 40 Using the Digital Zoom 42 Shooting Close-Ups (Macro-Mode 43 Using the Flash ...44 Using the Hot Shoe ...45 Shooting with Scenery-Matching 47 Playing Back 48...
Contents Chapter 1 Quick Guide Before Shooting 10 Packing List ...10 Optional Accessories...11 About Options for GR DIGITAL Only 12 Accessories ...13 Names of parts ...14 Using the Mode Dial ...16 Up-down Dial/ADJ. Dial 16 About LCD Monitor Display 17 Getting ... Shooting (Full-press 36 Checking the Focus and Shooting (Half-press 37 When the Subject is not Centered (Shooting with Focus-lock 40 Using the Digital Zoom 42 Shooting Close-Ups (Macro-Mode 43 Using the Flash ...44 Using the Hot Shoe ...45 Shooting with Scenery-Matching 47 Playing Back 48...

User Guide
Page 8
... the AF Auxiliary Light (AF AUX. Recommended Parts 189 C. MEM 125 Adjusting the Brightness of the LCD Monitor (LCD BRIGHTNESS 126 Setting a Function to Use Digital Zooming (DIGITAL ZOOM 146 Changing the Zoom Button Setting (ZOOM BTN. Specifications...187 B. Chapter 3 Changing Camera Settings Changing Camera Settings 122 SETUP Menu ...122 Using the...
... the AF Auxiliary Light (AF AUX. Recommended Parts 189 C. MEM 125 Adjusting the Brightness of the LCD Monitor (LCD BRIGHTNESS 126 Setting a Function to Use Digital Zooming (DIGITAL ZOOM 146 Changing the Zoom Button Setting (ZOOM BTN. Specifications...187 B. Chapter 3 Changing Camera Settings Changing Camera Settings 122 SETUP Menu ...122 Using the...
User Guide
Page 9
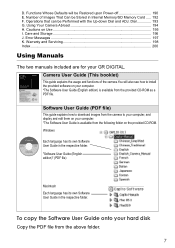
... them on Use ...195 I. Windows Each language has its own Software User Guide in the respective folder. D. To copy the Software User Guide onto your GR DIGITAL. Number of the camera.You will be Performed with the Up-down Dial and ADJ. Using Your Camera Abroad 194 H. Care and Storage ...196 J. Dial...
... them on Use ...195 I. Windows Each language has its own Software User Guide in the respective folder. D. To copy the Software User Guide onto your GR DIGITAL. Number of the camera.You will be Performed with the Up-down Dial and ADJ. Using Your Camera Abroad 194 H. Care and Storage ...196 J. Dial...
User Guide
Page 12
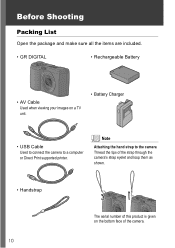
Before Shooting Packing List Open the package and make sure all the items are included. • GR DIGITAL • Rechargeable Battery • AV Cable Used when viewing your images on a TV unit. • Battery Charger • USB Cable Used to connect the camera to the camera Thread the tips of the strap through the camera's strap eyelet and loop them as shown. • Handstrap The serial number of this product is given on the bottom face of the camera. 10 Note Attaching the hand strap to a computer or Direct Print supported printer.
Before Shooting Packing List Open the package and make sure all the items are included. • GR DIGITAL • Rechargeable Battery • AV Cable Used when viewing your images on a TV unit. • Battery Charger • USB Cable Used to connect the camera to the camera Thread the tips of the strap through the camera's strap eyelet and loop them as shown. • Handstrap The serial number of this product is given on the bottom face of the camera. 10 Note Attaching the hand strap to a computer or Direct Print supported printer.
User Guide
Page 14
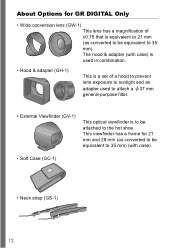
This viewfinder has a frame for GR DIGITAL Only • Wide conversion lens (GW-1) This lens has a magnification of a hood to prevent lens exposure to sunlight and an adapter used in combination. • ...
This viewfinder has a frame for GR DIGITAL Only • Wide conversion lens (GW-1) This lens has a magnification of a hood to prevent lens exposure to sunlight and an adapter used in combination. • ...

User Guide
Page 19
... P.45 3 Macro Shooting P.43 4 Self-timer P.95 5 Mode Types - 6 Recording Destination P.22 7 Remaining Number of Still Images P.192 8 Picture Quality P.69 9 Image Size P.69 10 Digital zoom P.42 11 Focus P.72 12 Auto Bracket P.80 13 White Balance P.88 Item Name 14 Photometry 15 Image Setting 16 Exposure 17 ISO Setting...
... P.45 3 Macro Shooting P.43 4 Self-timer P.95 5 Mode Types - 6 Recording Destination P.22 7 Remaining Number of Still Images P.192 8 Picture Quality P.69 9 Image Size P.69 10 Digital zoom P.42 11 Focus P.72 12 Auto Bracket P.80 13 White Balance P.88 Item Name 14 Photometry 15 Image Setting 16 Exposure 17 ISO Setting...

User Guide
Page 37
... following cases: • When shooting in a dark place without using the flash. • When shooting in Slow Sync Mode (P.44). • When shooting using the Digital Zoom (P.42). Note that camera shake should be avoided under the current shooting condition. 1 To prevent camera shake, use a tripod or hold the camera securely...
... following cases: • When shooting in a dark place without using the flash. • When shooting in Slow Sync Mode (P.44). • When shooting using the Digital Zoom (P.42). Note that camera shake should be avoided under the current shooting condition. 1 To prevent camera shake, use a tripod or hold the camera securely...

User Guide
Page 44
... how to assign another function to enlarge the subject. Press the shutter release button all the way. Using the Digital Zoom Set DIGITAL ZOOM on /off , selecting [ZOOM BTN. The digital zoom function can magnify the subject up to reduce the subject. Compose your picture and half- Press the 9.... 1. The magnification is active, press the 8 button to the 89 button, see P.146. 42 press the shutter release button. 3. When the digital zoom function is displayed on the LCD monitor. 2. SET.] on the SETUP menu allows you to assign the exposure compensation or white balancing to the...
... how to assign another function to enlarge the subject. Press the shutter release button all the way. Using the Digital Zoom Set DIGITAL ZOOM on /off , selecting [ZOOM BTN. The digital zoom function can magnify the subject up to reduce the subject. Compose your picture and half- Press the 9.... 1. The magnification is active, press the 8 button to the 89 button, see P.146. 42 press the shutter release button. 3. When the digital zoom function is displayed on the LCD monitor. 2. SET.] on the SETUP menu allows you to assign the exposure compensation or white balancing to the...
User Guide
Page 62
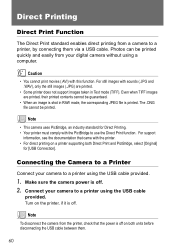
... Connection]. Make sure the camera power is off. Connecting the Camera to a Printer Connect your camera to a printer using the USB cable provided. Connect your digital camera without using the USB cable provided. 1. Note To disconnect the camera from a camera to use the Direct Print function. Direct Printing Direct Print Function...
... Connection]. Make sure the camera power is off. Connecting the Camera to a Printer Connect your camera to a printer using the USB cable provided. Connect your digital camera without using the USB cable provided. 1. Note To disconnect the camera from a camera to use the Direct Print function. Direct Printing Direct Print Function...
User Guide
Page 72
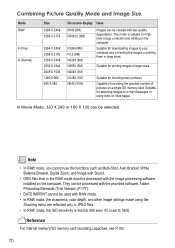
... are reflected only in large sizes. Note • In RAW mode, you cannot use the functions such as Multi-Shot, Auto Bracket, White Balance Bracket, Digital Zoom, and Image with Sound. • DNG files shot in large sizes. Combining Picture Quality Mode and Image Size. Suitable for printing images in the...
... are reflected only in large sizes. Note • In RAW mode, you cannot use the functions such as Multi-Shot, Auto Bracket, White Balance Bracket, Digital Zoom, and Image with Sound. • DNG files shot in large sizes. Combining Picture Quality Mode and Image Size. Suitable for printing images in the...
User Guide
Page 117
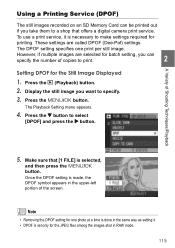
... for batch setting, you can be printed out if you want to select [DPOF] and press the $ button. Press the M/O button. Make sure that offers a digital camera print service.
... for batch setting, you can be printed out if you want to select [DPOF] and press the $ button. Press the M/O button. Make sure that offers a digital camera print service.

User Guide
Page 124
BTN. LIGHT DIGITAL ZOOM ZOOM BTN. BAL. Setting FORMAT [CARD] FORMAT [INT. LCD CONFIRM. The SETUP menu enables you to P.124 P.125 P.126 P.127 P.128 P.129 P.130 P.131 P....
BTN. LIGHT DIGITAL ZOOM ZOOM BTN. BAL. Setting FORMAT [CARD] FORMAT [INT. LCD CONFIRM. The SETUP menu enables you to P.124 P.125 P.126 P.127 P.128 P.129 P.130 P.131 P....

User Guide
Page 134
.... Possible Settings ON (Continue numbering) *Setting upon purchase File names will be automatically assigned to still images you take, in the format of "R" followed by 7 digits, from R0010001.jpg to select the desired setting. 4. With this setting, even when one SD Memory Card is switched with a consecutively numbered file name automatically...
.... Possible Settings ON (Continue numbering) *Setting upon purchase File names will be automatically assigned to still images you take, in the format of "R" followed by 7 digits, from R0010001.jpg to select the desired setting. 4. With this setting, even when one SD Memory Card is switched with a consecutively numbered file name automatically...

User Guide
Page 145
... SET) You can select a color space between sRGB (a standard color space used in step 4, press the M/O button. 143 If you pressed the # button in the digital world) and Adobe RGB (a color space wider than sRGB). When selecting [sRGB] 3.
... SET) You can select a color space between sRGB (a standard color space used in step 4, press the M/O button. 143 If you pressed the # button in the digital world) and Adobe RGB (a color space wider than sRGB). When selecting [sRGB] 3.

User Guide
Page 148
... press the M/O button. Reference For details about using the Digital Zoom, see P.123. 2. Setting Whether to Use Digital Zooming (DIGITAL ZOOM) You can be assigned to the 8/9 button. 1. Press the M/O or # button. 5. Now you have completed setting of digital zooming) is set to OFF (not use), the exposure ... whether to use . For the operating procedure, see P.42. 146 buttons to select [DIGITAL ZOOM] and press the $ button. 3. Press the !" When ON (use of digital zooming use or non-use digital zooming or not. Display the setup menu. These settings are used until they are changed...
... press the M/O button. Reference For details about using the Digital Zoom, see P.123. 2. Setting Whether to Use Digital Zooming (DIGITAL ZOOM) You can be assigned to the 8/9 button. 1. Press the M/O or # button. 5. Now you have completed setting of digital zooming) is set to OFF (not use), the exposure ... whether to use . For the operating procedure, see P.42. 146 buttons to select [DIGITAL ZOOM] and press the $ button. 3. Press the !" When ON (use of digital zooming use or non-use digital zooming or not. Display the setup menu. These settings are used until they are changed...

User Guide
Page 149
buttons to select 3 [ZOOM BTN. CMP.] or [WHT. Changing the Zoom Button Setting (ZOOM BTN. Display the setup menu. If you do not use digital zooming, you can assign the exposure compensation or white balancing function to the zoom button (8/9 button). These settings are used until they are changed the ...
buttons to select 3 [ZOOM BTN. CMP.] or [WHT. Changing the Zoom Button Setting (ZOOM BTN. Display the setup menu. If you do not use digital zooming, you can assign the exposure compensation or white balancing function to the zoom button (8/9 button). These settings are used until they are changed the ...

User Guide
Page 150
... appears. 4. The current camera settings will be registered. Display the SETUP menu. Press the M/O button. 148 For the operating procedure, see P.123. 3. For example, when a digital camera is turned on. Two types of my settings can use the camera without regard to register them, press the DISP. MY SETTINGS) The My...
... appears. 4. The current camera settings will be registered. Display the SETUP menu. Press the M/O button. 148 For the operating procedure, see P.123. 3. For example, when a digital camera is turned on. Two types of my settings can use the camera without regard to register them, press the DISP. MY SETTINGS) The My...
User Guide
Page 153
Chapter 4 Installing Software Installing the Provided Software (For Windows)..152 Installing the Provided Software (For Macintosh 171 Note The Caplio Software contained on the supplied CD-ROM is used for Ricoh digital camera series, GR DIGITAL and Caplio, in common.
Chapter 4 Installing Software Installing the Provided Software (For Windows)..152 Installing the Provided Software (For Macintosh 171 Note The Caplio Software contained on the supplied CD-ROM is used for Ricoh digital camera series, GR DIGITAL and Caplio, in common.
