User Guide
Page 14
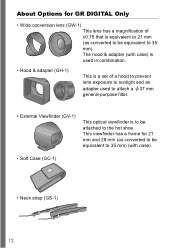
The hood & adapter (with case). • Soft Case (GC-1) • Neck strap (GS-1) 12 This viewfinder has a frame for GR DIGITAL Only • Wide conversion lens (GW-1) This lens has a magnification of a hood to prevent lens exposure to sunlight and an adapter used to attach a &#... (as converted to be attached to 35 mm). About Options for 21 mm and 28 mm (as converted to be equivalent to 35 mm) (with case) is used in combination. • Hood & adapter (GH-1) This is a set of x0.75 that is to be equivalent to the hot shoe...
The hood & adapter (with case). • Soft Case (GC-1) • Neck strap (GS-1) 12 This viewfinder has a frame for GR DIGITAL Only • Wide conversion lens (GW-1) This lens has a magnification of a hood to prevent lens exposure to sunlight and an adapter used to attach a &#... (as converted to be attached to 35 mm). About Options for 21 mm and 28 mm (as converted to be equivalent to 35 mm) (with case) is used in combination. • Hood & adapter (GH-1) This is a set of x0.75 that is to be equivalent to the hot shoe...

User Guide
Page 22
...; Based on CIPA standard (Temperature: 23 degrees Celsius, LCD on, 50% flash usage, turning the power off after it over and over again. In such a case, recharge the battery two or three times before use . In addition to use the AC Adapter, see P.25. • For how to the batteries, you...
...; Based on CIPA standard (Temperature: 23 degrees Celsius, LCD on, 50% flash usage, turning the power off after it over and over again. In such a case, recharge the battery two or three times before use . In addition to use the AC Adapter, see P.25. • For how to the batteries, you...

User Guide
Page 37
If the camera shake mark ( ) is displayed, try the following: • Using the flash (Set the camera to occur in the following cases: • When shooting in a dark place without using the flash. • When shooting in Slow Sync Mode (P.44). • When shooting using the Digital Zoom (P....
If the camera shake mark ( ) is displayed, try the following: • Using the flash (Set the camera to occur in the following cases: • When shooting in a dark place without using the flash. • When shooting in Slow Sync Mode (P.44). • When shooting using the Digital Zoom (P....

User Guide
Page 51
... When the camera power is off, pressing the Playback button for RAW is inserted, it plays back from playback mode to Shooting Mode. In this case, the mark standing for more than one second turns on the camera. (The camera starts up in Playback Mode.) When the camera is turned on...
... When the camera power is off, pressing the Playback button for RAW is inserted, it plays back from playback mode to Shooting Mode. In this case, the mark standing for more than one second turns on the camera. (The camera starts up in Playback Mode.) When the camera is turned on...

User Guide
Page 89
...ADJ. Press the !" When using the Shooting Setting menu, see "Using the Shooting Setting Menu" ( P.68). 1. Press the M/O button. In that case, the [!AE] symbol will turn the mode dial to 5, P or A. 2. To change the exposure, you can be dark (under- Set the ... a spotlight. Exposure can shoot with the ADJ. Set the exposure level lower (-). This section explains easy ways with correct exposure. In this case, set values. Note • This function cannot be displayed. 87 A Variety of Shooting Techniques/Playback Changing the Exposure (EXPOSURE COMP.) The...
...ADJ. Press the !" When using the Shooting Setting menu, see "Using the Shooting Setting Menu" ( P.68). 1. Press the M/O button. In that case, the [!AE] symbol will turn the mode dial to 5, P or A. 2. To change the exposure, you can be dark (under- Set the ... a spotlight. Exposure can shoot with the ADJ. Set the exposure level lower (-). This section explains easy ways with correct exposure. In this case, set values. Note • This function cannot be displayed. 87 A Variety of Shooting Techniques/Playback Changing the Exposure (EXPOSURE COMP.) The...

User Guide
Page 92
mode. 3. Press the #$ buttons until you change it. Press the !" button. In this case, add something white as the subject. The camera enters the ADJ. Press the !" Press the M/O button. Note In Auto Mode, white balance may not be ... turn the mode dial to Auto Mode for shooting until the White Balance menu appears. 5. Turn the ADJ. The Detail Setting menu appears. 6. In this case, switch to 5, P, A or M. 2. dial. 4. Make sure the camera power is completed and the LCD monitor displays a marking. This setting will be used for shooting with...
mode. 3. Press the #$ buttons until you change it. Press the !" button. In this case, add something white as the subject. The camera enters the ADJ. Press the !" Press the M/O button. Note In Auto Mode, white balance may not be ... turn the mode dial to Auto Mode for shooting until the White Balance menu appears. 5. Turn the ADJ. The Detail Setting menu appears. 6. In this case, switch to 5, P, A or M. 2. dial. 4. Make sure the camera power is completed and the LCD monitor displays a marking. This setting will be used for shooting with...

User Guide
Page 97
.... 2 The Self Timer mark appears. Using the Self-Timer You can set to the right of the symbol indicates the number of seconds. In this case, if you press the shutter button, the camera will shoot after either two or ten seconds. Press the shutter release button. Make sure the camera...
.... 2 The Self Timer mark appears. Using the Self-Timer You can set to the right of the symbol indicates the number of seconds. In this case, if you press the shutter button, the camera will shoot after either two or ten seconds. Press the shutter release button. Make sure the camera...
User Guide
Page 135
In this case, move image data 3 from the SD memory card to the built-in memory of the computer or a storage medium, and then format the SD memory ... SETTING] in the destination folder, the file is renamed before saving to avoid overwrite problems. • When an image has been transferred to a computer using RICOH Gate La (P.161), designating a file name same as a file named "RIMG****.jpg" (**** indicates the number of the image) even if [SEQUENTIAL NO] is set to...
In this case, move image data 3 from the SD memory card to the built-in memory of the computer or a storage medium, and then format the SD memory ... SETTING] in the destination folder, the file is renamed before saving to avoid overwrite problems. • When an image has been transferred to a computer using RICOH Gate La (P.161), designating a file name same as a file named "RIMG****.jpg" (**** indicates the number of the image) even if [SEQUENTIAL NO] is set to...

User Guide
Page 171
... required one , camera connection to uninstall the software. • If any other program is finished, close the displayed window. 169 Select the [Don't display this case, uninstall both the ImageMixer and the DeskTopBinder Lite and then uninstall either one . 1. Click [Start] on the Windows task bar. 2.
... required one , camera connection to uninstall the software. • If any other program is finished, close the displayed window. 169 Select the [Don't display this case, uninstall both the ImageMixer and the DeskTopBinder Lite and then uninstall either one . 1. Click [Start] on the Windows task bar. 2.
User Guide
Page 200
... taking pictures or loss of a camera malfunction, contact the dealer from which describes the defective part and the problem as precisely as the case and strap, nor does it may not be repairable, and restoration to its original condition may be repaired free of the above provisions refer...such as possible. • Remove all repair fees, including those incurred at weddings, on hand. • This warranty does not apply to the Ricoh service office. 2. Please note that if the camera is seriously damaged by a limited warranty. exposure to repairs offered free of charge, and do ...
... taking pictures or loss of a camera malfunction, contact the dealer from which describes the defective part and the problem as precisely as the case and strap, nor does it may not be repairable, and restoration to its original condition may be repaired free of the above provisions refer...such as possible. • Remove all repair fees, including those incurred at weddings, on hand. • This warranty does not apply to the Ricoh service office. 2. Please note that if the camera is seriously damaged by a limited warranty. exposure to repairs offered free of charge, and do ...