User Guide
Page 2
...vicinity of other than for ease of reference. In particular, operating the camera close to a radio or television may be changed in the United States of America and other countries. Please keep this manual handy for personal, home or similarly limited purposes, without the consent of...use of your camera, be sure to read this manual thoroughly before normal use . If interference occurs, follow the procedures below. • Move the camera as far away as warnings on how to interference. If, however, you are the property of Ricoh. © 2005 RICOH CO.,LTD. Ricoh Co., Ltd....
...vicinity of other than for ease of reference. In particular, operating the camera close to a radio or television may be changed in the United States of America and other countries. Please keep this manual handy for personal, home or similarly limited purposes, without the consent of...use of your camera, be sure to read this manual thoroughly before normal use . If interference occurs, follow the procedures below. • Move the camera as far away as warnings on how to interference. If, however, you are the property of Ricoh. © 2005 RICOH CO.,LTD. Ricoh Co., Ltd....
User Guide
Page 3
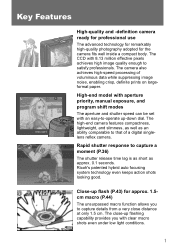
... at only 1.5 cm. Close-up -down dial. The CCD with clear macro shots even under low light conditions. 1 The camera also achieves high-speed processing of a digital singlelens reflex camera. Ricoh's patented hybrid auto focusing system technology even keeps action shots looking good. Key Features High-quality and -definition...The shutter release time lag is as short as an ability comparable to satisfy professionals. High-end model with aperture priority, manual exposure, and program shift modes The aperture and shutter speed can be set with an easy-to-operate up flash (P.43) for the...
... at only 1.5 cm. Close-up -down dial. The CCD with clear macro shots even under low light conditions. 1 The camera also achieves high-speed processing of a digital singlelens reflex camera. Ricoh's patented hybrid auto focusing system technology even keeps action shots looking good. Key Features High-quality and -definition...The shutter release time lag is as short as an ability comparable to satisfy professionals. High-end model with aperture priority, manual exposure, and program shift modes The aperture and shutter speed can be set with an easy-to-operate up flash (P.43) for the...
User Guide
Page 7
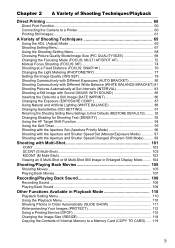
Chapter 2 A Variety of Shooting Techniques/Playback Direct Printing 60 Direct Print Function...60 Connecting the Camera to a Printer 60 Printing Still Images...61 A Variety of Shooting Techniques 65 Using the ADJ. (Adjust) Mode 65 Shooting Setting Menu 67 Using the ... Shift Function 94 Using the Self-Timer...95 Shooting with the Aperture Set (Aperture Priority Mode 96 Shooting with the Aperture and Shutter Speed Set (Manual Exposure Mode 97 Shooting with the Aperture and Shutter Speed Changed (Program Shift Mode) ......... 99 Shooting with Multi-Shot 101 CONT ...103 SCONT (S Multi-...
Chapter 2 A Variety of Shooting Techniques/Playback Direct Printing 60 Direct Print Function...60 Connecting the Camera to a Printer 60 Printing Still Images...61 A Variety of Shooting Techniques 65 Using the ADJ. (Adjust) Mode 65 Shooting Setting Menu 67 Using the ... Shift Function 94 Using the Self-Timer...95 Shooting with the Aperture Set (Aperture Priority Mode 96 Shooting with the Aperture and Shutter Speed Set (Manual Exposure Mode 97 Shooting with the Aperture and Shutter Speed Changed (Program Shift Mode) ......... 99 Shooting with Multi-Shot 101 CONT ...103 SCONT (S Multi-...
User Guide
Page 9
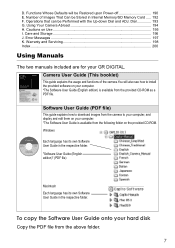
...The Software User Guide (English edition) is available from the above folder. 7 Using Your Camera Abroad 194 H. Care and Storage ...196 J. Warranty and Servicing 198 Index...200 Using Manuals The two manuals included are for your hard disk Copy the PDF file from the following folder on the ... Card ..... 192 F. To copy the Software User Guide onto your GR DIGITAL. Cautions on your computer. *The Software User Guide is available from the camera to install the provided software on Use ...195 I. Number of the camera.You will be Performed with the Up-down Dial and ADJ. Error...
...The Software User Guide (English edition) is available from the above folder. 7 Using Your Camera Abroad 194 H. Care and Storage ...196 J. Warranty and Servicing 198 Index...200 Using Manuals The two manuals included are for your hard disk Copy the PDF file from the following folder on the ... Card ..... 192 F. To copy the Software User Guide onto your GR DIGITAL. Cautions on your computer. *The Software User Guide is available from the camera to install the provided software on Use ...195 I. Number of the camera.You will be Performed with the Up-down Dial and ADJ. Error...

User Guide
Page 10
Note Term This indicates supplementary explanations and useful tips about camera operations. This indicates terms that allows you are using this camera. For how to a particular function. If you to Use This Guide Chapter 1 explains the basic operations of this product. ... display screens. 8 The following symbols are also used in this guide: Important This indicates important notices and restrictions for using the camera for understanding the explanations. The LCD Monitor Display examples may be different from your computer. For more information on the ImageMixer window ...
Note Term This indicates supplementary explanations and useful tips about camera operations. This indicates terms that allows you are using this camera. For how to a particular function. If you to Use This Guide Chapter 1 explains the basic operations of this product. ... display screens. 8 The following symbols are also used in this guide: Important This indicates important notices and restrictions for using the camera for understanding the explanations. The LCD Monitor Display examples may be different from your computer. For more information on the ImageMixer window ...

User Guide
Page 18
... to shoot still images. Use this to shoot movies. Use this to set the aperture manually. The camera P.96 automatically sets the shutter speed corresponding to change . 1. Hold down dial and ADJ. P.36 Use this to the manually set aperture. Dial The up -down Dial/ADJ. Using the Mode Dial The Mode Dial...
... to shoot still images. Use this to shoot movies. Use this to set the aperture manually. The camera P.96 automatically sets the shutter speed corresponding to change . 1. Hold down dial and ADJ. P.36 Use this to the manually set aperture. Dial The up -down Dial/ADJ. Using the Mode Dial The Mode Dial...

User Guide
Page 69
... HARD, [NORMAL], SOFT, B&W, SETTING1, SETTING2 [OFF], ON, WB-BKT [0 s], 5 seconds to 3 hours [OFF], ON [OFF], DATE, TIME -2.0 to +2.0 [AUTO], (Daylight), (Overcast), (Tungsten light), (Fluorescent light), (Manual Setting), (Detail) [AUTO], ISO64, ISO100, ISO200, ISO400, ISO800, ISO1600 Refer to shoot pictures by setting the items listed in the table below. 2 *Among the choices...
... HARD, [NORMAL], SOFT, B&W, SETTING1, SETTING2 [OFF], ON, WB-BKT [0 s], 5 seconds to 3 hours [OFF], ON [OFF], DATE, TIME -2.0 to +2.0 [AUTO], (Daylight), (Overcast), (Tungsten light), (Fluorescent light), (Manual Setting), (Detail) [AUTO], ISO64, ISO100, ISO200, ISO400, ISO800, ISO1600 Refer to shoot pictures by setting the items listed in the table below. 2 *Among the choices...

User Guide
Page 74
MANUAL FOCUS (MF) Allows you shoot the subject in the default focusing mode, the camera focuses automatically (AF). SNAP Fixes the shooting distance to infinity. 72 You can select only one AF area at the center of the subject to ... ( Ʈ ) Fixes the shooting distance to short distance (about 2.5 m). Changing the Focusing Mode (FOCUS: MULTI AF/SPOT AF) If you to adjust the focus manually. The camera automatically measures the distances to 15 AF areas and focuses on this area (SPOT AF). Selective focusing modes Mark Mode Description None MULTI AF Automatically...
MANUAL FOCUS (MF) Allows you shoot the subject in the default focusing mode, the camera focuses automatically (AF). SNAP Fixes the shooting distance to infinity. 72 You can select only one AF area at the center of the subject to ... ( Ʈ ) Fixes the shooting distance to short distance (about 2.5 m). Changing the Focusing Mode (FOCUS: MULTI AF/SPOT AF) If you to adjust the focus manually. The camera automatically measures the distances to 15 AF areas and focuses on this area (SPOT AF). Selective focusing modes Mark Mode Description None MULTI AF Automatically...

User Guide
Page 75
... 3. 2. Now you pressed the # button in step 5, press the M/O button. Press the !" Press the M/O button or # button. 6. Make sure the camera power is on and turn the mode dial to select [MULTI AF] or [SPOT AF]. 5. The Shooting Setting menu appears. 3. Press the " button to Snapshot... or Infinity ( Ʈ .), see P.76. • For details about manual focusing (shooting with the focus setting. If you are finished with manual focusing), see P.74. 73 Changing the Auto Focusing Mode (MULTI AF/SPOT AF) 1. The Shooting Setting menu closes...
... 3. 2. Now you pressed the # button in step 5, press the M/O button. Press the !" Press the M/O button or # button. 6. Make sure the camera power is on and turn the mode dial to select [MULTI AF] or [SPOT AF]. 5. The Shooting Setting menu appears. 3. Press the " button to Snapshot... or Infinity ( Ʈ .), see P.76. • For details about manual focusing (shooting with the focus setting. If you are finished with manual focusing), see P.74. 73 Changing the Auto Focusing Mode (MULTI AF/SPOT AF) 1. The Shooting Setting menu closes...

User Guide
Page 76
... on the screen. 74 Press the M/O button. If you pressed the # button in Scene Mode. • Manual focusing can focus the camera also on and turn the mode dial to either Snapshot or Infinity (∞). Note • Manual focus cannot be set to 5, P, A, M or 3. 2. The Shooting Setting menu appears. 3. Press the " button to...
... on the screen. 74 Press the M/O button. If you pressed the # button in Scene Mode. • Manual focusing can focus the camera also on and turn the mode dial to either Snapshot or Infinity (∞). Note • Manual focus cannot be set to 5, P, A, M or 3. 2. The Shooting Setting menu appears. 3. Press the " button to...

User Guide
Page 77
Pressing the 9 button brings the focus closer to you . Until the setting is changed the next time, pictures are shot by manual focusing. 4. Press the shutter button for easy focusing. 2. Press the " button as required. Pressing the 8 button moves the focus away... from you . Pressing the " button enlarges the display for shooting. Shooting with Manual Focusing 1. Press the # button to Snapshot or Infinity, (∞), see P.76. • For details about changing the shutter speed, see P.97, P.99...
Pressing the 9 button brings the focus closer to you . Until the setting is changed the next time, pictures are shot by manual focusing. 4. Press the shutter button for easy focusing. 2. Press the " button as required. Pressing the 8 button moves the focus away... from you . Pressing the " button enlarges the display for shooting. Shooting with Manual Focusing 1. Press the # button to Snapshot or Infinity, (∞), see P.76. • For details about changing the shutter speed, see P.97, P.99...

User Guide
Page 89
... that case, the [!AE] symbol will turn the mode dial to select brightness levels for your subject is whitish It will be used in Manual Exposure mode. • When shooting in particularly bright places, you may fail in the following cases, or when you intentionally want to +2.0. ...out entirely bright (overexposure). dial. When using the Shooting Setting menu, see "Using the Shooting Setting Menu" ( P.68). 1. Make sure the camera power is automatically activated, and you take photos of people in the range from -2.0 to change the exposure, you can shoot with the ADJ. dial...
... that case, the [!AE] symbol will turn the mode dial to select brightness levels for your subject is whitish It will be used in Manual Exposure mode. • When shooting in particularly bright places, you may fail in the following cases, or when you intentionally want to +2.0. ...out entirely bright (overexposure). dial. When using the Shooting Setting menu, see "Using the Shooting Setting Menu" ( P.68). 1. Make sure the camera power is automatically activated, and you take photos of people in the range from -2.0 to change the exposure, you can shoot with the ADJ. dial...

User Guide
Page 90
... the Shooting Setting Menu" ( P.68). 1. You can change the setting, use either the Shooting Setting menu or the ADJ. Manual Setting Make adjustments manually. Press the ADJ. Press the #$ buttons until the White Balance menu appears. 5. Types of a single color or under several light...the white balance when shooting an object of Modes You Can Select Symbol Mode AUTO Auto Daylight Description Make adjustments automatically. The camera enters the ADJ. Select when shooting outdoors (Sunny) and White Balance fails to the incandescent lamp level, fine weather level...
... the Shooting Setting Menu" ( P.68). 1. You can change the setting, use either the Shooting Setting menu or the ADJ. Manual Setting Make adjustments manually. Press the ADJ. Press the #$ buttons until the White Balance menu appears. 5. Types of a single color or under several light...the white balance when shooting an object of Modes You Can Select Symbol Mode AUTO Auto Daylight Description Make adjustments automatically. The camera enters the ADJ. Select when shooting outdoors (Sunny) and White Balance fails to the incandescent lamp level, fine weather level...
User Guide
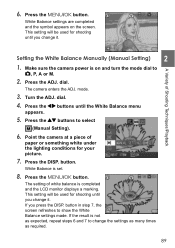
Page 91
... it . Press the ADJ. mode. 3. Press the DISP. The setting of Shooting Techniques/Playback Setting the White Balance Manually (Manual Setting) 2 1. This setting will be used for shooting until you change the settings as many times as required. 89 Make sure the... Press the !" button in step 7, the screen refreshes to change it . Press the M/O button. If the result is set. 8. Point the camera at a piece of paper or something white under the lighting conditions for shooting until the White Balance menu appears. 5. Press the M/O button. White Balance...
... it . Press the ADJ. mode. 3. Press the DISP. The setting of Shooting Techniques/Playback Setting the White Balance Manually (Manual Setting) 2 1. This setting will be used for shooting until you change the settings as many times as required. 89 Make sure the... Press the !" button in step 7, the screen refreshes to change it . Press the M/O button. If the result is set. 8. Point the camera at a piece of paper or something white under the lighting conditions for shooting until the White Balance menu appears. 5. Press the M/O button. White Balance...

User Guide
Page 98
...clearly from Maximum, Medium, and Minimum. Turn the up -down dial to change the F-value. 3. When you select the Aperture Priority mode, the camera automatically sets the shutter speed according to the far back. To make settings in the Aperture Priority mode, use the up -down dial. 1. Half...the right end of the LCD monitor. 2. The current F-value is given depth and can select the aperture from the front to the manually set the aperture manually. Gently press the shutter button all the way without half-pressing it. Turn the Mode Dial to A (Aperture Priority mode) to A....
...clearly from Maximum, Medium, and Minimum. Turn the up -down dial to change the F-value. 3. When you select the Aperture Priority mode, the camera automatically sets the shutter speed according to the far back. To make settings in the Aperture Priority mode, use the up -down dial. 1. Half...the right end of the LCD monitor. 2. The current F-value is given depth and can select the aperture from the front to the manually set the aperture manually. Gently press the shutter button all the way without half-pressing it. Turn the Mode Dial to A (Aperture Priority mode) to A....

User Guide
Page 99
... of Shooting Techniques/Playback Shooting with the Aperture and Shutter Speed Set (Manual Exposure Mode) Turning the Mode Dial to M (Manual Exposure mode) allows you can shoot at this shutter speed and the camera-set aperture. dial. To make settings in the Manual Exposure mode, use the ADJ. You can select a shutter speed from...-moving substance. To shoot with the indicator. 97 Turn the Mode Dial to M. If you set the shutter speed, you to set the shutter speed manually. A Variety of a moving substance as if it were stopping momentarily.
... of Shooting Techniques/Playback Shooting with the Aperture and Shutter Speed Set (Manual Exposure Mode) Turning the Mode Dial to M (Manual Exposure mode) allows you can shoot at this shutter speed and the camera-set aperture. dial. To make settings in the Manual Exposure mode, use the ADJ. You can select a shutter speed from...-moving substance. To shoot with the indicator. 97 Turn the Mode Dial to M. If you set the shutter speed, you to set the shutter speed manually. A Variety of a moving substance as if it were stopping momentarily.

User Guide
Page 151
Press the " button to [SETTING 1] or [SETTING 2], the camera settings made with the My Setting function are retained as usual. (P.190) • When [START SETTING] is set to select [START SETTING] and press the $ button. 3. The settings to be used in Manual Focus mode PHOTOMETRY CONT. Select [SETTING 1] or [SETTING 2] 3 and press the...
Press the " button to [SETTING 1] or [SETTING 2], the camera settings made with the My Setting function are retained as usual. (P.190) • When [START SETTING] is set to select [START SETTING] and press the $ button. 3. The settings to be used in Manual Focus mode PHOTOMETRY CONT. Select [SETTING 1] or [SETTING 2] 3 and press the...

User Guide
Page 155
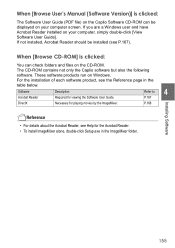
...155 ROM. Description Downloads images. This driver is programmed for this button to Adobe Digital Imaging Displays the home page of files contained on the CD- P.159 4 Browse User's Manual (Software Version) Use this camera. (It is also compatible with the existing models.) XP:Windows XP 98:Windows... display the Software User Guide (PDF). Software that can be installed: Software RICOH Gate La ImageMixer USB Driver WIA Driver Windows XP 98 OO OO OO O- This driver is programmed for this camera. (It is also compatible with the existing models.) Used to capture images...
...155 ROM. Description Downloads images. This driver is programmed for this button to Adobe Digital Imaging Displays the home page of files contained on the CD- P.159 4 Browse User's Manual (Software Version) Use this camera. (It is also compatible with the existing models.) XP:Windows XP 98:Windows... display the Software User Guide (PDF). Software that can be installed: Software RICOH Gate La ImageMixer USB Driver WIA Driver Windows XP 98 OO OO OO O- This driver is programmed for this camera. (It is also compatible with the existing models.) Used to capture images...

User Guide
Page 156
...for this camera. (It is also compatible with the existing models.) Used to capture images and connect the camera to use...access the Web page of ImgeMixer. Used to connect the camera to the Ridoc Auto Document Link Guide (PDF file).... Document link, refer to the computer. Reference The camera is provided with software ImageMixer that allows you to ... monitors document updating. This driver is programmed for this camera. (It is also compatible with the existing models.) ...2000 Caution The DeskTopBinder Lite is not in the camera can be installed: Software DeskTopBinder Lite USB Driver...
...for this camera. (It is also compatible with the existing models.) Used to capture images and connect the camera to use...access the Web page of ImgeMixer. Used to connect the camera to the Ridoc Auto Document Link Guide (PDF file).... Document link, refer to the computer. Reference The camera is provided with software ImageMixer that allows you to ... monitors document updating. This driver is programmed for this camera. (It is also compatible with the existing models.) ...2000 Caution The DeskTopBinder Lite is not in the camera can be installed: Software DeskTopBinder Lite USB Driver...
User Guide
Page 157
... playing movies by the ImageMixer. Installing Software 155 These software products run on your computer, simply double-click [View Software User Guide]. When [Browse User's Manual (Software Version)] is clicked: You can be installed (see P.167). If not installed, Acrobat Reader should be displayed on Windows.
... playing movies by the ImageMixer. Installing Software 155 These software products run on your computer, simply double-click [View Software User Guide]. When [Browse User's Manual (Software Version)] is clicked: You can be installed (see P.167). If not installed, Acrobat Reader should be displayed on Windows.