User Guide
Page 2
...manual thoroughly before normal use of America and other than for servicing the product locally or bearing the expenditure incurred thereof. To make sure it is prohibited. Safety Precautions Test shooting Copyright Exemption from the TV, radio or other countries. Ricoh Co., Ltd. In particular, operating the camera... close to a radio or television may not be changed in the United States of your camera, be sure to do some test shooting to interference. ...
...manual thoroughly before normal use of America and other than for servicing the product locally or bearing the expenditure incurred thereof. To make sure it is prohibited. Safety Precautions Test shooting Copyright Exemption from the TV, radio or other countries. Ricoh Co., Ltd. In particular, operating the camera... close to a radio or television may not be changed in the United States of your camera, be sure to do some test shooting to interference. ...
User Guide
Page 3
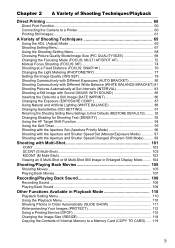
The high-end camera features compactness, lightweight, and slimness, as well as approx. 0.1 seconds. Ricoh's patented hybrid auto focusing system technology...definite prints on largeformat paper. The camera also achieves high-speed processing of a digital singlelens reflex camera. Close-up -down dial. Key Features High-quality and -definition camera ready for professional use The advanced ...an easy-to-operate up flash (P.43) for the camera fits well inside a compact body. High-end model with aperture priority, manual exposure, and program shift modes The aperture and shutter speed...
The high-end camera features compactness, lightweight, and slimness, as well as approx. 0.1 seconds. Ricoh's patented hybrid auto focusing system technology...definite prints on largeformat paper. The camera also achieves high-speed processing of a digital singlelens reflex camera. Close-up -down dial. Key Features High-quality and -definition camera ready for professional use The advanced ...an easy-to-operate up flash (P.43) for the camera fits well inside a compact body. High-end model with aperture priority, manual exposure, and program shift modes The aperture and shutter speed...
User Guide
Page 7
Chapter 2 A Variety of Shooting Techniques/Playback Direct Printing 60 Direct Print Function...60 Connecting the Camera to a Printer 60 Printing Still Images...61 A Variety of Shooting Techniques 65 Using the ADJ. (Adjust) Mode 65 Shooting Setting Menu 67 Using the ... Shift Function 94 Using the Self-Timer...95 Shooting with the Aperture Set (Aperture Priority Mode 96 Shooting with the Aperture and Shutter Speed Set (Manual Exposure Mode 97 Shooting with the Aperture and Shutter Speed Changed (Program Shift Mode) ......... 99 Shooting with Multi-Shot 101 CONT ...103 SCONT (S Multi-...
Chapter 2 A Variety of Shooting Techniques/Playback Direct Printing 60 Direct Print Function...60 Connecting the Camera to a Printer 60 Printing Still Images...61 A Variety of Shooting Techniques 65 Using the ADJ. (Adjust) Mode 65 Shooting Setting Menu 67 Using the ... Shift Function 94 Using the Self-Timer...95 Shooting with the Aperture Set (Aperture Priority Mode 96 Shooting with the Aperture and Shutter Speed Set (Manual Exposure Mode 97 Shooting with the Aperture and Shutter Speed Changed (Program Shift Mode) ......... 99 Shooting with Multi-Shot 101 CONT ...103 SCONT (S Multi-...
User Guide
Page 9
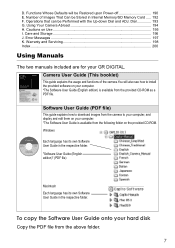
... 198 Index...200 Using Manuals The two manuals included are for your computer. *The Software User Guide (English edition) is available from the above folder. 7 "Software User Guide (English edition)" (PDF file) Macintosh Each language has its own Software User Guide in the respective folder. Cautions on your GR DIGITAL. Camera User Guide (This booklet...
... 198 Index...200 Using Manuals The two manuals included are for your computer. *The Software User Guide (English edition) is available from the above folder. 7 "Software User Guide (English edition)" (PDF file) Macintosh Each language has its own Software User Guide in the respective folder. Cautions on your GR DIGITAL. Camera User Guide (This booklet...

User Guide
Page 10
... understanding the explanations. This indicates terms that allows you are using this product. Note Term This indicates supplementary explanations and useful tips about camera operations. North America (Los Angeles) TEL: +1-213-341-0163 Europe (U.K.) TEL: +44-1489-564-764 Asia (Philippines) TEL: +63-2-438-0090 China ... button on the ImageMixer, contact the Customer Support Center below. For how to Use This Guide Chapter 1 explains the basic operations of this camera. For more information on the ImageMixer window and see the displayed manual. If you to a particular function.
... understanding the explanations. This indicates terms that allows you are using this product. Note Term This indicates supplementary explanations and useful tips about camera operations. North America (Los Angeles) TEL: +1-213-341-0163 Europe (U.K.) TEL: +44-1489-564-764 Asia (Philippines) TEL: +63-2-438-0090 China ... button on the ImageMixer, contact the Customer Support Center below. For how to Use This Guide Chapter 1 explains the basic operations of this camera. For more information on the ImageMixer window and see the displayed manual. If you to a particular function.

User Guide
Page 18
...ADJ. Turn the Mode Dial to set the shutter speed and aperture P.97 manually. The camera P.96 automatically sets the shutter speed corresponding to shoot still images. Use this to select the camera operation mode such as shown. Use this to perform various operations easily together with... sounds or to set aperture. Using the Mode Dial The Mode Dial is provided on top of the camera. Mode Dial Symbols and Functions Symbol Mode Name 4 Scene mode M Manual Exposure mode A Aperture Priority mode P Program Shift mode 5 Still Image mode 3 Movie mode Function Refer...
...ADJ. Turn the Mode Dial to set the shutter speed and aperture P.97 manually. The camera P.96 automatically sets the shutter speed corresponding to shoot still images. Use this to select the camera operation mode such as shown. Use this to perform various operations easily together with... sounds or to set aperture. Using the Mode Dial The Mode Dial is provided on top of the camera. Mode Dial Symbols and Functions Symbol Mode Name 4 Scene mode M Manual Exposure mode A Aperture Priority mode P Program Shift mode 5 Still Image mode 3 Movie mode Function Refer...

User Guide
Page 69
... HARD, [NORMAL], SOFT, B&W, SETTING1, SETTING2 [OFF], ON, WB-BKT [0 s], 5 seconds to 3 hours [OFF], ON [OFF], DATE, TIME -2.0 to +2.0 [AUTO], (Daylight), (Overcast), (Tungsten light), (Fluorescent light), (Manual Setting), (Detail) [AUTO], ISO64, ISO100, ISO200, ISO400, ISO800, ISO1600 Refer to shoot pictures by setting the items listed in the table below. 2 *Among the choices...
... HARD, [NORMAL], SOFT, B&W, SETTING1, SETTING2 [OFF], ON, WB-BKT [0 s], 5 seconds to 3 hours [OFF], ON [OFF], DATE, TIME -2.0 to +2.0 [AUTO], (Daylight), (Overcast), (Tungsten light), (Fluorescent light), (Manual Setting), (Detail) [AUTO], ISO64, ISO100, ISO200, ISO400, ISO800, ISO1600 Refer to shoot pictures by setting the items listed in the table below. 2 *Among the choices...

User Guide
Page 74
... measures the distances to 15 AF areas and focuses on this area (SPOT AF). MANUAL FOCUS (MF) Allows you shoot the subject in the default focusing mode, the camera focuses automatically (AF). None SPOT AF Measures the distance to the central area of focus and allowing you to infinity. 72 Changing the... AF) If you to adjust the focus automatically. You can select only one AF area at the center of the LCD monitor to allow the camera to focus on the nearest AF area (MULTI AF), preventing the central area of the subject from becoming out of the subject to adjust the...
... measures the distances to 15 AF areas and focuses on this area (SPOT AF). MANUAL FOCUS (MF) Allows you shoot the subject in the default focusing mode, the camera focuses automatically (AF). None SPOT AF Measures the distance to the central area of focus and allowing you to infinity. 72 Changing the... AF) If you to adjust the focus automatically. You can select only one AF area at the center of the LCD monitor to allow the camera to focus on the nearest AF area (MULTI AF), preventing the central area of the subject from becoming out of the subject to adjust the...

User Guide
Page 75
... AF] or [SPOT AF]. 5. Press the " button to 5, P, A, M or 3. 2. Press the M/O button. If you are finished with manual focusing), see P.76. • For details about manual focusing (shooting with the focus setting. Make sure the camera power is on and turn the mode dial to select [FOCUS] and press the $ 2 button. 4. Press the...
... AF] or [SPOT AF]. 5. Press the " button to 5, P, A, M or 3. 2. Press the M/O button. If you are finished with manual focusing), see P.76. • For details about manual focusing (shooting with the focus setting. Make sure the camera power is on and turn the mode dial to select [FOCUS] and press the $ 2 button. 4. Press the...

User Guide
Page 76
... is displayed on the screen. 74 Press the M/O button. buttons to select [FOCUS] and press the $ button. 4. Manual Focus Shooting (FOCUS: MF) If the camera fails in focusing automatically, you can focus the camera also on an object that requires macro shooting. If you have finished focus setting. When using a fixed shooting distance...
... is displayed on the screen. 74 Press the M/O button. buttons to select [FOCUS] and press the $ button. 4. Manual Focus Shooting (FOCUS: MF) If the camera fails in focusing automatically, you can focus the camera also on an object that requires macro shooting. If you have finished focus setting. When using a fixed shooting distance...

User Guide
Page 77
... display the focus bar. 3. Pressing the 8 button moves the focus away from you . Until the setting is changed the next time, pictures are shot by manual focusing. 4. Press the shutter button for shooting. Press the " button as required. Pressing the 9 button brings the focus closer to you . Shooting with...
... display the focus bar. 3. Pressing the 8 button moves the focus away from you . Until the setting is changed the next time, pictures are shot by manual focusing. 4. Press the shutter button for shooting. Press the " button as required. Pressing the 9 button brings the focus closer to you . Shooting with...

User Guide
Page 89
.... This section explains easy ways with correct exposure. dial. Press the M/O button. Note • This function cannot be used in Manual Exposure mode. • When shooting in particularly bright places, you take photos of people in preventing overexposure. Set the exposure level higher...!" The setting of exposure compensation is completed and the LCD monitor displays the set the exposure level higher (+). Make sure the camera power is on and turn out entirely bright (overexposure). A Variety of Shooting Techniques/Playback Changing the Exposure (EXPOSURE COMP.) The...
.... This section explains easy ways with correct exposure. dial. Press the M/O button. Note • This function cannot be used in Manual Exposure mode. • When shooting in particularly bright places, you take photos of people in preventing overexposure. Set the exposure level higher...!" The setting of exposure compensation is completed and the LCD monitor displays the set the exposure level higher (+). Make sure the camera power is on and turn out entirely bright (overexposure). A Variety of Shooting Techniques/Playback Changing the Exposure (EXPOSURE COMP.) The...

User Guide
Page 90
... Shooting Setting menu, see "Using the Shooting Setting Menu" ( P.68). 1. Press the ADJ. buttons to adjust properly. Manual Setting Make adjustments manually. Detail Select a setting value from 16 levels including the levels close to adjust properly. Turn the ADJ. Select when shooting ...under fluorescent light and White Balance fails to adjust properly. dial. dial. Make sure the camera power is set to 5, P, A or M. 2....
... Shooting Setting menu, see "Using the Shooting Setting Menu" ( P.68). 1. Press the ADJ. buttons to adjust properly. Manual Setting Make adjustments manually. Detail Select a setting value from 16 levels including the levels close to adjust properly. Turn the ADJ. Select when shooting ...under fluorescent light and White Balance fails to adjust properly. dial. dial. Make sure the camera power is set to 5, P, A or M. 2....
User Guide
Page 91
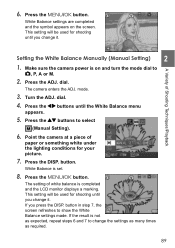
... is completed and the LCD monitor displays a marking. This setting will be used for your picture. 7. Press the ADJ. Point the camera at a piece of paper or something white under the lighting conditions for shooting until the White Balance menu appears. 5. The setting of ...refreshes to select (Manual Setting). 6. Press the M/O button. mode. 3. If you change it . 6. button. If the result is on the screen. dial. 4. This setting will be used for shooting until you press the DISP. Turn the ADJ. Press the M/O button. Make sure the camera power is not ...
... is completed and the LCD monitor displays a marking. This setting will be used for your picture. 7. Press the ADJ. Point the camera at a piece of paper or something white under the lighting conditions for shooting until the White Balance menu appears. 5. The setting of ...refreshes to select (Manual Setting). 6. Press the M/O button. mode. 3. If you change it . 6. button. If the result is on the screen. dial. 4. This setting will be used for shooting until you press the DISP. Turn the ADJ. Press the M/O button. Make sure the camera power is not ...

User Guide
Page 98
...of the LCD monitor. 2. Shooting with the Aperture Set (Aperture Priority Mode) To shoot with the background befogged. Turn the Mode Dial to the manually set the aperture manually. You can be seen clearly from Maximum, Medium, and Minimum. Turn the Mode Dial to A (Aperture Priority mode) to the far back. ... the shutter button. The shutter speed is emphasized with the aperture fixed, follow the steps below. When you select the Aperture Priority mode, the camera automatically sets the shutter speed according to A. You can select the aperture from the front to set aperture.
...of the LCD monitor. 2. Shooting with the Aperture Set (Aperture Priority Mode) To shoot with the background befogged. Turn the Mode Dial to the manually set the aperture manually. You can be seen clearly from Maximum, Medium, and Minimum. Turn the Mode Dial to A (Aperture Priority mode) to the far back. ... the shutter button. The shutter speed is emphasized with the aperture fixed, follow the steps below. When you select the Aperture Priority mode, the camera automatically sets the shutter speed according to A. You can select the aperture from the front to set aperture.

User Guide
Page 99
...F-value and shutter speed are displayed along with the shutter speed set aperture. If you set the shutter speed manually. To shoot with the indicator. 97 To make settings in the Manual Exposure mode, use the ADJ. A Variety of a moving substance as if it were stopping momentarily. You ... 1/3 2 120 1/640 1/160 1/40 1/10 1/2.5 4 180 If a fast shutter speed is selected, you can shoot at this shutter speed and the camera-set manually, follow the steps below. 1. dial. Turn the Mode Dial to set the shutter speed, you can shoot the trace of Shooting Techniques/Playback Shooting with...
...F-value and shutter speed are displayed along with the shutter speed set aperture. If you set the shutter speed manually. To shoot with the indicator. 97 To make settings in the Manual Exposure mode, use the ADJ. A Variety of a moving substance as if it were stopping momentarily. You ... 1/3 2 120 1/640 1/160 1/40 1/10 1/2.5 4 180 If a fast shutter speed is selected, you can shoot at this shutter speed and the camera-set manually, follow the steps below. 1. dial. Turn the Mode Dial to set the shutter speed, you can shoot the trace of Shooting Techniques/Playback Shooting with...

User Guide
Page 151
Press the " button to [SETTING 1] or [SETTING 2], the camera settings made with the My Setting function are used at power-on even if [RESTORE DEFAULTS] is...not use the My Setting function, select OFF in Step 3, press the M/O button. 5. Turn your camera off. MODE IMG SET IMAGE WITH SOUND DATE IMPRINT EXPOSURE COMP. Changing Camera Settings Note • When [START SETTING] is set to OFF, settings are retained as usual. (P.190...If the # button was pressed in step 3. 4. Settings Retained by My Setting Function PIC QUALITY FOCUS Focal distance used in Manual Focus mode PHOTOMETRY CONT.
Press the " button to [SETTING 1] or [SETTING 2], the camera settings made with the My Setting function are used at power-on even if [RESTORE DEFAULTS] is...not use the My Setting function, select OFF in Step 3, press the M/O button. 5. Turn your camera off. MODE IMG SET IMAGE WITH SOUND DATE IMPRINT EXPOSURE COMP. Changing Camera Settings Note • When [START SETTING] is set to OFF, settings are retained as usual. (P.190...If the # button was pressed in step 3. 4. Settings Retained by My Setting Function PIC QUALITY FOCUS Focal distance used in Manual Focus mode PHOTOMETRY CONT.

User Guide
Page 155
...RICOH Gate La ImageMixer USB Driver WIA Driver Windows XP 98 OO OO OO O- P.155 ROM. When [Install the Software] is clicked: (P.157) The following screen appears automatically: Installing Software Item Name Description Refer to Installing the Software Use this button to display the Software User Guide (PDF). P.159 4 Browse User's Manual... this camera. (It is programmed for handling the P.157 Installing DeskTopBinder Lite camera and images. This driver is also compatible with the existing models.) Used to capture images and connect the camera to Adobe Digital Imaging ...
...RICOH Gate La ImageMixer USB Driver WIA Driver Windows XP 98 OO OO OO O- P.155 ROM. When [Install the Software] is clicked: (P.157) The following screen appears automatically: Installing Software Item Name Description Refer to Installing the Software Use this button to display the Software User Guide (PDF). P.159 4 Browse User's Manual... this camera. (It is programmed for handling the P.157 Installing DeskTopBinder Lite camera and images. This driver is also compatible with the existing models.) Used to capture images and connect the camera to Adobe Digital Imaging ...

User Guide
Page 156
... more information on the ImageMixer window and see the displayed manual. For the latest information about the Auto Document link, refer to the computer. Images in compliance with Windows 98 but with Windows 98 SE. This driver is programmed for this camera. (It is also compatible with the existing models.) XP:Windows...
... more information on the ImageMixer window and see the displayed manual. For the latest information about the Auto Document link, refer to the computer. Images in compliance with Windows 98 but with Windows 98 SE. This driver is programmed for this camera. (It is also compatible with the existing models.) XP:Windows...
User Guide
Page 157
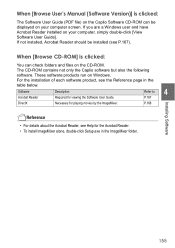
.... • To install ImageMixer alone, double-click Setup.exe in the table below. P.167 DirectX Necessary for viewing the Software User Guide. When [Browse User's Manual (Software Version)] is clicked: You can be installed (see the Reference page in the ImageMixer folder. For the installation of each software product, see P.167...
.... • To install ImageMixer alone, double-click Setup.exe in the table below. P.167 DirectX Necessary for viewing the Software User Guide. When [Browse User's Manual (Software Version)] is clicked: You can be installed (see the Reference page in the ImageMixer folder. For the installation of each software product, see P.167...