Product Guide
Page 7
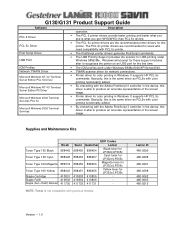
Supplies and Maintenance Kits Toner Type 160 Black Ricoh 888442 Toner Type 160 Cyan 888445 Toner Type 160 Magenta 885374 Toner Type 160 Yellow 888443 Staple Cartridge 410801 Staple Refill 410802 Staple (Set + Refill) ... LP332c/LP335c 888451 888455 Yellow toner for USB printing under Windows 98/Me/2000/XP/Server2003. • TWAIN scanner driver for network connections. • Printer driver for color printing in Windows. Lanier ID 480-0295 480-0298 480-0297 480-0298 480-0062 480-0063 480-0215 Version - 1.0 It supports HP PCL...
Supplies and Maintenance Kits Toner Type 160 Black Ricoh 888442 Toner Type 160 Cyan 888445 Toner Type 160 Magenta 885374 Toner Type 160 Yellow 888443 Staple Cartridge 410801 Staple Refill 410802 Staple (Set + Refill) ... LP332c/LP335c 888451 888455 Yellow toner for USB printing under Windows 98/Me/2000/XP/Server2003. • TWAIN scanner driver for network connections. • Printer driver for color printing in Windows. Lanier ID 480-0295 480-0298 480-0297 480-0298 480-0062 480-0063 480-0215 Version - 1.0 It supports HP PCL...
Product Guide
Page 8
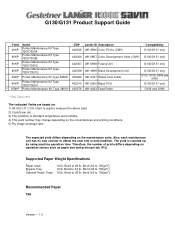
... Name EDP Lanier ID Description Compatibility 40KP Printer Maintenance Kit Type 7200/7300A 402305 481-0896 Color PCU's (CMY) G130/G131 only 80KP Printer Maintenance Kit Type 7200/7300B 402306 481-0897 Color Development Units (CMY) G130/G131 only * 80KP Printer Maintenance Kit Type 7200/7300C 402307 481-0898 Fusing Unit G130/G131 only 80KP Printer Maintenance Kit Type 7200/7300 D 402308 481-0899...
... Name EDP Lanier ID Description Compatibility 40KP Printer Maintenance Kit Type 7200/7300A 402305 481-0896 Color PCU's (CMY) G130/G131 only 80KP Printer Maintenance Kit Type 7200/7300B 402306 481-0897 Color Development Units (CMY) G130/G131 only * 80KP Printer Maintenance Kit Type 7200/7300C 402307 481-0898 Fusing Unit G130/G131 only 80KP Printer Maintenance Kit Type 7200/7300 D 402308 481-0899...
Product Guide
Page 9
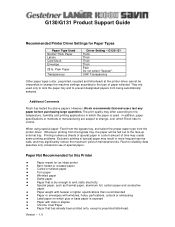
...according to the type of special paper. OHP Transparency Other paper types (color, preprinted, recycled and letterhead) at the printer driver cannot be fed out to prevent designated papers from the printer driver. The print quality may significantly reduce the maximum yield of manufacturing...the face-up external tray. Additional Comments Ricoh has tested the above papers. However, Ricoh recommends that is dry enough to change , over which Ricoh has no control. In addition, paper specifications or methods of maintenance kits. Whenever printing from the bypass tray, ...
...according to the type of special paper. OHP Transparency Other paper types (color, preprinted, recycled and letterhead) at the printer driver cannot be fed out to prevent designated papers from the printer driver. The print quality may significantly reduce the maximum yield of manufacturing...the face-up external tray. Additional Comments Ricoh has tested the above papers. However, Ricoh recommends that is dry enough to change , over which Ricoh has no control. In addition, paper specifications or methods of maintenance kits. Whenever printing from the bypass tray, ...

Product Guide
Page 13
...unit Black PCU Expected Yield (prints) 3P/J 40K Yield Target Number of Rotations Number of Prints 280k 40K Color PCU 40K 280k 40K Black Development 80K Color Development Unit 80k Fusing Unit 80k 860k 80K 870K 80k 8190k 80k The number of Prints (%) 1P/J 2P....2%) 40.5 (50.6%) 64.4 (80.5%) 3P/J 40 (100%) 40 (100%) 80 (100%) 80 (100%) 80 (100%) Version - 1.0 G130/G131 Maintenance Kit Black PCU Color PCU Black Development Color Development Unit Fusing Unit Number of rotation per page depends on the P/J. If the P/J is fed out regardless of the P/J condition.
...unit Black PCU Expected Yield (prints) 3P/J 40K Yield Target Number of Rotations Number of Prints 280k 40K Color PCU 40K 280k 40K Black Development 80K Color Development Unit 80k Fusing Unit 80k 860k 80K 870K 80k 8190k 80k The number of Prints (%) 1P/J 2P....2%) 40.5 (50.6%) 64.4 (80.5%) 3P/J 40 (100%) 40 (100%) 80 (100%) 80 (100%) 80 (100%) Version - 1.0 G130/G131 Maintenance Kit Black PCU Color PCU Black Development Color Development Unit Fusing Unit Number of rotation per page depends on the P/J. If the P/J is fed out regardless of the P/J condition.

Product Guide
Page 14
..., and 5% image coverage ratio). If making patterns in these modes (self-check, MUSIC, and idling), the yield counter (rotation counter) of maintenance kits counts up without making a service contract. As explained on the previous page, the yield of the PM parts depends on the number of rotations ...affects the unit yield. Version - 1.0 G130/G131 Product Support Guide The diagram on the below is a graph made from the data in the printer field.) The expected yield of all users, this may cause a reduction in profits depending on how a customer makes prints. Therefore, it is ...
..., and 5% image coverage ratio). If making patterns in these modes (self-check, MUSIC, and idling), the yield counter (rotation counter) of maintenance kits counts up without making a service contract. As explained on the previous page, the yield of the PM parts depends on the number of rotations ...affects the unit yield. Version - 1.0 G130/G131 Product Support Guide The diagram on the below is a graph made from the data in the printer field.) The expected yield of all users, this may cause a reduction in profits depending on how a customer makes prints. Therefore, it is ...

Product Guide
Page 15
... 30K 40K 80K 150K Remarks Black PCU Prints R Included in maintenance kit F Color (Y/M/C) PCU Prints R Included in maintenance kit A Black Development Unit Prints R Included in maintenance kit D Color (C/M/Y) Development Unit Prints R Included in maintenance kit B Fusing Unit Prints R Included in maintenance kit C Waste Toner Bottle Dust Filter Prints R R Included in maintenance kit E Included in maintenance kit D Punch Kit Chads Item 10K Prints I Remarks Discard chads NOTE: The...
... 30K 40K 80K 150K Remarks Black PCU Prints R Included in maintenance kit F Color (Y/M/C) PCU Prints R Included in maintenance kit A Black Development Unit Prints R Included in maintenance kit D Color (C/M/Y) Development Unit Prints R Included in maintenance kit B Fusing Unit Prints R Included in maintenance kit C Waste Toner Bottle Dust Filter Prints R R Included in maintenance kit E Included in maintenance kit D Punch Kit Chads Item 10K Prints I Remarks Discard chads NOTE: The...

Maintenance Manual
Page 1
... and Other Media 13 Paper not supported by this printer 17 Print Area ...18 Loading Paper ...20 Loading Paper in Tray 1/2 and the optional paper feed unit 20 Loading Paper in the Bypass Tray 28 Switching between Paper Trays 34 Replacing Consumables and Maintenance Kit Using the Screwdriver 36 Detaching and Reattaching the...
... and Other Media 13 Paper not supported by this printer 17 Print Area ...18 Loading Paper ...20 Loading Paper in Tray 1/2 and the optional paper feed unit 20 Loading Paper in the Bypass Tray 28 Switching between Paper Trays 34 Replacing Consumables and Maintenance Kit Using the Screwdriver 36 Detaching and Reattaching the...

Maintenance Manual
Page 36
B Insert the screw into the screwdriver, you can work without having to worry about dropping the screw. ❒ After using the screwdriver, return it to its original position inside the front cover. G1307528_1.00 Copyright © 2005 36 By pushing the screw into the screwdriver. Replacing Consumables and Maintenance Kit Using the Screwdriver The screwdriver supplied is used for attaching options and is located inside of the front cover. er. A Open the printer's front cover, and then remove the provided screwdriv-
B Insert the screw into the screwdriver, you can work without having to worry about dropping the screw. ❒ After using the screwdriver, return it to its original position inside the front cover. G1307528_1.00 Copyright © 2005 36 By pushing the screw into the screwdriver. Replacing Consumables and Maintenance Kit Using the Screwdriver The screwdriver supplied is used for attaching options and is located inside of the front cover. er. A Open the printer's front cover, and then remove the provided screwdriv-

Maintenance Manual
Page 37
... detached from the printer to detach the 2 tray finisher from the printer. A Hold the handle at the top of the 2 tray finisher firmly using one hand, pull the 2 tray finisher straight out, and let go when it stops. Replacing Consumables and Maintenance Kit Detaching and Reattaching ...the Options This section describes how to detach or reattach optional finishers and how to the printer after closing the duplex reversal unit. Follow the procedure below when replacing ...
... detached from the printer to detach the 2 tray finisher from the printer. A Hold the handle at the top of the 2 tray finisher firmly using one hand, pull the 2 tray finisher straight out, and let go when it stops. Replacing Consumables and Maintenance Kit Detaching and Reattaching ...the Options This section describes how to detach or reattach optional finishers and how to the printer after closing the duplex reversal unit. Follow the procedure below when replacing ...
Maintenance Manual
Page 38
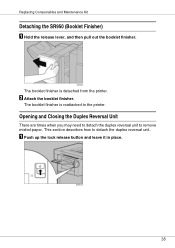
The booklet finisher is detached from the printer. A Push up the lock release button and leave it in place. 38 B Attach the booklet finisher. Opening and Closing the Duplex Reversal Unit There are times when you may need to detach the duplex reversal unit to the printer. Replacing Consumables and Maintenance Kit Detaching the SR950 (Booklet Finisher) A Hold the release lever, and then pull out the booklet finisher. This section describes how to detach the duplex reversal unit. The booklet finisher is reattached to remove misfed paper.
The booklet finisher is detached from the printer. A Push up the lock release button and leave it in place. 38 B Attach the booklet finisher. Opening and Closing the Duplex Reversal Unit There are times when you may need to detach the duplex reversal unit to the printer. Replacing Consumables and Maintenance Kit Detaching the SR950 (Booklet Finisher) A Hold the release lever, and then pull out the booklet finisher. This section describes how to detach the duplex reversal unit. The booklet finisher is reattached to remove misfed paper.

Maintenance Manual
Page 39
The duplex reversal unit is closed. ❒ Attach the duplex reversal unit after detaching the 2 tray finisher or the booklet finisher from the printer. The duplex reversal unit is attached. C Close the duplex reversal unit by raising it slowly using both hands, and push it in, until ... ❒ You do not have to remove the external tray even if the 2 tray finisher or the booklet finisher is opened. Replacing Consumables and Maintenance Kit B Lower the duplex reversal unit slowly until it stops. ❒ Open the duplex reversal unit after closing the printer's upper left cover. 39
The duplex reversal unit is closed. ❒ Attach the duplex reversal unit after detaching the 2 tray finisher or the booklet finisher from the printer. The duplex reversal unit is attached. C Close the duplex reversal unit by raising it slowly using both hands, and push it in, until ... ❒ You do not have to remove the external tray even if the 2 tray finisher or the booklet finisher is opened. Replacing Consumables and Maintenance Kit B Lower the duplex reversal unit slowly until it stops. ❒ Open the duplex reversal unit after closing the printer's upper left cover. 39
Maintenance Manual
Page 40
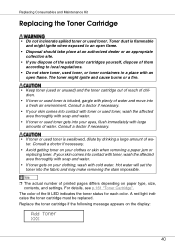
Consult a doctor if necessary. • Avoid getting toner on your clothing, wash with cold water. The color of water. The toner might ignite when exposed to an open flame. • Disposal should take place at an authorized dealer or an ...lit LED indicates the toner status for each color. Replace the toner cartridge if the following message appears on paper type, size, contents, and settings. For details, see p.161 "Toner Cartridge". A red light indicates the toner cartridge must be replaced. Replacing Consumables and Maintenance Kit Replacing the Toner Cartridge • Do not...
Consult a doctor if necessary. • Avoid getting toner on your clothing, wash with cold water. The color of water. The toner might ignite when exposed to an open flame. • Disposal should take place at an authorized dealer or an ...lit LED indicates the toner status for each color. Replace the toner cartridge if the following message appears on paper type, size, contents, and settings. For details, see p.161 "Toner Cartridge". A red light indicates the toner cartridge must be replaced. Replacing Consumables and Maintenance Kit Replacing the Toner Cartridge • Do not...
Maintenance Manual
Page 41
...white mode using the black toner. Replacing Consumables and Maintenance Kit or Add Toner XXX/XXX ❒ A combination of magenta (M), cyan (C), yellow (Y), and black (K). Change the color mode setting to replace. Unhook the green hook on the upper right cover of the printer ( ), open the upper right cover ( ). From... the lock button on the toner cartridge with one to four colors, yellow, magenta, cyan, black, appears in "XXX". ❒ If cyan, magenta, or yellow toner runs out, you want to "Black and White" from the printer driver. ❒ If black toner runs out, printing is ...
...white mode using the black toner. Replacing Consumables and Maintenance Kit or Add Toner XXX/XXX ❒ A combination of magenta (M), cyan (C), yellow (Y), and black (K). Change the color mode setting to replace. Unhook the green hook on the upper right cover of the printer ( ), open the upper right cover ( ). From... the lock button on the toner cartridge with one to four colors, yellow, magenta, cyan, black, appears in "XXX". ❒ If cyan, magenta, or yellow toner runs out, you want to "Black and White" from the printer driver. ❒ If black toner runs out, printing is ...

Maintenance Manual
Page 42
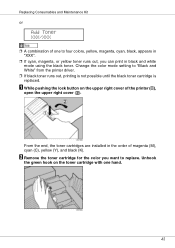
D Take the new toner cartridge out of the box. ❒ The black toner cartridge contains more than the other hand, slowly pull it up environment, toner might be left in a toner car- Replacing Consumables and Maintenance Kit C Holding the toner cartridge with the other toner cartridges. Remaining toner might scatter. ❒ Depending on the setting up and out. ❒ Do not shake the removed toner cartridge. E Shake the toner cartridge back and forth five or six times. 42 In such cases, reinstall the toner cartridge. tridge.
D Take the new toner cartridge out of the box. ❒ The black toner cartridge contains more than the other hand, slowly pull it up environment, toner might be left in a toner car- Replacing Consumables and Maintenance Kit C Holding the toner cartridge with the other toner cartridges. Remaining toner might scatter. ❒ Depending on the setting up and out. ❒ Do not shake the removed toner cartridge. E Shake the toner cartridge back and forth five or six times. 42 In such cases, reinstall the toner cartridge. tridge.

Maintenance Manual
Page 43
al contact area. ❒ Do not install and remove toner cartridges repeatedly. Replacing Consumables and Maintenance Kit F Holding the toner cartridge with the metal contact area in front, insert in toner leak. This could result in the direction of the arrow. ❒ Do not touch the metal contact area with your fingers. H Close the upper right cover. Please wait while the toner loads. 43 G Slowly insert the toner cartridge, until the green hook clips over the met-
al contact area. ❒ Do not install and remove toner cartridges repeatedly. Replacing Consumables and Maintenance Kit F Holding the toner cartridge with the metal contact area in front, insert in toner leak. This could result in the direction of the arrow. ❒ Do not touch the metal contact area with your fingers. H Close the upper right cover. Please wait while the toner loads. 43 G Slowly insert the toner cartridge, until the green hook clips over the met-

Maintenance Manual
Page 44
Replacing Consumables and Maintenance Kit The following message appears on the display. 44 appears on the display: Loading Toner... ❒ To avoid malfunction, do not turn off the power while "Loading Toner..."
Replacing Consumables and Maintenance Kit The following message appears on the display. 44 appears on the display: Loading Toner... ❒ To avoid malfunction, do not turn off the power while "Loading Toner..."
Maintenance Manual
Page 45
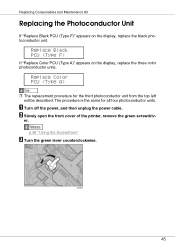
... the front cover of the printer, remove the green screwdriv- The procedure is the same for the third photoconductor unit from the top left will be described. Replacing Consumables and Maintenance Kit Replacing the Photoconductor Unit If "Replace Black PCU (Type F)" appears on the display, replace the three color photoconductor units. p.36 "Using the...
... the front cover of the printer, remove the green screwdriv- The procedure is the same for the third photoconductor unit from the top left will be described. Replacing Consumables and Maintenance Kit Replacing the Photoconductor Unit If "Replace Black PCU (Type F)" appears on the display, replace the three color photoconductor units. p.36 "Using the...

Maintenance Manual
Page 46
The photoconductor units are attached in the order of the photoconductor unit. 46 The green hook is located on the upper right of black (K), yellow (Y), cyan (C), and magenta (M). Replacing Consumables and Maintenance Kit D Loosen the two screws fastening the inner cover, using the provided screwdriver. Starting from the upper left, the units are installed as shown. You cannot remove these two screws. Move the green hook slowly to replace. F Remove the photoconductor unit you want to the right, as shown. E Lift the inner cover until it clicks into place and holds.
The photoconductor units are attached in the order of the photoconductor unit. 46 The green hook is located on the upper right of black (K), yellow (Y), cyan (C), and magenta (M). Replacing Consumables and Maintenance Kit D Loosen the two screws fastening the inner cover, using the provided screwdriver. Starting from the upper left, the units are installed as shown. You cannot remove these two screws. Move the green hook slowly to replace. F Remove the photoconductor unit you want to the right, as shown. E Lift the inner cover until it clicks into place and holds.

Maintenance Manual
Page 47
I Install the new photoconductor unit. G Hold the hook down, grip the green areas at the top ( ), and then slowly pull out the unit ( ). H Lift and hold the green handle at the top and bottom of the bag. 47 Take the unit out of the photoconductor unit, and then slowly pull the unit out until you can see the entire green handle. ❒ Pulling out the photoconductor unit quickly might cause it to fall. Replacing Consumables and Maintenance Kit For black, remove the upper left one, and for color, remove the three on the right.
I Install the new photoconductor unit. G Hold the hook down, grip the green areas at the top ( ), and then slowly pull out the unit ( ). H Lift and hold the green handle at the top and bottom of the bag. 47 Take the unit out of the photoconductor unit, and then slowly pull the unit out until you can see the entire green handle. ❒ Pulling out the photoconductor unit quickly might cause it to fall. Replacing Consumables and Maintenance Kit For black, remove the upper left one, and for color, remove the three on the right.
Maintenance Manual
Page 48
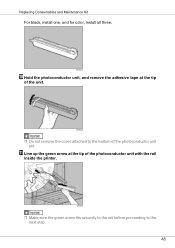
J Hold the photoconductor unit, and remove the adhesive tape at the tip of the photoconductor unit yet. Replacing Consumables and Maintenance Kit For black, install one, and for color, install all three. K Line up the green arrow at the tip of the unit. ❒ Do not remove the cover attached to the bottom of the photoconductor unit with the rail inside the printer. ❒ Make sure the green arrow fits securely to the rail before proceeding to the next step. 48
J Hold the photoconductor unit, and remove the adhesive tape at the tip of the photoconductor unit yet. Replacing Consumables and Maintenance Kit For black, install one, and for color, install all three. K Line up the green arrow at the tip of the unit. ❒ Do not remove the cover attached to the bottom of the photoconductor unit with the rail inside the printer. ❒ Make sure the green arrow fits securely to the rail before proceeding to the next step. 48


